Blog
Arduino Control a Relay with a Button

In this Arduino tutorial, we’re going to learn how to control a relay with a button. This is a very similar tutorial to our button LED control tutorial, but with a relay! The main difference being that a relay will allow you to control something of higher voltage than the Arduino can control directly.
RELATED: Control a Relay with a Light Sensor
Don’t worry too much about how a relay works. We’re going to cover that in the next tutorial! Just know that when the Arduino activates it, it works like a switch: turning some other device On or Off.
By using a relay, we can control all kinds of high voltage or high current devices from the Arduino. For example, we can control traditional incandescent light bulbs, a high power motor, a servo actuator, or even a regular household appliances such as a coffee pot or a vacuum cleaner.
Parts List for this Project
Here’s a handy parts list for this project. Some of these links may be affiliate links. If you use them, they cost you nothing, but we may get a small commission that helps us keep building awesome content like this.
| QTY | PART/LINK | ||
|---|---|---|---|
| 1X | [icon name=”microchip” prefix=”fas”] | Arduino Uno | [icon name=”cart-plus” prefix=”fas”] |
| 1X | [icon name=”usb” prefix=”fab”] | USB Type B Cable | [icon name=”cart-plus” prefix=”fas”] |
| 1X | [icon name=”th” prefix=”fas”] | Solderless Breadboard | [icon name=”cart-plus” prefix=”fas”] |
| 1X | [icon name=”grip-lines” prefix=”fas”] | Jumper Wire Kit | [icon name=”cart-plus” prefix=”fas”] |
| 1X | [icon name=”toggle-off” prefix=”fas”] | Button Kit | [icon name=”cart-plus” prefix=”fas”] |
| 1X | [icon name=”ellipsis-h” prefix=”fas”] | Resistor Kit (220 Ohm) | [icon name=”cart-plus” prefix=”fas”] |
| 1X | [icon name=”power-off” prefix=”fas”] | Relay Kit | [icon name=”cart-plus” prefix=”fas”] |
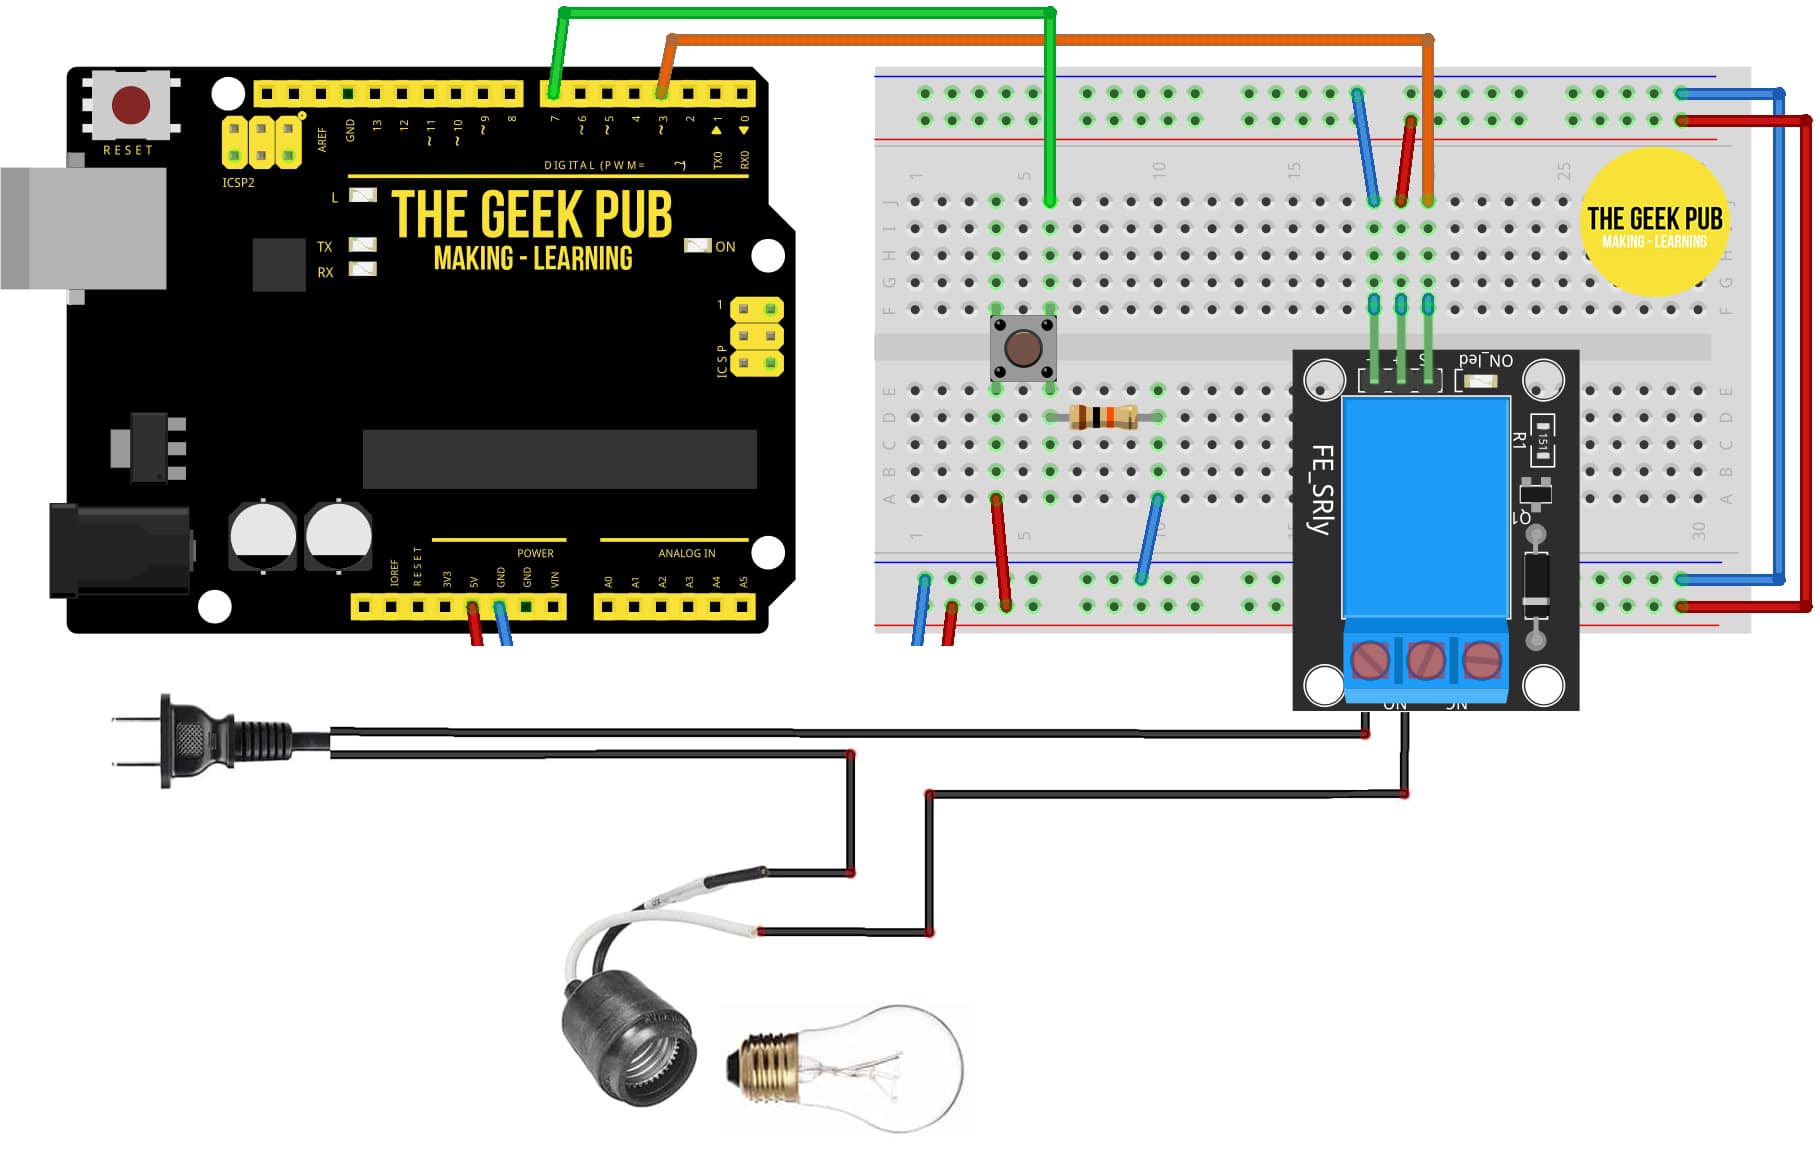
Wiring Diagram : Control a Relay with a Button
Next up in our mission to control a relay with a button, it is time to wire everything up on the breadboard.
In this wiring example, we’re showing how you could control a 110v/220v light bulb using an Arduino with a relay module.
Warning: Mains voltage can seriously injure or even kill you. If you don’t have experience with it, we recommend you do not do this project or that you seek additional expert help. You have been warned!
Code for Using a Button to Control a Relay
The following code will allow you to use a button to control a relay with the Arduino.
// constants won't change
const int BUTTON_PIN = 7;  // Connect the Button to pin 7 or change here
const int RELAY_PIN    = 3; // Connect the LED to pin 3 or change here

// variables will change:
int relayState = LOW;     // tracks the current state of LED
int lastButtonState;    // the previous state of button
int currentButtonState; // the current state of button

void setup() {
  Serial.begin(9600);                // initialize serial
  pinMode(BUTTON_PIN, INPUT_PULLUP); // set arduino pin to input pull-up mode
  pinMode(RELAY_PIN, OUTPUT);          // set arduino pin to output mode

  currentButtonState = digitalRead(BUTTON_PIN);
}

void loop() {
  lastButtonState    = currentButtonState;      // save the last state
  currentButtonState = digitalRead(BUTTON_PIN); // read new state

  if(lastButtonState == HIGH && currentButtonState == LOW) {
    Serial.println("The button is pressed");

    // toggle state of LED
    if(relayState == LOW)
       relayState = HIGH;
    else
      relayState = LOW;

    // control relay arccoding to the toggled state
    digitalWrite(RELAY_PIN, relayState);
  }
}
Next Steps
Now you can go back to the main index, or continue to the next tutorial!


