Blog
Arduino Touch Sensor Tutorial

In this tutorial we will cover the basics of the Arduino touch sensor. It’s one of the fundamental input devices available for the platform. I a touch sensor simply put senses when it comes in contact with a human, be it finger, toe, or even your nose. The touch sensor can be substituted in many projects for a regular button to get that neat touch feel.
Touch sensors have been around for a long time. In fact I just refurbished a touch lamp made in the late 1980s. The technology is very simple and it has really been refined over the years to be mostly fool proof.
Parts List for this Project
Here’s a handy parts list for this project to get you started. Some of these may be affiliate links. If you use them they cost you nothing but we get a small commission that helps us keep making great content like this.
| QTY | PART/LINK | ||
|---|---|---|---|
| 1X | [icon name=”microchip” prefix=”fas”] | Arduino Uno | [icon name=”cart-plus” prefix=”fas”] |
| 1X | [icon name=”usb” prefix=”fab”] | USB Type B Cable | [icon name=”cart-plus” prefix=”fas”] |
| 1X | [icon name=”th” prefix=”fas”] | Solderless Breadboard | [icon name=”cart-plus” prefix=”fas”] |
| 1X | [icon name=”grip-lines” prefix=”fas”] | Jumper Wire Kit | [icon name=”cart-plus” prefix=”fas”] |
| 1X | [icon name=”lightbulb” prefix=”fas”] | LED Kit | [icon name=”cart-plus” prefix=”fas”] |
| 1X | [icon name=”ellipsis-h” prefix=”fas”] | Resistor Kit (220 Ohm) | [icon name=”cart-plus” prefix=”fas”] |
| 1X | [icon name=”hand-point-right” prefix=”fas”] | Capacitive Sensor | [icon name=”cart-plus” prefix=”fas”] |
Arduino Touch Sensor
The touch sensor itself is simply a small PCB with some traces on it, a couple of resistors and a capacitor. You can make a touch sensor yourself with just a little work!
Touch Sensor Pinout
The touch sensor has three pins. All three are necessary in order to use the sensor. Most touch sensors works by going HIGH when they are touched, and are otherwise normally LOW. Check the specifications on yours as it could work in reverse.
- VCCconnects to 5V on the Arduino
- GND connects to ground
- SIGNAL connects to one of your digital input pins
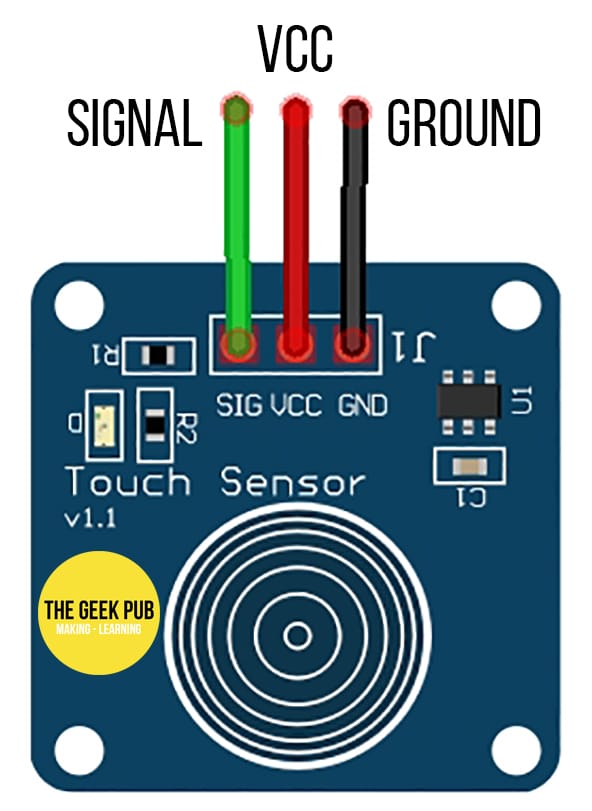
Touching the sensor causes a change in capacitance to be sensed. This will be presented to the Arduino by moving the signal line HIGH. When a finger is not touching the sensor it will move the signal line to LOW.
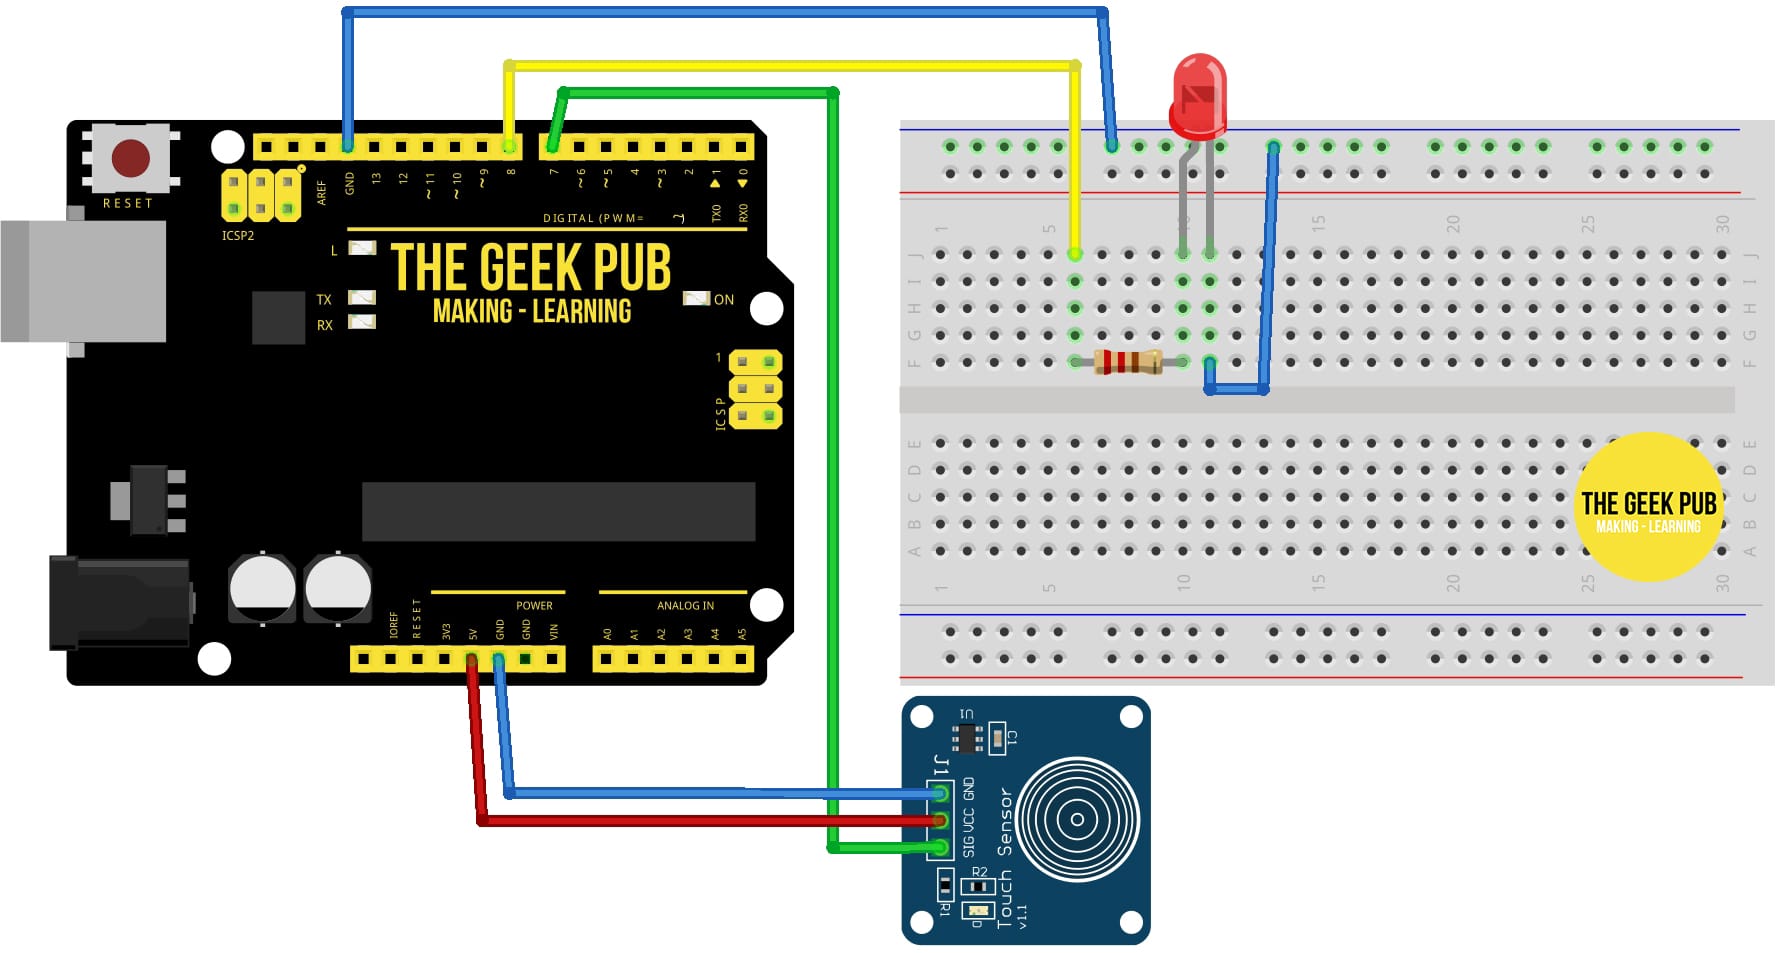
Arduino Touch Sensor Wiring Diagram
In this tutorial we’re going to wire up an Arduino touch sensor along with an LED. We will imitate an old school touch lamp. When the touch sensor is tapped the LED will turn on or off (the opposite of its current state). It should be wired as follows:
- Touch Sensor VCC to Arduino 5V
- Touch Sensor GND to Arduino GND
- Touch Sensor Signal to PIN 7
- LED Anode (+) to Resistor
- LED Cathode (-) to Arduino GND
- Resistor to Arduino PIN 8
Arduino Touch Sensor Code
This code checks the current state of the Arduino touch sensor. Each time you touch the sensor with your finger, the state change will be sensed and the LED will be toggled on or off, just like your mom’s old touch lamp from 1988!
/*
 *  ARDUINO TOUCH SENSOR TUTORIAL
 *  By: TheGeekPub.com
 *  More Arduino Tutorials: https://www.thegeekpub.com/arduino-tutorials/
 */

const int SENSOR_PIN = 7; // Pin that connects to touch sensor Signal Pin
const int LED_PIN = 8; // Pin that connects to the LED

int lastKnownState = LOW;      // the previous state from the input pin
int currentState;         // the current reading from the input pin
int ledState = LOW;

void setup() {
  // initialize the Arduino's pins
  pinMode(SENSOR_PIN, INPUT);
  pinMode(LED_PIN, OUTPUT);
}

void loop() {
  // read the state of the the input pin:
  currentState = digitalRead(SENSOR_PIN);

  if(lastKnownState == LOW && currentState == HIGH){
    // toggle LED state
    if(ledState == LOW)
      ledState = HIGH;
    else if(ledState == HIGH)
      ledState = LOW;

    // control LED
    digitalWrite(LED_BUILTIN, ledState);
  }

  // save the the last state
  lastKnownState = currentState;
}
That’s the basics of the Arduino touch sensor. It’s very simple!
Next Steps
Now you can move on to the next tutorial or go back to the index!