Blog
Arduino Force Sensor Tutorial

The Arduino force sensor is a super neat sensor that you can use in your projects to measure if something is being pressed upon and to what degree. The force sensor is used in many devices that you might not expect. For example the drum pad! When you tap on a drum pad there is a force sensor under the pad measuring how hard the drum stick (or your fingers) tapped it!
Arduino Force Sensor
When you think about the Arduino force sensor you should think about it like a simplified scale. You know! The one you stand on to check your weight! However, rather than measuring in pounds or kilograms, the Arduino force sensor measurements are much simpler. The measurement is read from an analog input and is measure from 0 to 255. We can convert these to mean no touch, light touch, and hard touch as examples.
Note: Although it is possible to determine somewhat measure weight with an Arduino force sensor, this is not the right sensor for that task.
Parts list for this Project
Here’s a handy parts list for this project to get you started. Some of these may be affiliate links. If you use them they cost you nothing but we get a small commission that helps us keep making great content like this.
| QTY | PART/LINK | ||
|---|---|---|---|
| 1X | [icon name=”microchip” prefix=”fas”] | Arduino Uno | [icon name=”cart-plus” prefix=”fas”] |
| 1X | [icon name=”usb” prefix=”fab”] | USB Type B Cable | [icon name=”cart-plus” prefix=”fas”] |
| 1X | [icon name=”th” prefix=”fas”] | Solderless Breadboard | [icon name=”cart-plus” prefix=”fas”] |
| 1X | [icon name=”grip-lines” prefix=”fas”] | Jumper Wire Kit | [icon name=”cart-plus” prefix=”fas”] |
| 1X | [icon name=”ellipsis-h” prefix=”fas”] | Resistor Kit (10K Ohm) | [icon name=”cart-plus” prefix=”fas”] |
| 1X | [icon name=”lightbulb” prefix=”fas”] | LED Kit | [icon name=”cart-plus” prefix=”fas”] |
| 1X | [icon name=”hand-point-right” prefix=”fas”] | Force Sensor | [icon name=”cart-plus” prefix=”fas”] |
Force Sensor Pinout and Function
Much like a resistor, the force sensor operates symmetrically. This means it has no polarity or preferred orientation. Either pin may be used interchangeably.

It’s no coincidence we said compared it to a resistor. In fact, the Arduino force sensor acts much like a resistor. A variable resistor to be more specific! The resistance of the force sensor decreases as pressure is applied, allowing more current to flow. We can measure this resistance using an analog pin on the Arduino! We will use the analogRead() function for this.
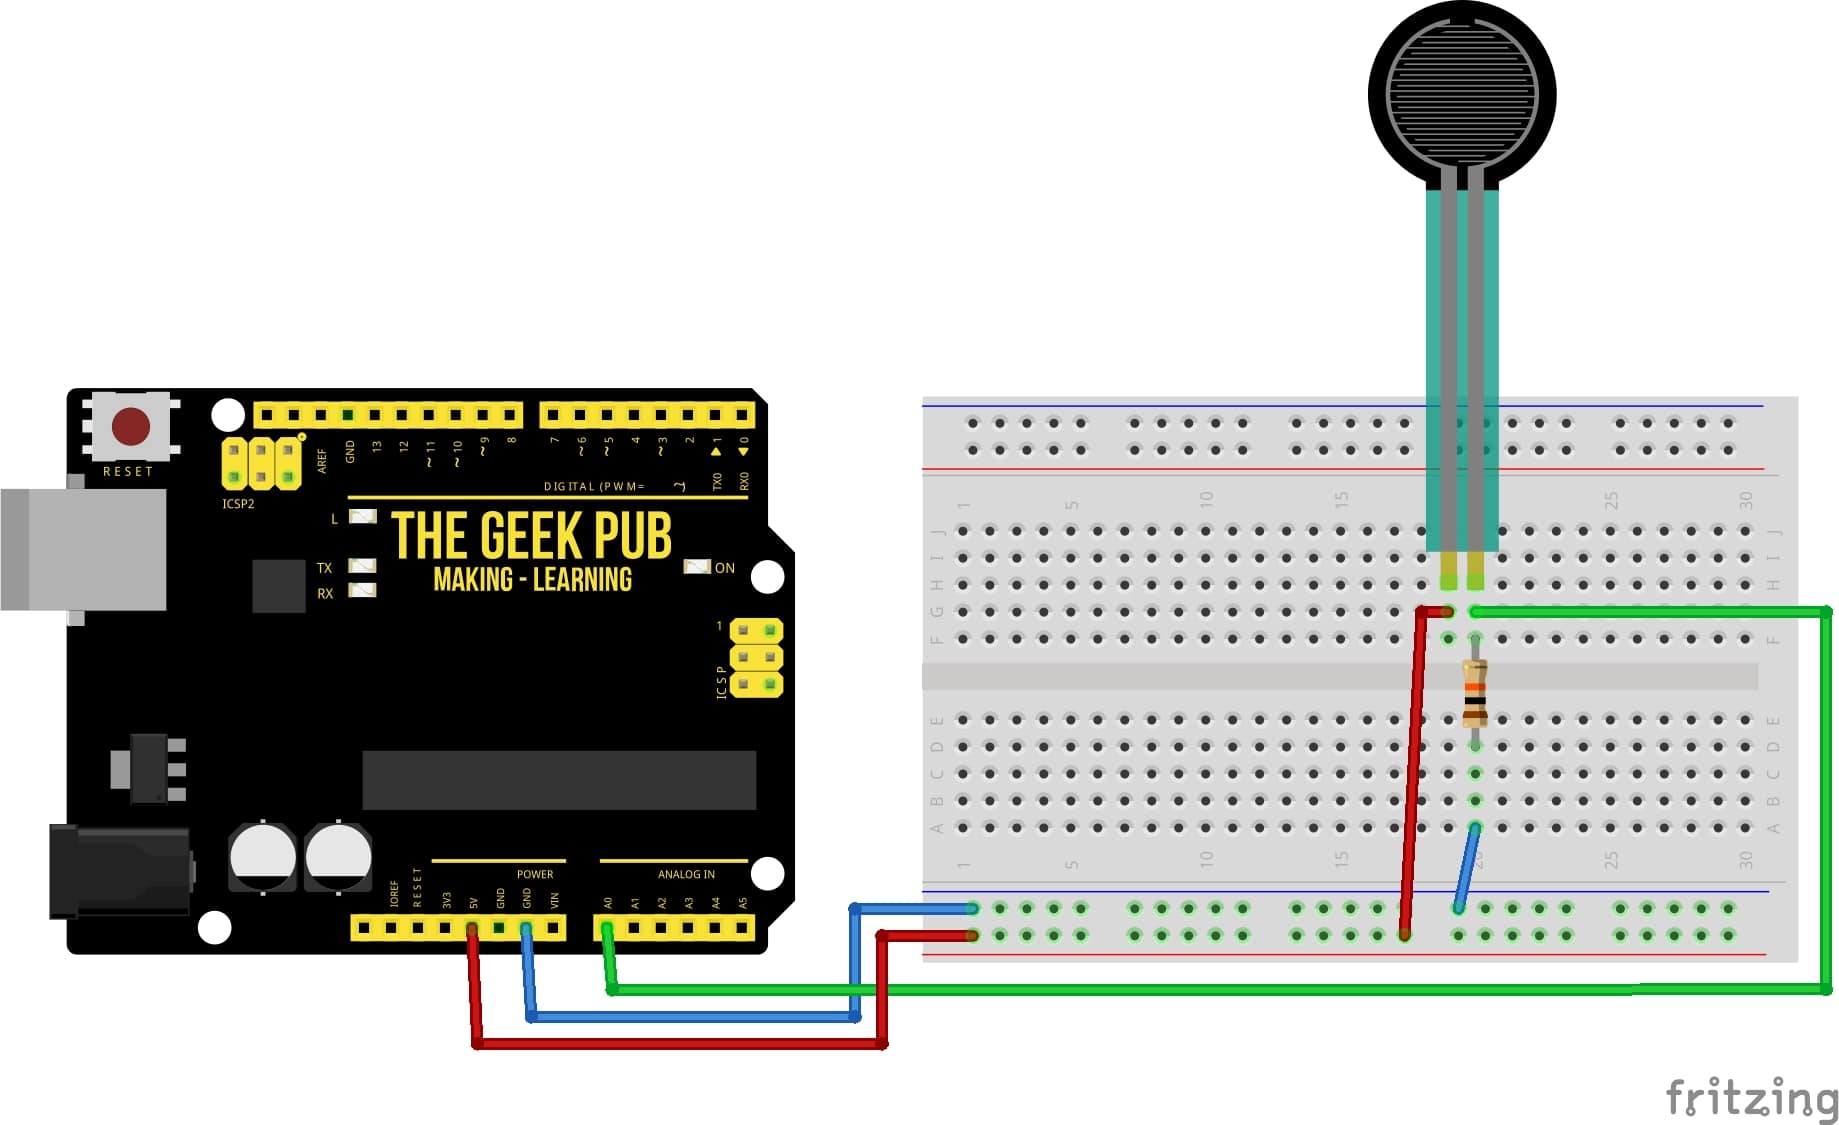
Arduino Force Sensor Basic Wiring Diagram
Wiring up the force sensor is easy. However, it does require a 10K Ohm pull-down resistor to make it work.
- Arduino Pin A0 to Force Sensor Pin 2
- Arduino 5V to Force Sensor Pin 1
- Force Sensor Pin 2 to Pull-down Resistor
- Pull-down resistor to GND
Arduino Force Sensor Code Example (Serial Console)
This first sketch will simply print out on the serial monitor a relative amount of force being applied to the sensor’s pad.
/*
    ARDUINO FORCE SENSOR TUTORIAL: SERIAL OUTPUT
    By: TheGeekPub.com
    More Arduino Tutorials: https://www.thegeekpub.com/arduino-tutorials/
*/

#define FORCE_SENSOR_PIN A0 // the FSR and 10K pulldown are connected to A0

void setup() {
  Serial.begin(9600);
}

void loop() {
  int analogReading = analogRead(FORCE_SENSOR_PIN);

  Serial.print("Raw Force Reading: ");
  Serial.print(analogReading); // print the raw analog value

  if (analogReading < 10)       // from 0 to 9
    Serial.println(" -> NO FORCE DETECTED");
  else if (analogReading < 100) // from 100 to 349
    Serial.println(" -> LOW FORCE");
  else if (analogReading < 350) // from 350 to 799
    Serial.println(" -> MEDIUM FORCE");
  else // from 800 to 1023
    Serial.println(" -> HIGH FORCE");

  delay(1000);
}
Ramping it Up
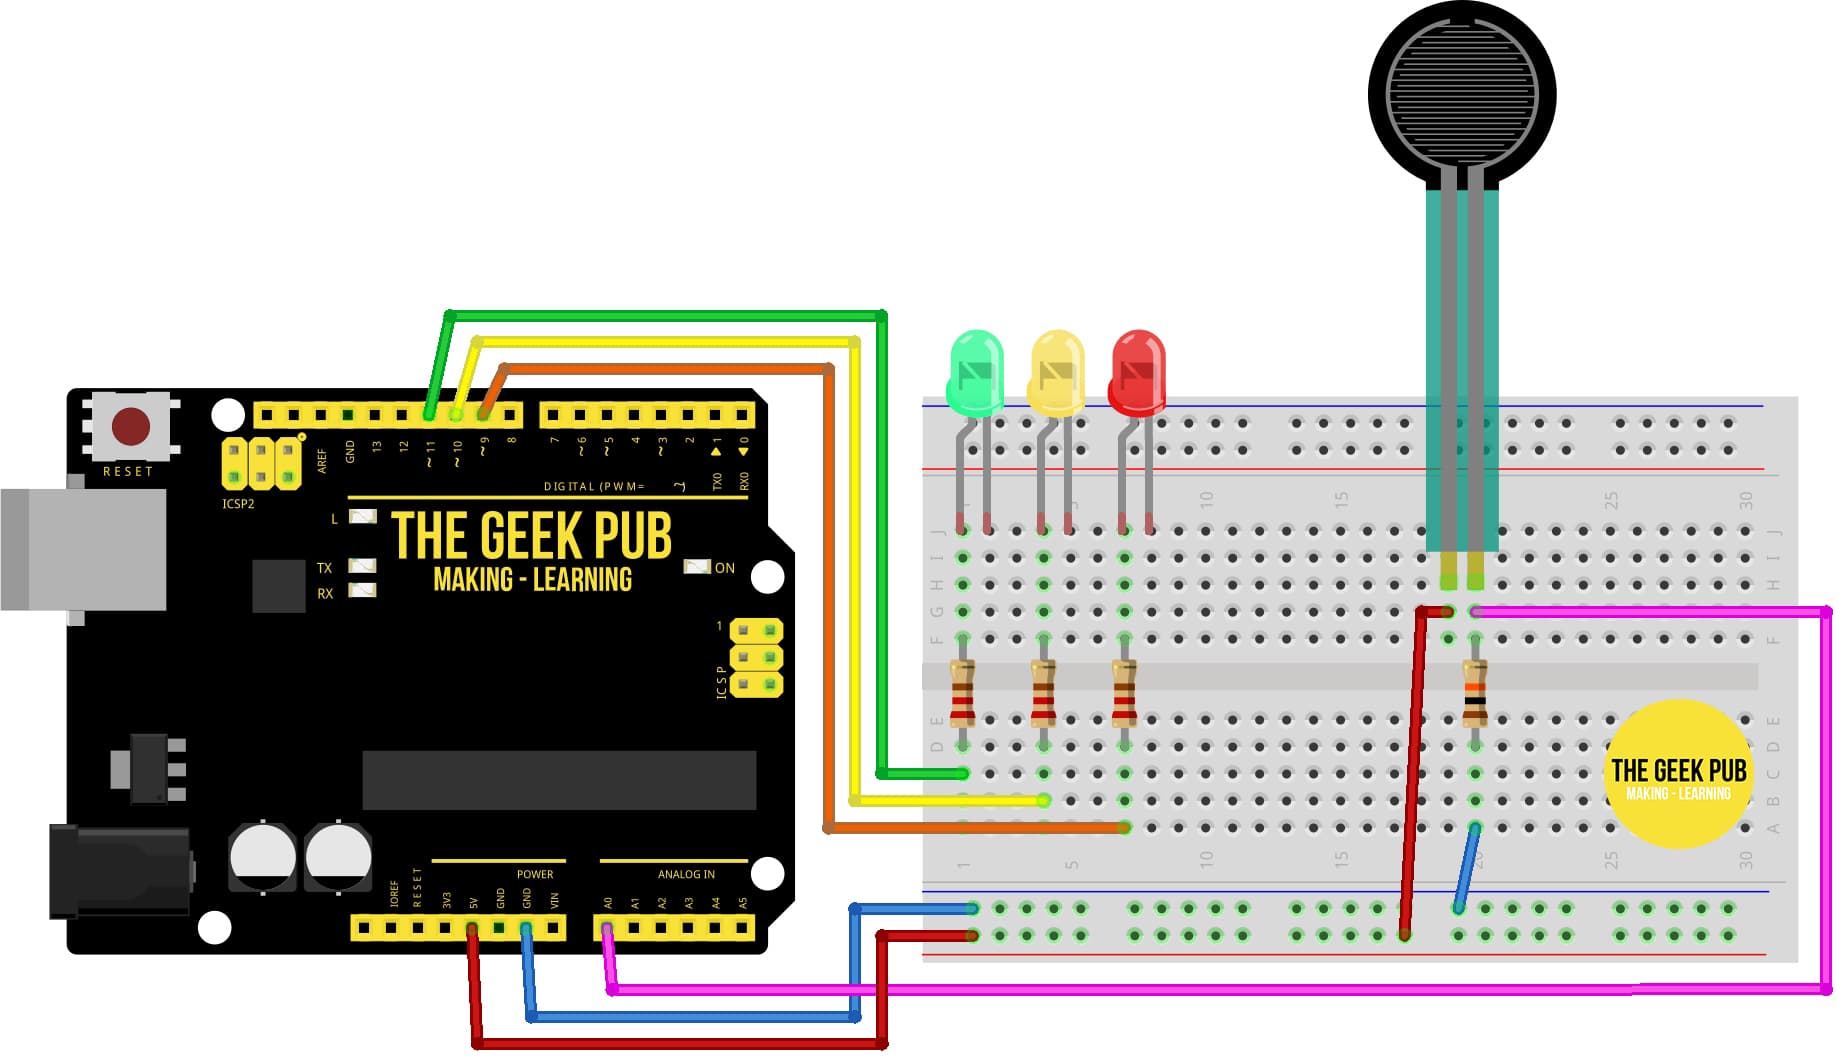
Now let’s ramp up this project and make it a little more interesting. Let’s add three LEDs to the breadboard: a yellow, green, and red LED. As we press harder on the force sensor, the LEDs will change from Green to Yellow, to Red!
Arduino Force Sensor Wiring Diagram with LEDs
Add three LEDs, wired to the pins 9-11 as follows:
Arduino Force Sensor Code Example (LEDs)
This code will light our LEDs rather than outputting to the serial monitor.
/*
    ARDUINO FORCE SENSOR TUTORIAL: LED FEEDBACK
    By: TheGeekPub.com
    More Arduino Tutorials: https://www.thegeekpub.com/arduino-tutorials/
*/

#define FORCE_SENSOR_PIN A0 // the FSR and 10K pulldown are connected to A0
#define RED_LED 9
#define YELLOW_LED 10
#define GREEN_LED 11

void setup() {
  pinMode(RED_LED, OUTPUT);
  pinMode(YELLOW_LED, OUTPUT);
  pinMode(GREEN_LED, OUTPUT);
}

void loop() {
  int analogReading = analogRead(FORCE_SENSOR_PIN);

  if (analogReading < 10)       // from 0 to 9
    {
    //all LEDs OFF
    digitalWrite(RED_LED, LOW);
    digitalWrite(YELLOW_LED, LOW);
    digitalWrite(GREEN_LED, LOW);
    }
  else if (analogReading < 100) // from 100 to 349
    {
    //Green LEDs On
    digitalWrite(RED_LED, LOW);
    digitalWrite(YELLOW_LED, LOW);
    digitalWrite(GREEN_LED, HIGH);
    }
  else if (analogReading < 350) // from 350 to 799
    {
    //Yellow LED On
    digitalWrite(RED_LED, LOW);
    digitalWrite(YELLOW_LED, HIGH);
    digitalWrite(GREEN_LED, LOW);
    }
  else // from 800 to 1023
    {
    //Green LED On
    digitalWrite(RED_LED, LOW);
    digitalWrite(YELLOW_LED, HIGH);
    digitalWrite(GREEN_LED, LOW);
    }
  delay(100);
}
You can see as you press on the force sensor the LEDs will change to show feedback on hard you are pressing.
Next Steps
You can now go on to the next tutorial or go back to the index.


hello, thanks for your post, I wanted to suggest if possible, that you leave the link to download the fritizing libraries of the parts you used.