Blog
Control a Piezo Buzzer with a Button

In this Arduino Tutorial we’re going to learn how to control a piezo buzzer with a button. Pressing a button on your breadboard will cause the piezo buzzer to sound. In this tutorial we will be using a active piezo buzzer. If you’d like to do this with a passive piezo buzzer you can find the code here.
Parts List for this Project
Here’s a handy parts list for this project. Some of these links may be affiliate links. If you use them, they cost you nothing, but we may get a small commission that helps us keep building awesome content like this.
| QTY | PART/LINK | ||
|---|---|---|---|
| 1X | [icon name=”microchip” prefix=”fas”] | Arduino Uno | [icon name=”cart-plus” prefix=”fas”] |
| 1X | [icon name=”usb” prefix=”fab”] | USB Type B Cable | [icon name=”cart-plus” prefix=”fas”] |
| 1X | [icon name=”th” prefix=”fas”] | Solderless Breadboard | [icon name=”cart-plus” prefix=”fas”] |
| 1X | [icon name=”grip-lines” prefix=”fas”] | Jumper Wire Kit | [icon name=”cart-plus” prefix=”fas”] |
| 1X | [icon name=”toggle-off” prefix=”fas”] | Button Kit | [icon name=”cart-plus” prefix=”fas”] |
| 1X | [icon name=”ellipsis-h” prefix=”fas”] | Resistor Kit (220 Ohm) | [icon name=”cart-plus” prefix=”fas”] |
| 1X | [icon name=”volume-up” prefix=”fas”] | Piezo Buzzer | [icon name=”cart-plus” prefix=”fas”] |
Getting Started with Piezo Buzzers
If you’re not yet familiar with piezo buzzers there are two different types: active and passive. Active piezo buzzers will sound just by apply 3.3-5V to the positive lead. Passive piezo buzzers need to be sent a PWM signal in order to work. We highly recommend you check out our first tutorial on piezo buzzers if you’ve not already completed it.
RELATED: Control a Relay with a Button on the Arduino
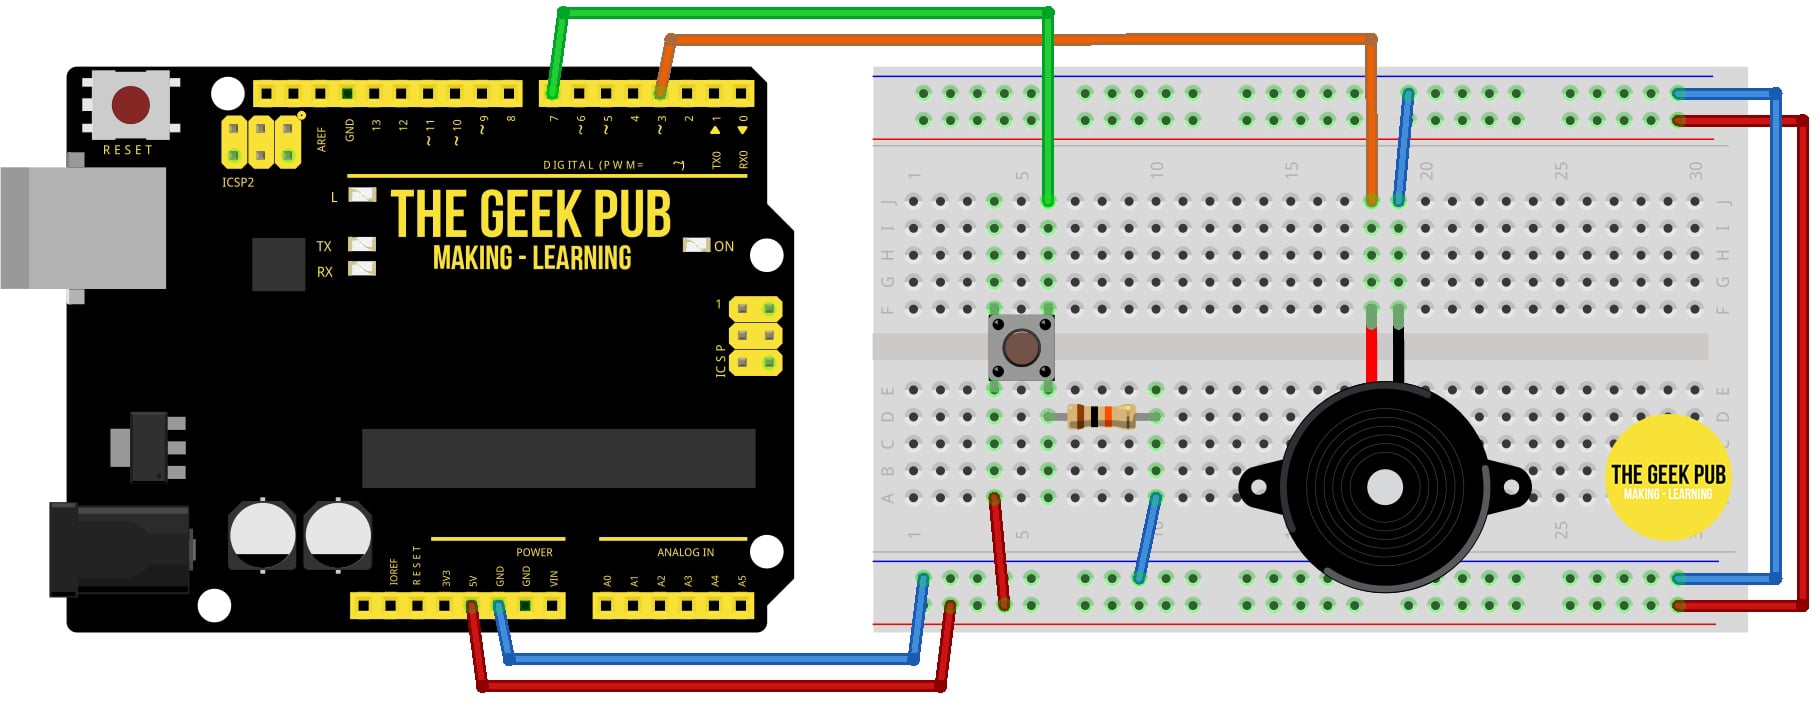
Arduino Wiring Diagram to Control a Piezo Buzzer with a Button
This wiring diagram will teach you how to connect all of the components to the Arduino. One note is that a pull-down resistor is best practice for this type of project. Many tutorials like this leave off the pull-down resistor for simplicity’s sake. However, the project will likely have numerous problems and false presses frustrating the student more than just learning a simple extra step. Check out our Arduino Button Tutorial for more information on pull-down resistors.
Code for Controlling a Piezo Buzzer with an Button on the Arduino
The following code will control a piezo buzzer with a button on the Arduino. This code can be modified and adjusted to suit your needs.
const int BUTTON_PIN = 7; // Arduino pin connected to button's pin
const int BUZZER_PIN = 3; // Arduino pin connected to Buzzer's pin

void setup() {
  Serial.begin(9600);                // initialize serial
  pinMode(BUTTON_PIN, INPUT_PULLUP); // set arduino pin to input pull-up mode
  pinMode(BUZZER_PIN, OUTPUT);       // set arduino pin to output mode
}

void loop() {
  int buttonState = digitalRead(BUTTON_PIN); // read new state

  if (buttonState == LOW) {
    Serial.println("The button is being pressed");
    digitalWrite(BUZZER_PIN, HIGH); // turn on
  }
  else
  if (buttonState == HIGH) {
    Serial.println("The button is unpressed");
    digitalWrite(BUZZER_PIN, LOW);  // turn off
  }
}
Next Steps
Now you can move forward to the next tutorial or go back to the main index of tutorials.