Blog
Arduino Use a Button to Toggle an LED

In this next tutorial on the Arduino platform we’re going to learn how to use a button to toggle an LED On and Off with the press of a momentary push button. This isn’t like turning a switch on and off, rather its controlled by logic in the Arduino’s microcontroller. The Arduino reads the state of the button and on press makes a logic decision for what to do do next.
If you haven’t done our previous Arduino LED Tutorial, or our Arduino Button Tutorial, you should consider doing those first as they are considered foundational skills to this tutorial!
Watch the Tutorial Video
Using a Button to Toggle an LED
Using a button to toggle an LED on the Arduino is a logic game. Our sketch will monitor the button to see if it is pressed, or not pressed. On press, the LED will then toggle On or Off, depending on what state it is currently in. If the LED is on, it will turn off. If it is Off, it will turn On.
Although this simple logic seems overkill (and it is), this is a foundational learning skill that is meant to teach an understanding that can be used for larger, more complicated projects. For example, you might have a whole string of things you need the Arduino to do after pressing the button. It may also need to check sensors and act appropriately!
Imagine a garage door opener for a moment. If you press the button, it doesn’t just open or close the door. Rather it goes through a sequence of logic. Is the door open? If it is open, are the garage door sensors clear of humans or pets? Turn the garage door opener’s internal light on. Begin closing the door. etc.
Before you can do all of those things, you need to learn the basics! So let’s start with simple: Use a button to toggle an LED!
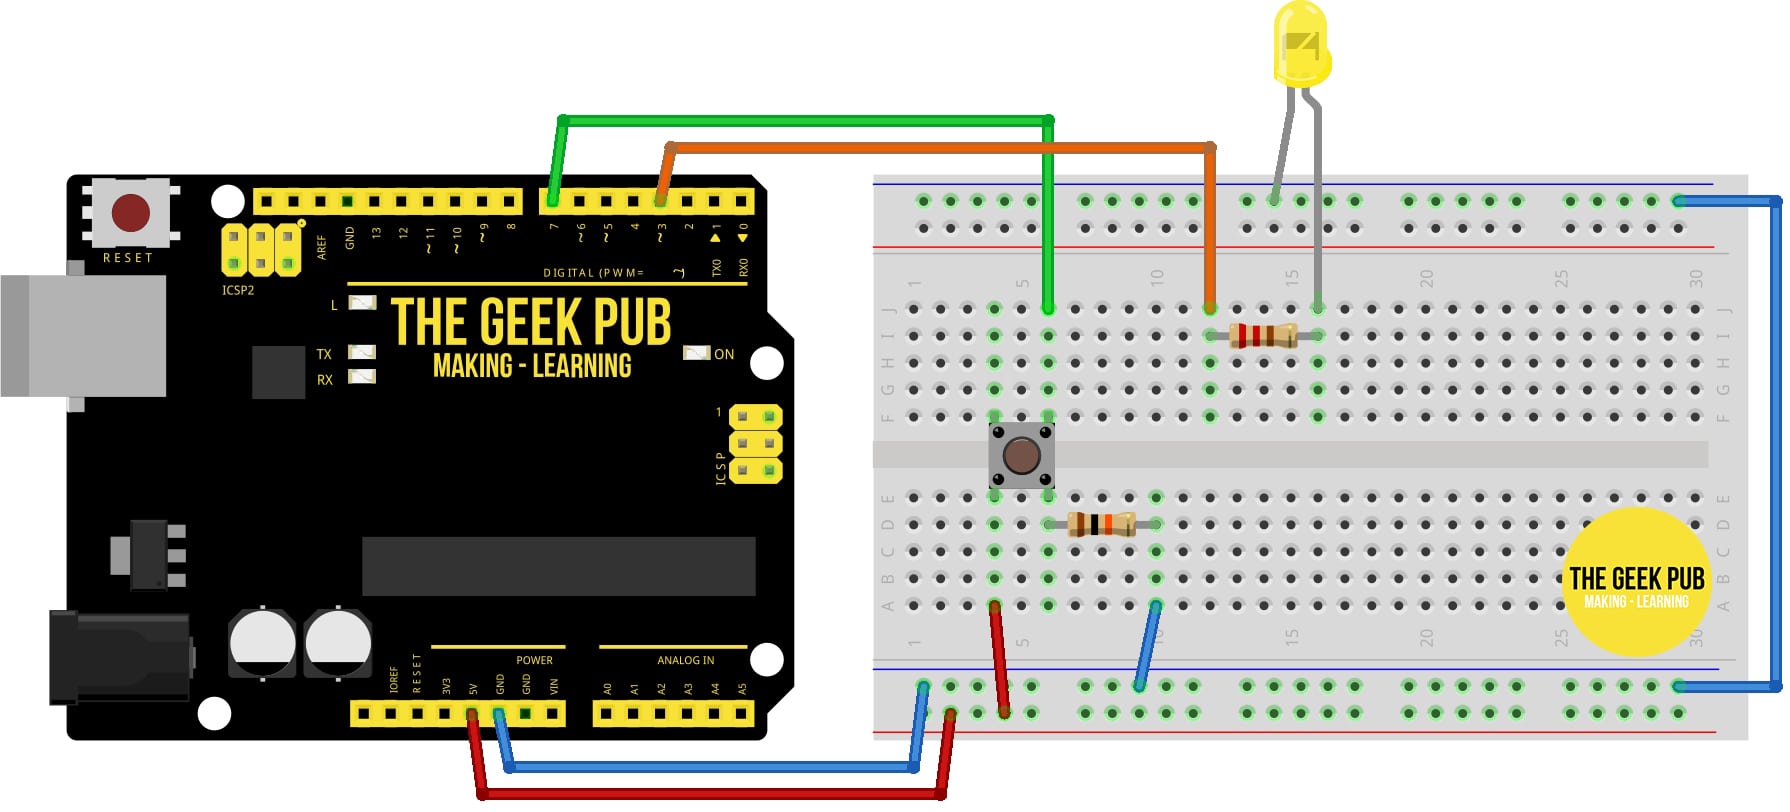
Wiring Diagram for the Button and LED
Let’s start with a wiring diagram for this project.
One thing to be aware of, many Arduino tutorials on buttons leave out the pull-down resistor attached to the button. They do this for simplicity’s sake. However, this inevitability leads to projects that do not work correctly and causes for more grief and frustration to the person doing the tutorial than than the two extra wires needed to add a pull-down resistor. Lack of a pull-down resistor will cause your button presses to be erratic and inconsistent. Without a pull-down resistor, sometimes, just touching the Arduino can cause it to think the button has been pressed,
Parts List for this Project
If you’d like a simple place to get started with the Arduino, here’s a handy parts list to get you started. Some of these links may be affiliate links. These cost you nothing, but if you use them we get a small commission that helps us keep making tutorials like these!
| QTY | PART/LINK | ||
|---|---|---|---|
| 1X | [icon name=”microchip” prefix=”fas”] | Arduino Uno | [icon name=”cart-plus” prefix=”fas”] |
| 1X | [icon name=”usb” prefix=”fab”] | USB Type B Cable | [icon name=”cart-plus” prefix=”fas”] |
| 1X | [icon name=”th” prefix=”fas”] | Solderless Breadboard | [icon name=”cart-plus” prefix=”fas”] |
| 1X | [icon name=”grip-lines” prefix=”fas”] | Jumper Wire Kit | [icon name=”cart-plus” prefix=”fas”] |
| 1X | [icon name=”lightbulb” prefix=”fas”] | LED Kit | [icon name=”cart-plus” prefix=”fas”] |
| 1X | [icon name=”toggle-off” prefix=”fas”] | Button Kit | [icon name=”cart-plus” prefix=”fas”] |
| 1X | [icon name=”ellipsis-h” prefix=”fas”] | Resistor Kit (220 Ohm) | [icon name=”cart-plus” prefix=”fas”] |
Code for the Button and LED
Now that you’ve got your LED and button all wired up, let’s put the code on the Arduino! Paste the following code into the Arduino IDE and upload it to your Arduino.
One thing you should be aware of is that this code does not take into effect the problem of debouncing. If you have problems with the switch thinking it was pressed multiple times, you should read our debouncing tutorial. Some switches are more prone to bounce than other switches.
This code tracks the state of the LED (is it on or off) and then tracks the button to see if it has been pressed. Upon pressing the button, the state of the LED is changed.
/*
    ARDUINO BUTTON TOGGLES LED
    By: TheGeekPub.com
    More Arduino Tutorials: https://www.thegeekpub.com/arduino-tutorials/
*/

// constants won't change
const int BUTTON_PIN = 7;  // Connect the Button to pin 7 or change here
const int LED_PIN    = 3;       // Connect the LED to pin 3 or change here

// variables will change:
int ledState = LOW;        // tracks the current state of LED
int lastButtonState;        // the previous state of button
int currentButtonState; // the current state of button

void setup() {
  Serial.begin(9600);                         // initialize serial
  pinMode(BUTTON_PIN, INPUT);  // set arduino pin to input mode
  pinMode(LED_PIN, OUTPUT);      // set arduino pin to output mode

  currentButtonState = digitalRead(BUTTON_PIN);
}

void loop() {
  lastButtonState    = currentButtonState;                // save the last state
  currentButtonState = digitalRead(BUTTON_PIN); // read new state

  if(lastButtonState == HIGH && currentButtonState == LOW) {
    Serial.print("The button is pressed: ");

    // toggle state of LED
    if(ledState == LOW) {
       ledState = HIGH;
       Serial.println("Turning LED on");
    }
    else {
      ledState = LOW;
      Serial.println("Turning LED off");
    }

    // control LED arccoding to the toggled state
    digitalWrite(LED_PIN, ledState);  //turns the LED on or off based on the variable
  }
}
Next Steps
Now you can move on the the next tutorial or go back to the index!


