Blog
How to Fade an LED with a Potentiometer: Arduino

In this Arduino tutorial, we’re going to learn the basics of how to fade an LED with a potentiometer. As you turn the knob of the potentiometer the resistance changes. The Arduino will take this readings on the connected analog pin and then software will use a PWM signal at the correct frequency to light the LED.
Doing this with Old School Electronics
In old school electronics this would be as simple as putting the LED in series with the potentiometer and connecting it to a voltage source. My how times have changed!

With the old school method the potentiometer will simply reduces the current to the LED based on the position of the potentiometer and resistance.
This seems so simple and no microcontroller is even needed! Why would we use one? If you need a super simple solution then there is no reason to! However if you want to offer added functionality then a microcontroller like the Arduino become necessary. With the Arduino method of how to fade an LED with a potentiometer, the microcontroller is in charge of the LED not the potentiometer. With nothing but software changes we can change the behavior of the LED. We could even turn it on or off regardless of the position of the potentiometer. We could also add in additional sensor, say a photoresistor as a secondary control.
Parts List for this Project
If you’d like a simple place to get started with the Arduino, here’s a handy parts list to get you started. Some of these links may be affiliate links. These cost you nothing, but if you use them we get a small commission that helps us keep making tutorials like these!
| QTY | PART/LINK | ||
|---|---|---|---|
| 1X | [icon name=”microchip” prefix=”fas”] | Arduino Uno | [icon name=”cart-plus” prefix=”fas”] |
| 1X | [icon name=”usb” prefix=”fab”] | USB Type B Cable | [icon name=”cart-plus” prefix=”fas”] |
| 1X | [icon name=”th” prefix=”fas”] | Solderless Breadboard | [icon name=”cart-plus” prefix=”fas”] |
| 1X | [icon name=”grip-lines” prefix=”fas”] | Jumper Wire Kit | [icon name=”cart-plus” prefix=”fas”] |
| 1X | [icon name=”lightbulb” prefix=”fas”] | LED Kit | [icon name=”cart-plus” prefix=”fas”] |
| 1X | [icon name=”ellipsis-h” prefix=”fas”] | Resistor Kit (220 Ohm) | [icon name=”cart-plus” prefix=”fas”] |
| 1X | [icon name=”circle” prefix=”fas”] | Potentiometer Kit | [icon name=”cart-plus” prefix=”fas”] |
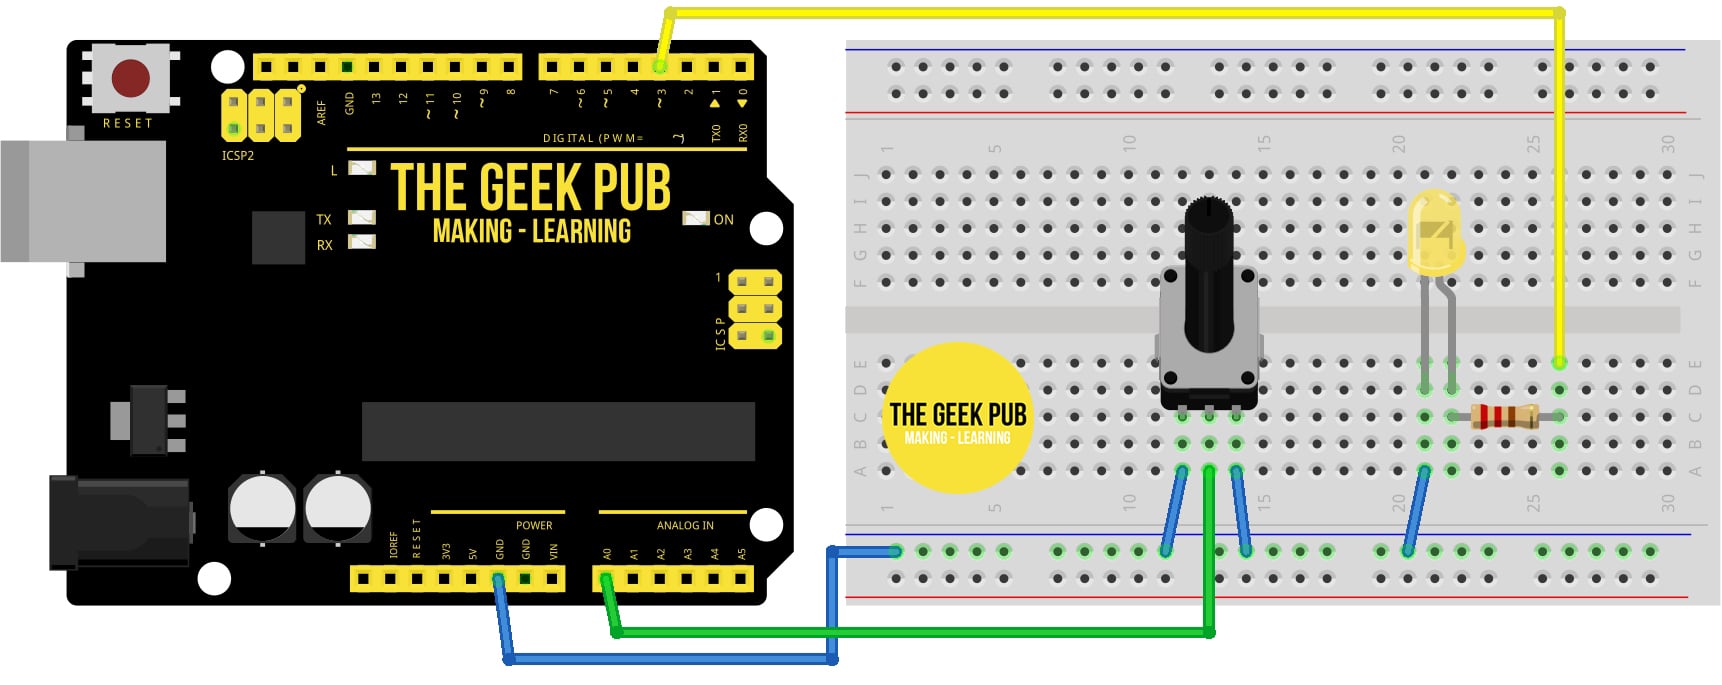
Wiring Diagram for How to Fade and LED with a Potentiometer
Use the following wiring diagram to connect your LED and Potentiometer to the Arduino using a breadboard.
Arduino Code
This code will read the Arduino AO analog input and use software to send a PWM pulse to the LED to control brightness. Additionally it will print the analog reading and the current brightness level to the serial monitor.
RELATED: Understanding the Arduino Serial Monitor
int LED_PIN = 3;  // the PWM pin the LED is attached to

// the setup routine runs once when you press reset:
void setup() {
  // initialize serial communication at 9600 bits per second:
  Serial.begin(9600);

  // declare LED pin to be an output:
  pinMode(LED_PIN, OUTPUT);
}

// the loop routine runs over and over again forever:
void loop() {
  // reads the input on analog pin A0 (value between 0 and 1023)
  int analogValue = analogRead(A0);

  // scales it to brightness (value between 0 and 255)
  int brightness = map(analogValue, 0, 1023, 0, 255);

  // sets the brightness LED that connects to  pin 3
  analogWrite(LED_PIN, brightness);

  // print out the value
  Serial.print("Analog: ");
  Serial.print(analogValue);
  Serial.print(", Brightness: ");
  Serial.println(brightness);
  delay(100);
Next Steps
Now you con move on to the next tutorial or go back to the index.