Most orders for IN STOCK items placed by 12PM CST M-F ship SAME DAY. Orders for custom items and prints may take additional time to process.
Fading an LED is something you’ll likely use in lot of your projects. It’s a really nice and elegant effect to make the indicators in your projects more pleasing.
| QTY | PART/LINK | ||
|---|---|---|---|
| 1X | Arduino Uno | ||
| 1X | USB Type B Cable | ||
| 1X | Solderless Breadboard | ||
| 1X | Jumper Wire Kit | ||
| 1X | LED Kit | ||
| 1X | Resistor Kit (220 Ohm) |
Some of these links are affiliates. If you use them it costs you nothing, but we get a small commissions and that helps us keep making content for you!

LED Basics Pro Tip: If you haven’t done the first tutorial in the LED series called Blink, you should go do that tutorial first. It explains some of the fundamentals of LEDs that are need to know. LEDs do not operate like a traditional light bulb and have some uniqueness in what makes them work. This means using a resistor!
Some of the pins on the Arduino’s GPIO header can be used to generate a PWM signal. PWM stands for Pulse Width Modulation. You should check out our tutorial on PWM if you haven’t already, but basically PWM pulses a voltage on a pin for a specific percentage of time. This effect reduces or increases the brightness of the LED.
Not all pins on the Arduino can support PWM (at least in hardware). The PWM pins on the Arduino Uno are 3, 5, 6, 9, 10, and 11. In our tutorial, we’ll just use pin 9. But any of these others would work just as well.
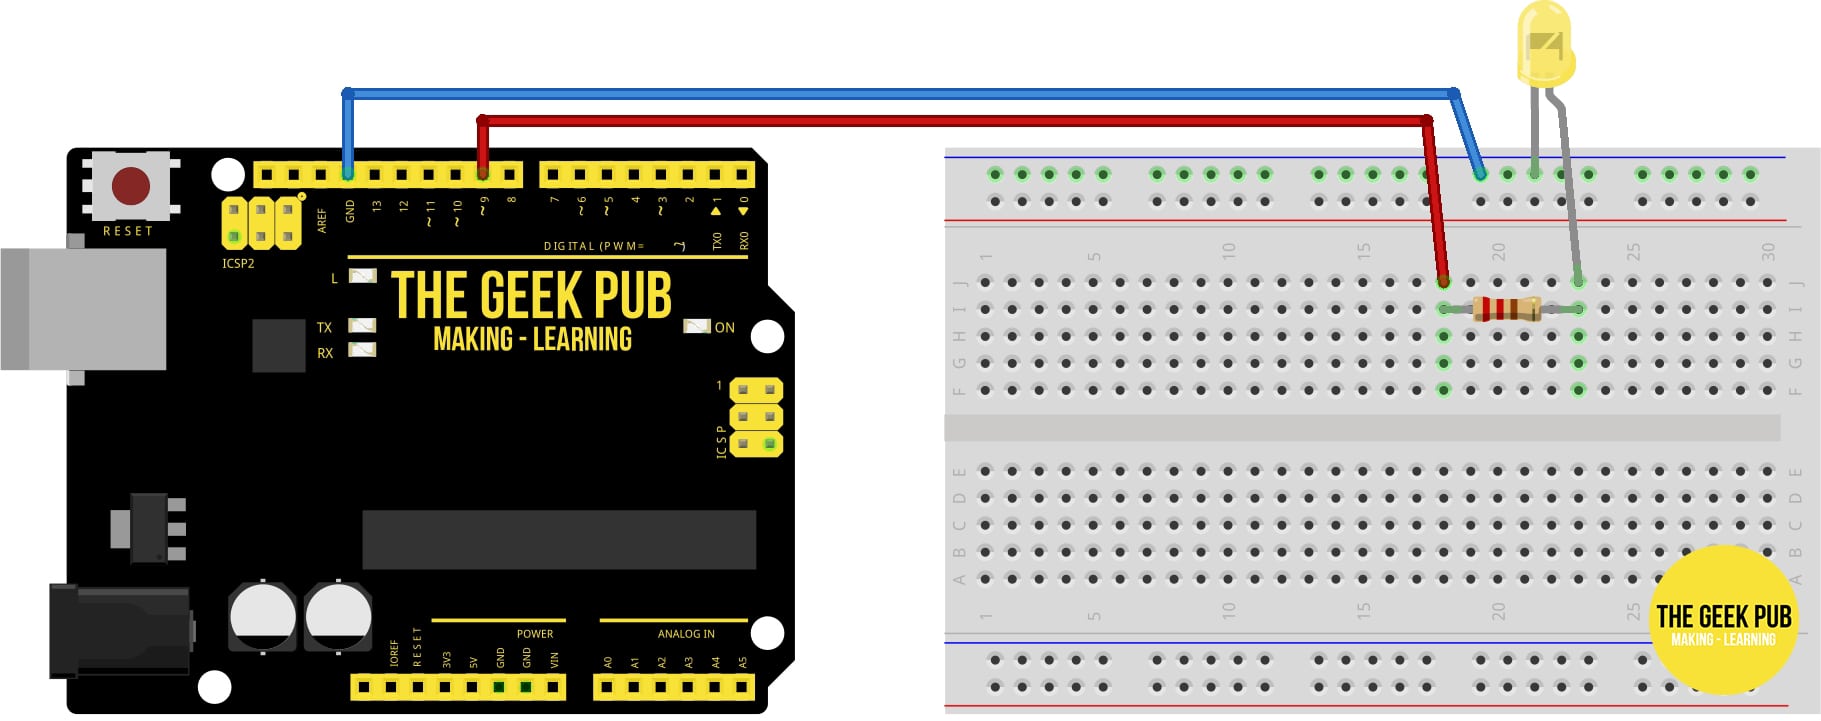
The wiring for this project is incredibly simple. It requires only two wires, a resistor, and an LED. Please note that a resistor is required to prevent damage to the resistor.
Wire the Arduino as follows:

There are a couple of different options for fading an LED on the Arduino. The first is to vary the PWM signal and inserting a delay() to slow it down enough that human eyes can see it. The second option is a much better solution although slightly more complicated. Let’s learn both ways and discover why to choose one option over the other.
This first option is the code directly from the Arduino tutorials provided by the OEMs. This uses the delay() function to slow the process down so its easily visible. Delay() however blocks other code from running and isn’t always a smooth dim. But it works fine for many use cases.
int led = 9;           // the PWM pin the LED is attached to
int brightness = 0;    // how bright the LED is
int fadeAmount = 5;    // how many points to fade the LED by

// the setup routine runs once when you press reset:
void setup() {
  // declare pin 9 to be an output:
  pinMode(led, OUTPUT);
}

// the loop routine runs over and over again forever:
void loop() {
  // set the brightness of pin 9:
  analogWrite(led, brightness);

  // change the brightness for next time through the loop:
  brightness = brightness + fadeAmount;

  // reverse the direction of the fading at the ends of the fade:
  if (brightness <= 0 || brightness >= 255) {
    fadeAmount = -fadeAmount;
  }
  // wait for 30 milliseconds to see the dimming effect
  delay(30);
}
The main problem with the previous sketch is that the delay() function is a blocker. All code executing on the Arduino will be blocked (paused) by a delay() function. This can cause a lot of problems if you have other tasks running. To get around this issue you can use the millis() function.
The following code will “fade in” an LED, starting dim and brightening.
const int LED_PIN = 9; // we're using pin 9 for our PWN connection
unsigned long fadeTime = 3000; // fade time is 3 seconds

unsigned long fadeStartTime;

// the setup routine runs once when you press reset
void setup() {
  pinMode(LED_PIN, OUTPUT); // set pin 9 to be an output
  fadeStartTime = millis();
}

// fade-in in loop, and restart after finishing
void loop() {
  unsigned long progress = millis() - fadeStartTime;

  if (progress <= fadeTime) {
    long brightness = map(progress, 0, fadeTime, 0, 255);
    analogWrite(LED_PIN, brightness);
  }
  else {
    fadeStartTime = millis(); // restart fade again
  }
}
The following code will “fade out” an LED, starting bright and dimming.
const int LED_PIN = 9; // we're using pin 9 for our PWN connection
unsigned long fadeTime = 3000; // fade time is 3 seconds

unsigned long fadeStartTime;

// the setup routine runs once when you press reset
void setup() {
  pinMode(LED_PIN, OUTPUT); // declare pin 9 to be an output
  fadeStartTime = millis();
}

// fade-out in loop, and restart after finishing
void loop() {
  unsigned long progress = millis() - fadeStartTime;

  if (progress <= fadeTime) {
    long brightness = 255 - map(progress, 0, fadeTime, 0, 255);
    analogWrite(LED_PIN, brightness);
  }
  else {
    fadeStartTime = millis(); // restart fade again
  }
}
Take the next steps on your Arduino journey and learn more, or go back to main tutorial page:
If you like our content maybe consider upgrading to Premium. You’ll get access to