Blog
Arduino Basics: Code Structure
Now that you’ve made you first program, we’re ready to move on and to actually understand a bit about what we wrote, why it worked, and some basics about the code structure of the Arduino platform.
Arduino Code Basics
Arduino calls its programs “Sketches”. So from this point forward we will be using that term when we refer to the programs we are creating.
Most programming languages have something called subroutines. Sometimes these subroutines can return data and are then called functions. Most everything in the world of Sketches will be referred to as Functions.
Arduinos have two required functions in every sketch: setup() and loop(). You can have as many functions in your sketch as you like, but you must have these two or the sketch will refuse to compile.
Setup Function
The setup() function is where we place code that we only want to run one time. This is usually setting configuration settings, defining constants (a variable that never changes), or loading libraries we will use later in the loop() function. Although it should be noted that there is nothing preventing you from putting regular code into the setup() function. Regardless of what you put inside it, it will be executed the moment the Arduino is powered on and then never executed again.
Loop Function
The loop() function is generally considered to be where the magic happens. This is logically the main program (or “application”) that your Arduino is executing. When all of the code you’ve written is completed, the loop function starts over and begins executing it all over again. Infinitely (or until you turn it off).
Example Sketch: Setup and Loop
Let’s create a quick sketch to give a basic example of Arduino code structure. We will take our “Hello World!” program and evolve it a little.
In the IDE, enter the following program and press the upload button to compile and send it to your Arduino.
void setup() {
  // put your setup code here, to run once:
  Serial.begin(9600);
  Serial.println("Hello Setup Code! I run once!");
}

void loop() {
  // put your main code here, to run repeatedly:
  Serial.println("Hello Loop Code! I repeat!");
  delay(1000);
}
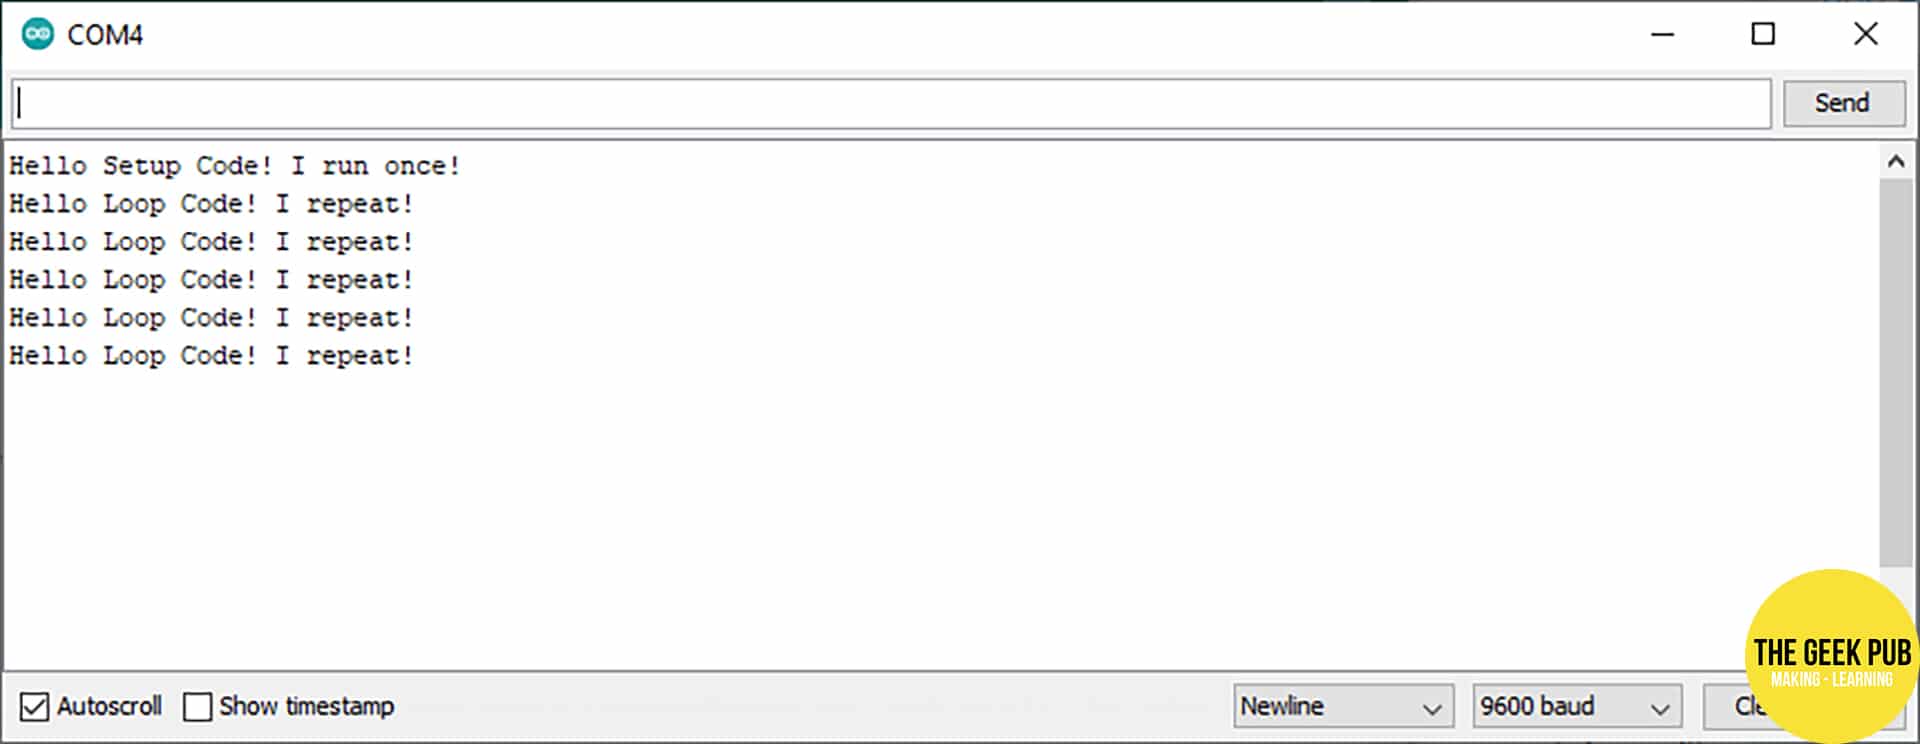
Once the upload is complete, open the serial console again and you should see the following output. You can see that the setup code is running a single time and at the very beginning, but the loop code runs over and over again. Just as we would expect!
Additional Considerations for Arduino Code Structure
There are a few other basics you should know about the Arduino code structure before moving on the next step in our tutorials. Let’s quickly take a look at those.
Block Comments
Block comments are used to write notes in the code that you or others can read later to understand how code works or why it was written in such a way. It’s just a simple way to leave documentation along the way.
A block comment is ignored by the compiler and is not sent to the Arduino when you upload your sketch. Therefore it doesn’t take up any memory in the Arduino. We recommend creating as many comments as you can. It’s amazing how much they help when years (or in my case even days later) you try to remember why you did something they way you did.
Block comments are created with /* at the beginning, a * on each new line, and */ to end it.
Here’s an example of some code with a block comment added:
/*
 * This example of a block comment.
 *
 * This comment and code was written by The Geek Pub! This will be ignored by the compiler.
 */

void setup() {
  // put your setup code here, to run once:
  Serial.begin(9600);
  Serial.println("Hello Setup Code! I run once!");
}

void loop() {
  // put your main code here, to run repeatedly:
  Serial.println("Hello Loop Code! I repeat!");
  delay(1000);
}
Includes
The next thing to understand is the include statement. Includes are a way to bring in additional code from libraries or other sketches. This is accomplished in the setup() function by using #include.
Many libraries are available in the Arduino ecosystem to help you get started. Many times code already exists to do the thing you’d like to do, already written by someone else. For example, if you want to control a servo there is no reason to write code to do this as there is an existing servo library that you can simply include and then send instructions to.
To include the server library in your code you would simple add #include <servo.h> before the setup() function. Here’s an example sketch:
/*
 * This example of a block comment.
 *
 * This sketch includes the servo.h function for use in our code.
 */

#include <Servo.h>

void setup() {
  // put your setup code here, to run once:
  Serial.begin(9600);
  Serial.println("Hello Setup Code! I run once!");
}

void loop() {
  // put your main code here, to run repeatedly:
  Serial.println("Hello Loop Code! I repeat!");
  delay(1000);
}
Defining Constants
Constants are simply variables that aren’t variable! Sometimes we need to define things in our code in a single place that can be used later in many places in our code. This is super handy for turning things on and off for testing. Or to make a specific configuration for code that might be written to run on numerous devices.
For example, we might write a sketch that is designed to work with 10 LEDs or 20 LEDs depending on what the user needs. So we might create a constant to define how many LEDs at the beginning of the sketch. Another example would be to define what PINs do what on the hardware. For example you might define pin 3 on the Uno is where you will be connecting an LED. Constants would be defined before the setup() function as follows:
#define LED_COUNT 20
#define LED_PIN 3

void setup() {
  // put your setup code here, to run once:
  pinMode(LED_PIN, OUTPUT);    // The compiler will replace LED_PIN with 3
}

void loop() {
  // put your main code here, to run repeatedly:

}
Remember, unlike a variable… constants do not and cannot ever be changed once the code is complied.
The Arduino IDE includes many constants that are defined out of the box that you can use in your code to make things simpler. Such as defining where a pin is an input put or an output pin. In this example, we define pin 3 as an output pin using the inbuilt constant OUTPUT.
Global Variables
The last thing we’ll talk about for now are global variables. Global variables are variables that work anywhere in your Arduino sketch, inside or outside of a function. Most variables are local to only the function they are defined within.
Global variables should be used very sparingly!
In this example code, we will create a global variable called my_global_variable of the type integer. In the setup() function we will define it to as one (although there is a faster way to do this you’ll learn later). In the loop() function we will increment it over and over by adding 1 to it.
int my_global_variable;

void setup() {
  // put your setup code here, to run once:
  Serial.begin(9600);
  my_global_variable = 1;
}

void loop() {
  // put your main code here, to run repeatedly:
  Serial.println(my_global_variable);
  my_global_variable = my_global_variable + 1;
}
The serial will start counting at 1 and continue until you stop the program.
Next Steps
Now that you’re familiar with the basics of Arduino code structure, you can move on to the next steps, or go back.