Blog
Using the DHT11 Temperature Sensor with the Raspberry Pi

In this tutorial, we’re going to cover using the the DHT11 (or DHT22) temperature and humidity sensor with the
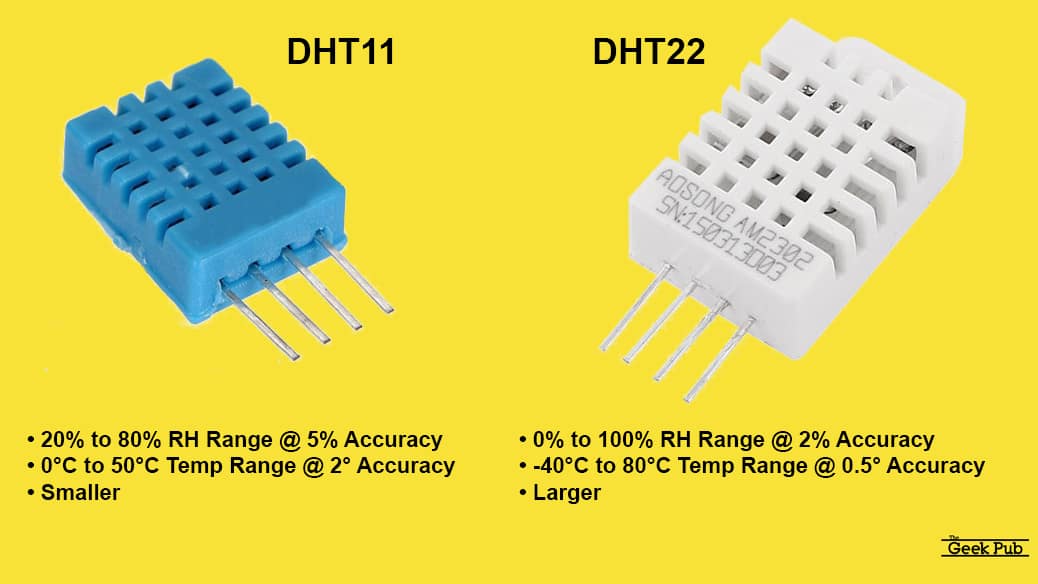
The DHT11 vs DHT22 Sensors
The DHT11 and DHT22 are fundamentally the same from a wiring and software perspective. However, the DHT22 is a more accurate sensor. In this project we’ll be using the DHT11. If you have a DHT22, just follow along and everything will work the same and you’ll get more accurate readings! You will need to change the code snippet to reflect your sensor though.
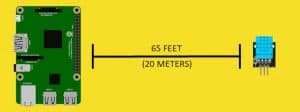
These sensor are ideal for remote mounting due to the fact that they can operate up to 65 feet (20 meters) apart using a long wire. I should also note that these sensors come as separate components or as modules. We’re going to use a module. The difference is that the module includes the 10K Ohm pull up resistor on the board. If you decide to use the standalone sensor, we have a wiring diagram for that below as well.
Parts List for this Project
Here’s a quick parts list for this project to get you started:
- Raspberry Pi 3
- DHT11 or DHT 22 Sensors Only; or
- DHT11 or DHT22 Modules
- 10K Ohm Resistor
- Raspberry Pi Breakout Cable
- Breadboard and Wires
The DHT11/22 Raspberry Pi Tutorial Video
Wiring the DHT11 or DHT22 to the Raspberry Pi
Before we can begin using the DHT11 Temperature Sensor with the
RELATED: Installing Raspbian for the First Time
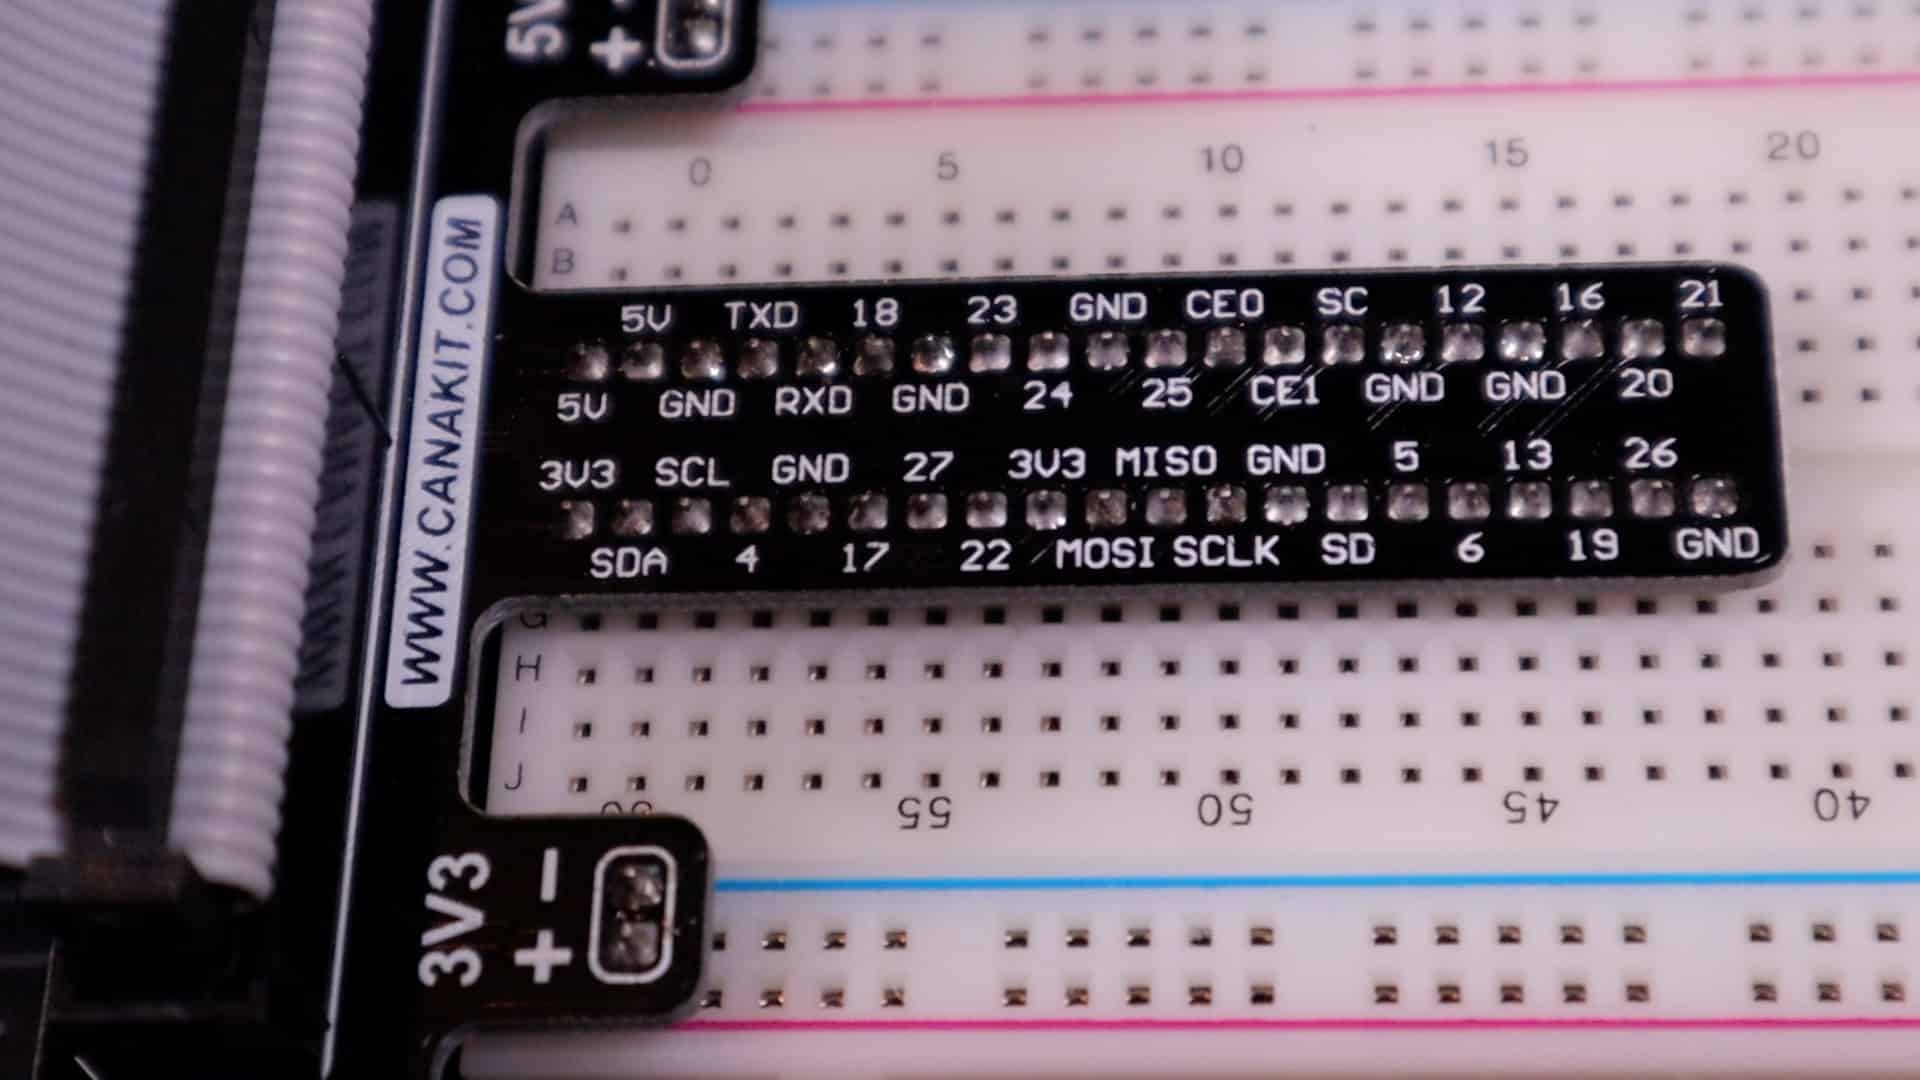
Using a Breadboard and Breakout Cable
You don’t need a breadboard for this project, but I feel like it makes things much simpler to understand, especially if you use of these breakout cables. It makes the Pi’s pinout much easier to follow. There’s a link to these in the description.
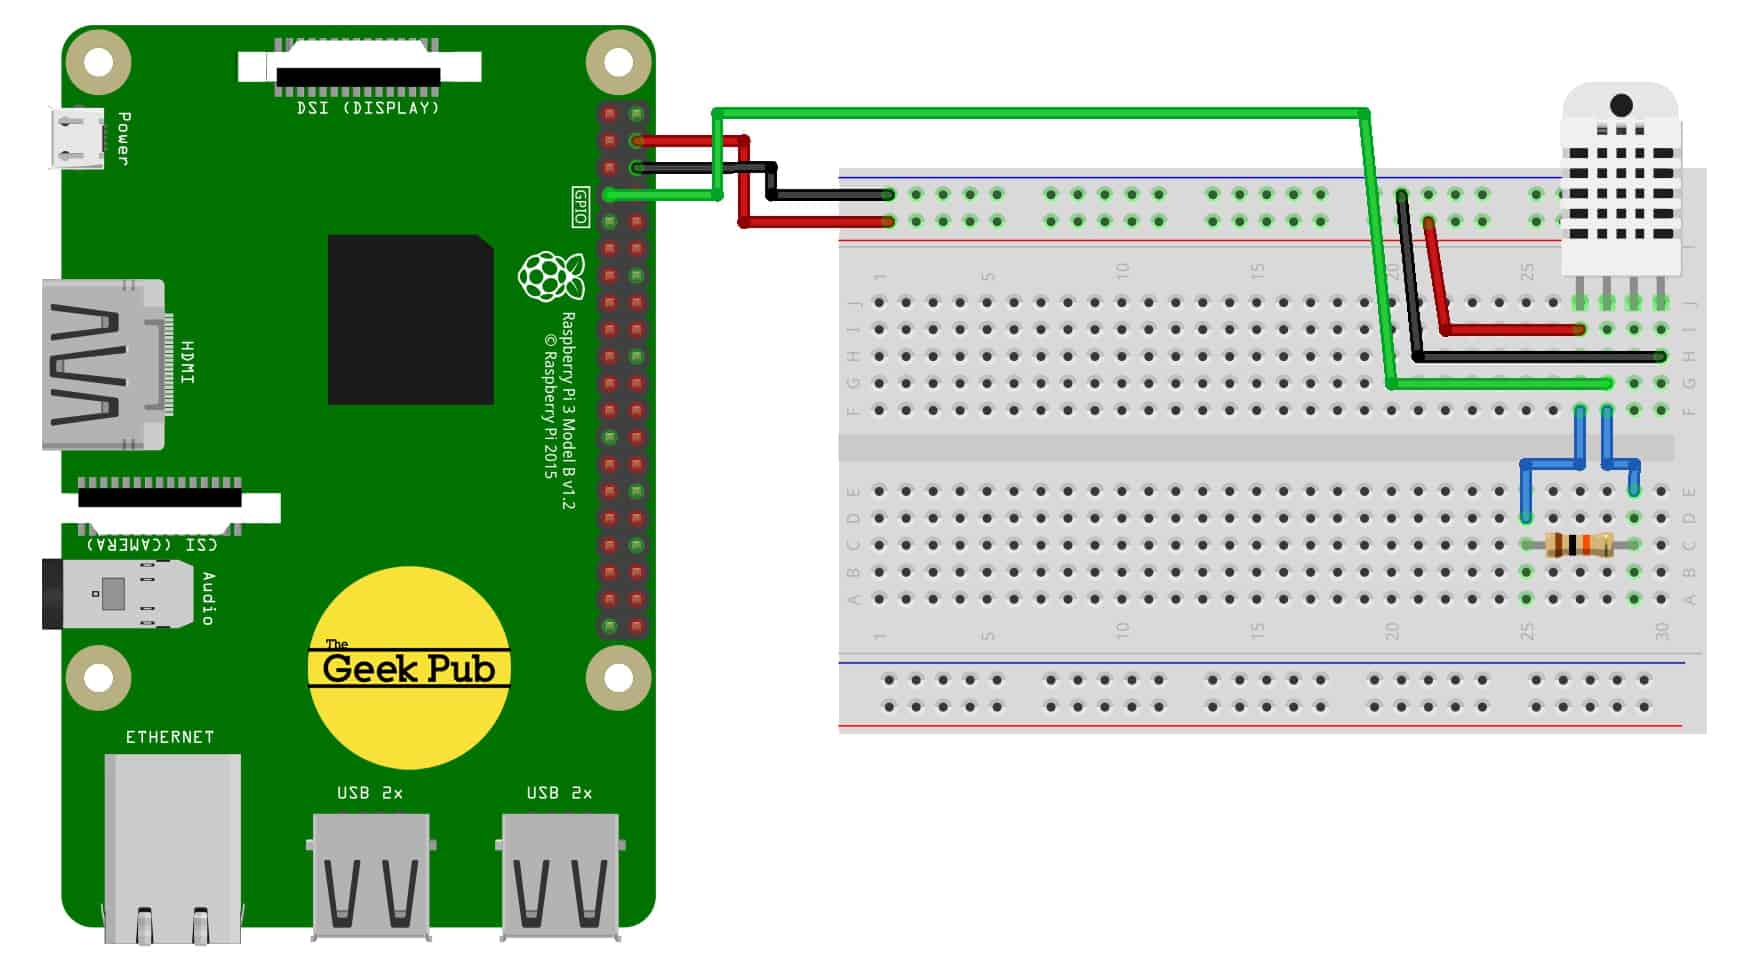
DHT11 / DHT22 Wiring Diagrams for the Raspberry Pi (Module)
Use the following wiring diagram if you have a DHT11 or DHT22 module with an integtated pull up resistor.
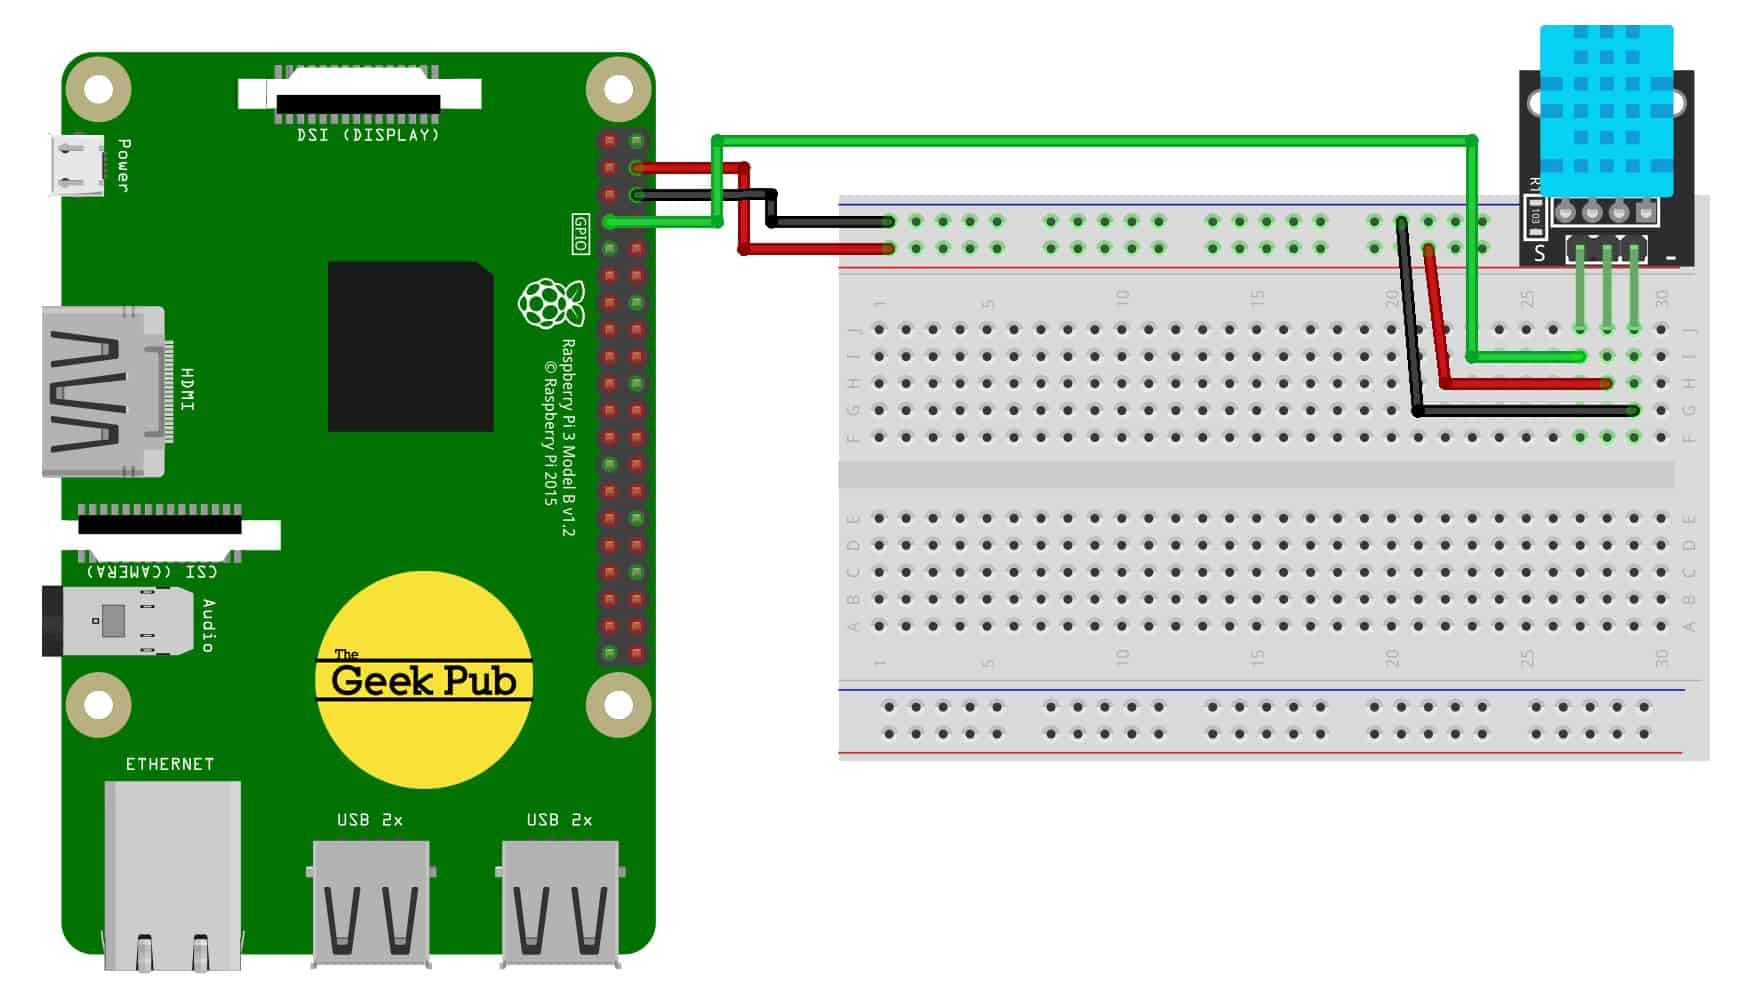
- DHT11/22 Sensor Vcc+ to
Raspberry Pi 5V - DHT11/22 Sensor GND to
Raspberry Pi GND - DHT11/22 Sensor Signal to
Raspberry Pi PIN 7 (GPIO PIN 4)
DHT11 / DHT22 Wiring Diagrams for the Raspberry Pi (Sensor Only)
Use the following wiring diagram if you have a DHT11 or DHT22 sensor with and need to add a separate pull up resistor.
- DHT11/22 Sensor Vcc+ to
Raspberry Pi 5V - DHT11/22 Sensor GND to
Raspberry Pi GND - DHT11/22 Sensor Signal to
Raspberry Pi PIN 7 (GPIO PIN 4) - 10K Ohm Resistor between DHT11/22 PIN 1 and PIN 2
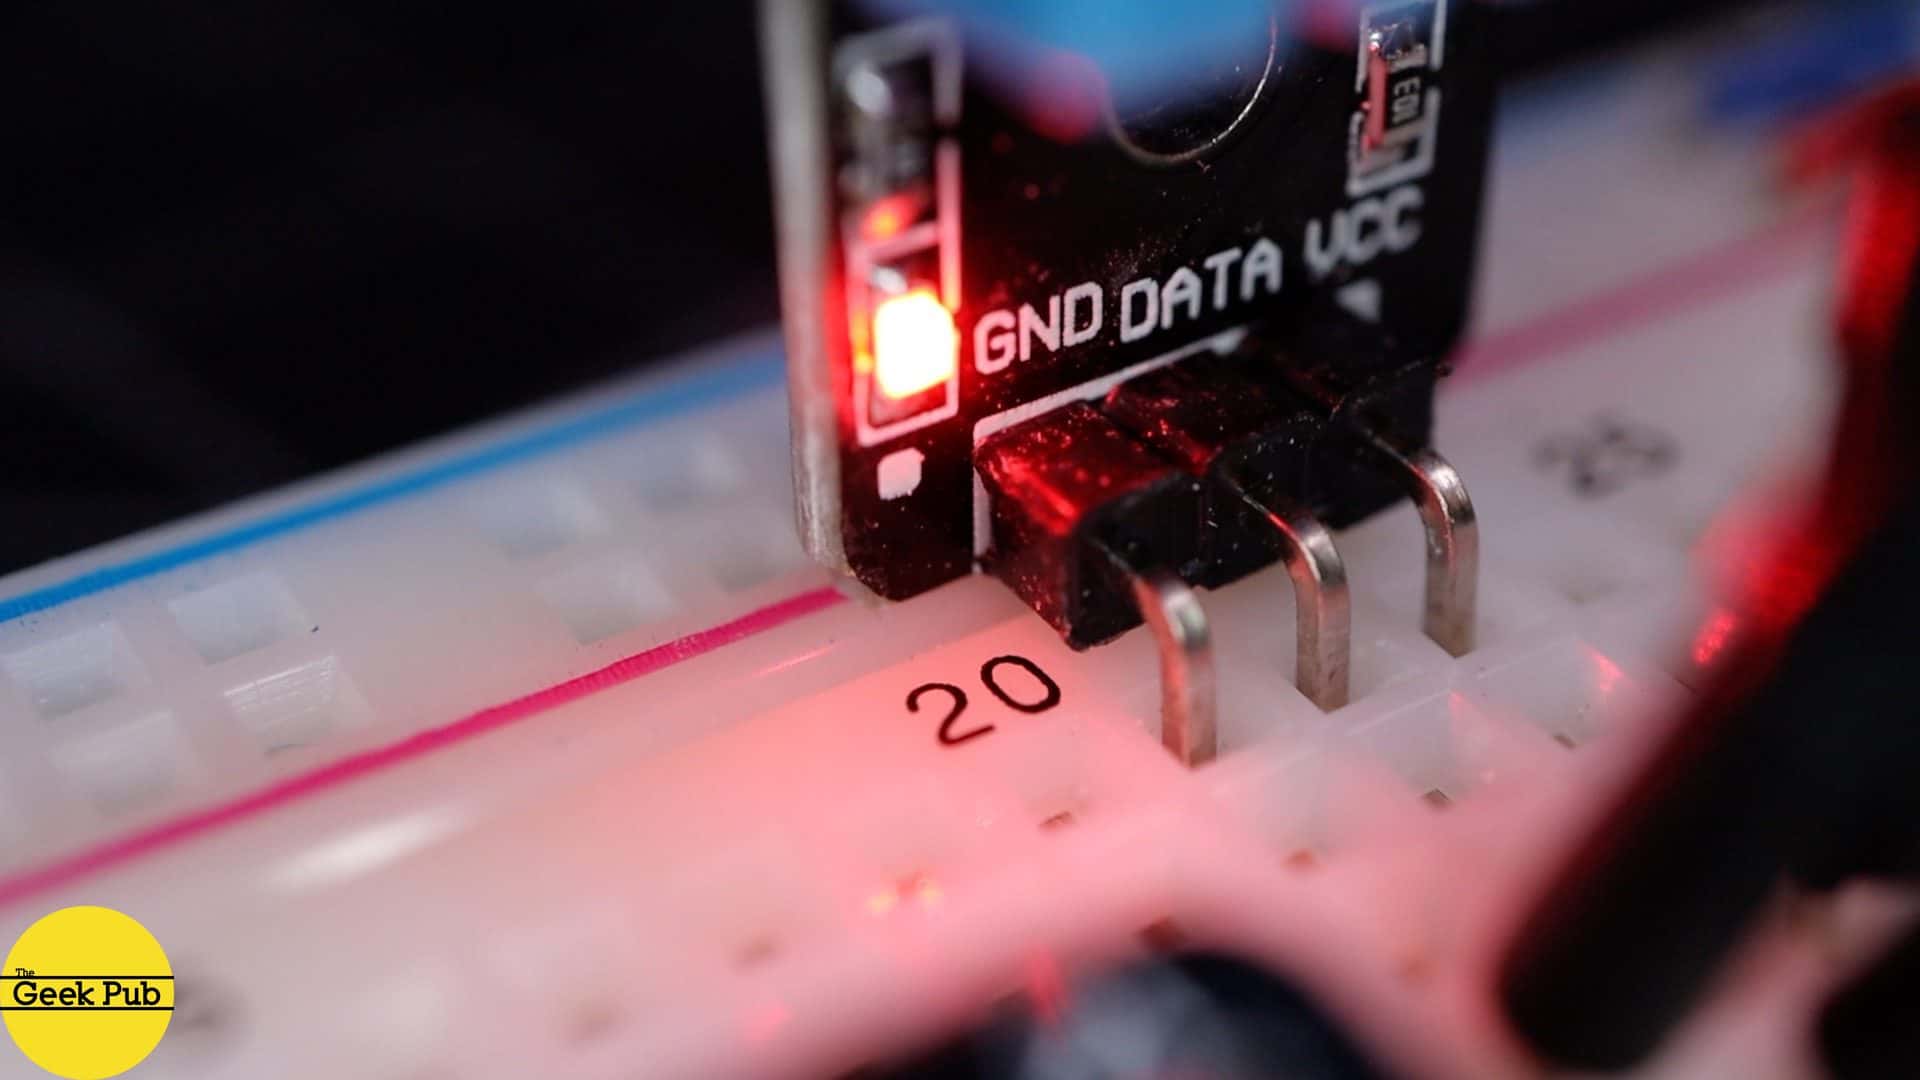
If you wired everything up correctly, you’ll see a red LED glowing on the DHT11 module. (NOTE: Some cost reduced modules do not include this LED.)
RELATED: DHT11 Sensor Wiki Page
Python Code for Raspberry Pi DHT11/DHT22
Next thing we need to do is install the DHT python library. This is done by entering the following command:
[code language=”bash”]
sudo pip3 install Adafruit_DHT
[/code]
Note: If you run into problems with the above command, you may not have PIP installed on your Pi. You can fix that by running the following commands. These will install PIP and other utilities you may need.
[code language=”bash”]
sudo apt-get install python3-dev python3-pip
sudo python3 -m pip install –upgrade pip setuptools wheel
[/code]
OK. Now let’s take a look at the code we’re going to use. This is some very basic code written in Python. The first section of code imports the DHT library from Adafruit and the system time library.
[code language=”python”]
import Adafruit_DHT
import time
[/code]
This line defines the sensor object we will use, and the next line is a variable that defines the GPIO pin we are using.
[code language=”python”]
DHT_SENSOR = Adafruit_DHT.DHT11
DHT_PIN = 4
[/code]
And finally the code loop that goes next. The “while True:” line will force everything indented after to run in an infinite loop.
First, we capture the temperature and humidity to two aptly named variables, and then use an IF statement to check to see if it worked. If it worked, we print the temperature and humidity to the screen. If it it failed we let you know to check your wiring.
Lastly, since the DHT11 and DHT22 can only be checked a maximum of once per second, we use the system time.sleep function two pause three seconds between checks.
[code language=”python”]
while True:
humidity, temperature = Adafruit_DHT.read(DHT_SENSOR, DHT_PIN)
if humidity is not None and temperature is not None:
print("Temp={0:0.1f}C Humidity={1:0.1f}%".format(temperature, humidity))
else:
print("Sensor failure. Check wiring.");
time.sleep(3);
[/code]
Python Code for DHT11/22 Complete
And here is the completed python code for the DHT11/22 sensors.
[code language=”python”]
import Adafruit_DHT
import time
DHT_SENSOR = Adafruit_DHT.DHT11
DHT_PIN = 4
while True:
humidity, temperature = Adafruit_DHT.read(DHT_SENSOR, DHT_PIN)
if humidity is not None and temperature is not None:
print("Temp={0:0.1f}C Humidity={1:0.1f}%".format(temperature, humidity))
else:
print("Sensor failure. Check wiring.");
time.sleep(3);
[/code]
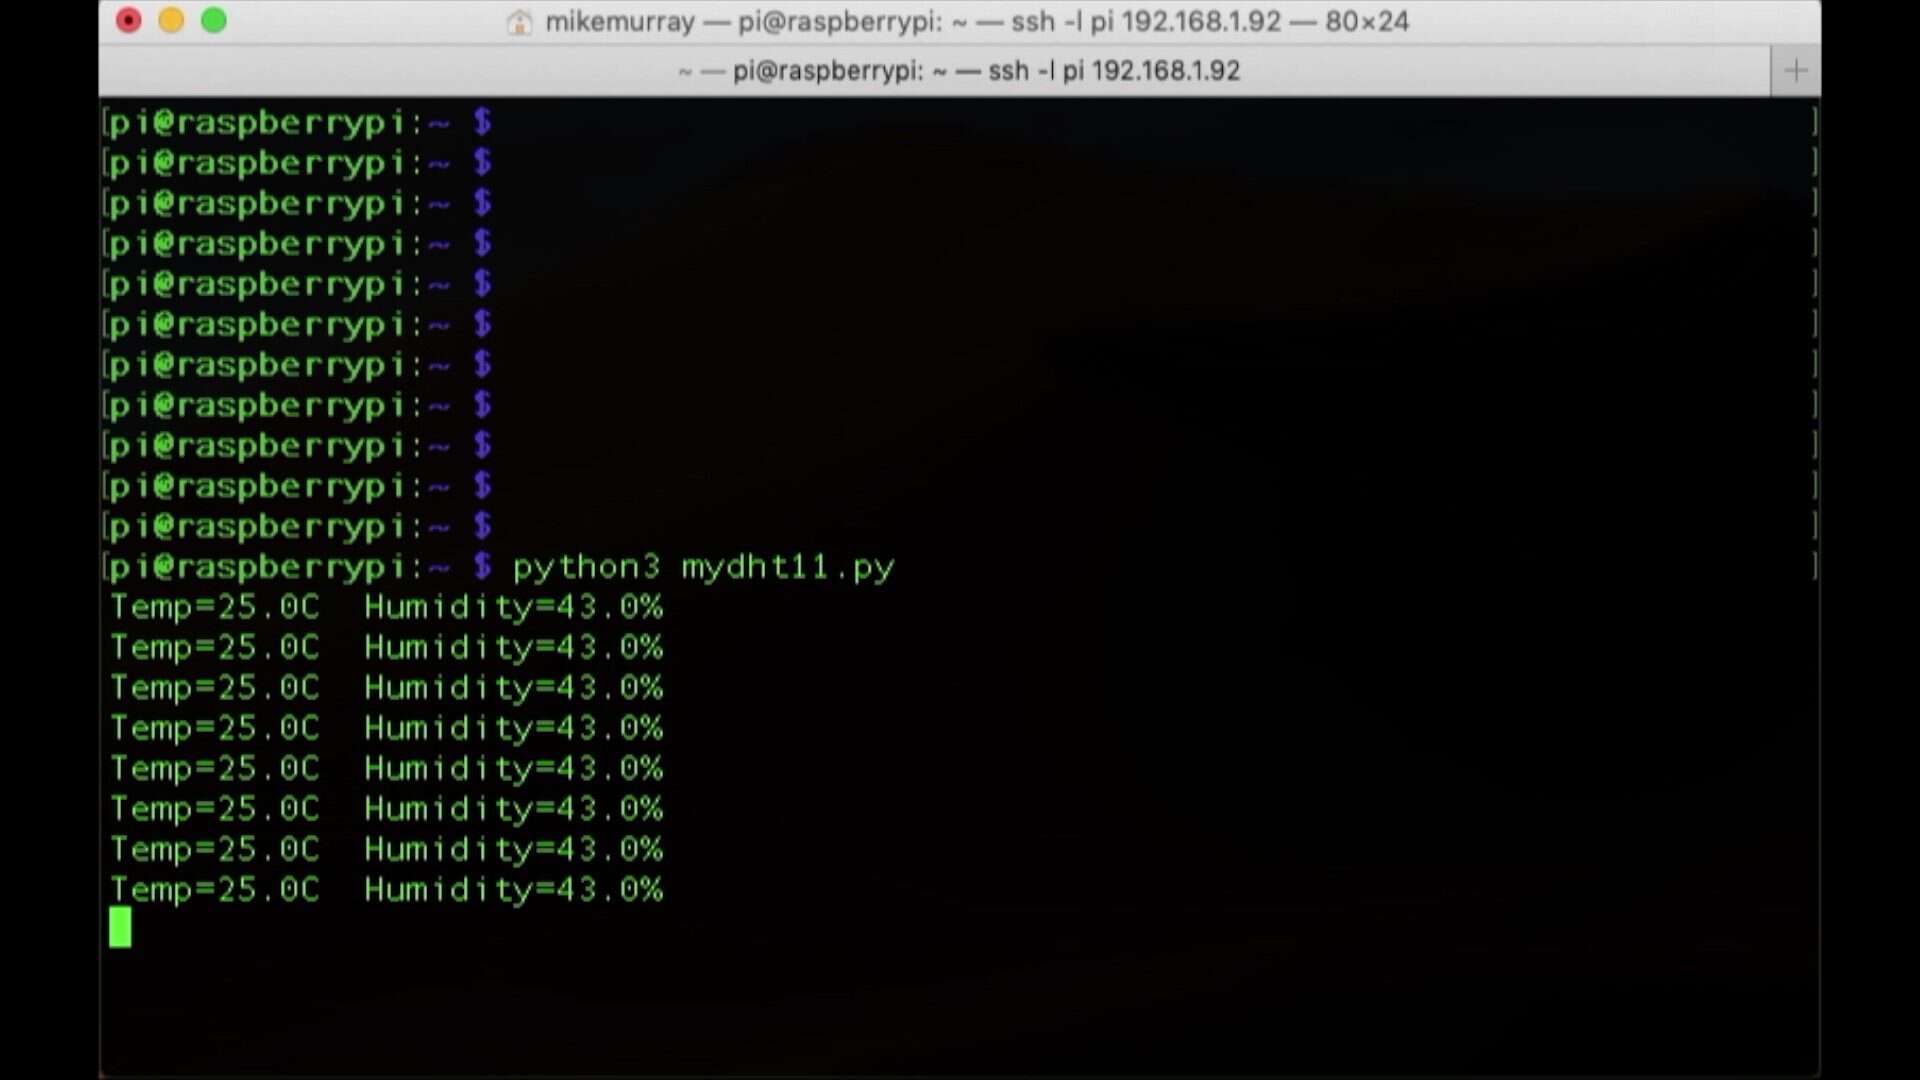
To run your code, enter python3 mydht11.py and press enter. If you did everything correctly, you’ll start seeing the temperature and humidity reported on the terminal window every 3 seconds.
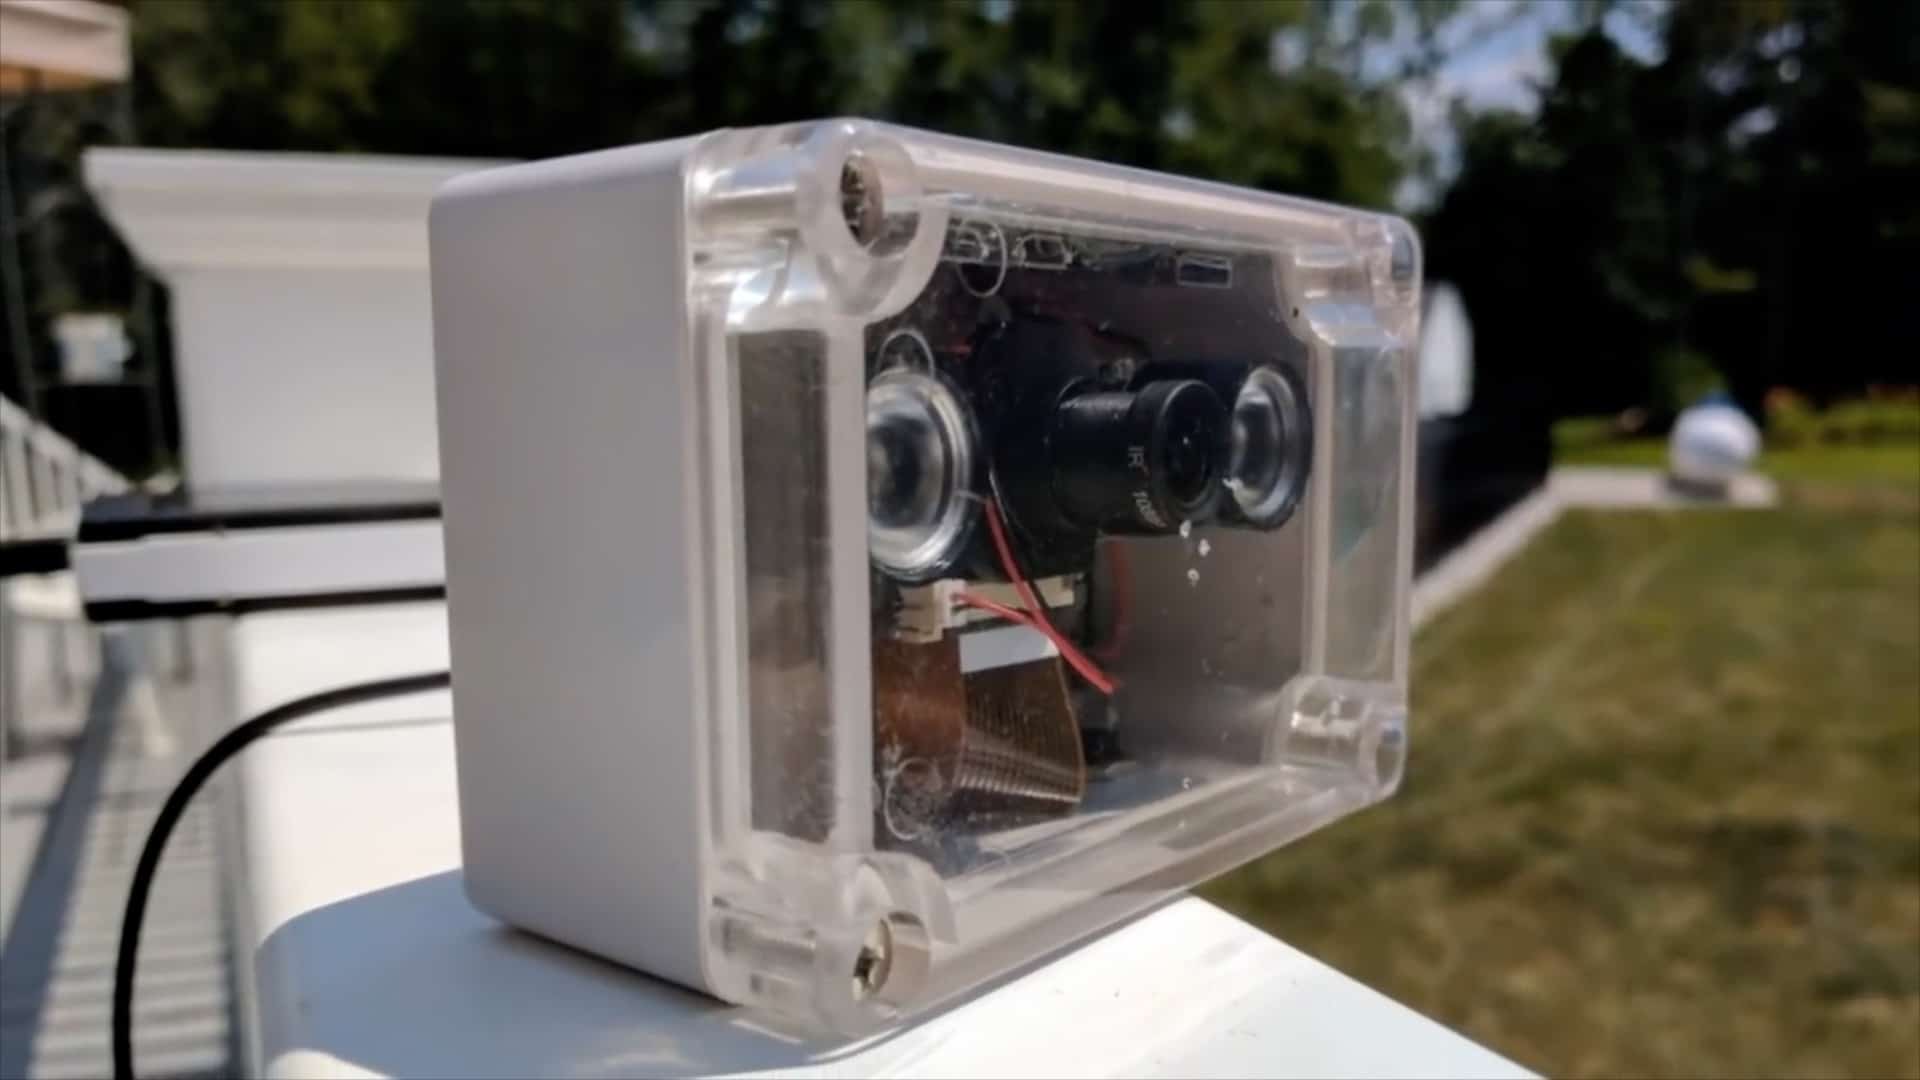
The Completed DHT11/DHT22 Project
There are so many possible uses for these sensors. You can use them to capture the temperature of your Pi when its in an enclosure in the hot summer heat, or you can use it to check on the temperature of room in your house when you’re out of town. It’s also very commonly used in creating weather stations.

If you have any problems, leave a comment below and we’ll do our best to help you out!


4.5
by far the best tutorial on this topic. thanks!
Hey it works! I am going to monitor the temperature of my dog’s house on the farm to make sure he never gets too cold or hot (so I know I need to provide extra heat or cooling). We live on a farm.
Any luck doing this from a raspberry pie zero?
Should work exactly the same. Are you having a problem?
This is literally the only tutorial on the internet that actually works. I never leave comments. So thanks for this.
4
Thanks! Is there anything different in the code for the 3 pin version of the DHT22?
Nope. works exactly the same.
Hello, can we send the temperature and humidity data to internet or our site to monitoring it? Thankk you
4.5
i start the script mydht11.py, it displays the temperature and humidity once, but then it starts showing a sensor failure every time…any ideas?
I followed this guide to the best that I could. I was a little confused as to where to put the script but I ran the command “nano mydht11.py” and pasted the code in and saved it. Now when I run the script I get a sensor failure. Not sure what to do.
This is what I’m running to :
Could not find a version that satisfies the requirement Adafruit_DHT (from versions: )
No matching distribution found for Adafruit_DHT
What the heck??? anybody.
resolved this got new problem
dsettles@RPI3B:~ $ python3 mydht22.py
Traceback (most recent call last):
File “mydht22.py”, line 9, in
humidity, temperature = Adafruit_DHT.read(DHT_SENSOR, DHT_PIN)
File “/usr/local/lib/python3.7/dist-packages/Adafruit_DHT/common.py”, line 81, in read
return platform.read(sensor, pin)
File “/usr/local/lib/python3.7/dist-packages/Adafruit_DHT/Raspberry_Pi_2.py”, line 34, in read
raise RuntimeError(‘Error accessing GPIO.’)
RuntimeError: Error accessing GPIO.
Thanks for this great tutorial. It was my first Pi Project and with other tutorials it did not work. In between correct meassurements I do also get sensor failure do you have an idea about this?
I did exactly as followed and keep getting sensor failure check wiring
Hi all,
New to using sensors on the Pi, I am currently waiting waiting for my breadboard to arrive, in the mean time could I connect my DHT sensor to the Pi just using jumper cables ?
Everything that I have checked on the interwebs says yes. If you have the 3 pin dht series.
The top picture is correct, but looking at the diagram of Pi and BB the (3 pin) positive and data wires are switched. Mayhaps that’s why so many are having troubles with the program?
I’m getting ready to set this up for my green house to monitor heat and humidity.
I’ll come back as soon as it’s done.
Great tutorial,
Lon
So, my setup went the same as others with the check the cable error, but it would show temp and hum several times, and back to check cable.
I commented out (#) else and print lines, and it works flawlessly.
Thanks for your tutorial,
I’m trying to add actual time to code, but I get actual time just once, then is always the same time with correct temp./hum.:
### CODE
from datetime import datetime #import datetime module
import Adafruit_DHT
import time
DHT_SENSOR = Adafruit_DHT.DHT11
DHT_PIN = 4
# datetime object containing current date and time
now = datetime.now()
while True:
humidity, temperature = Adafruit_DHT.read(DHT_SENSOR, DHT_PIN)
if humidity is not None and temperature is not None:
print(now.strftime(“%H:%M:%S”), “Temp={0:0.1f}C Humidity={1:0.1f}%”.format( temperature, humidity))
else:
print(“Sensor failure. Check wiring.”);
time.sleep(60);
###
### SHELL
Shell:
16:10:34 Temp=25.0C Humidity=62.0%
16:10:34 Temp=24.0C Humidity=62.0%
16:10:34 Temp=24.0C Humidity=62.0%
###
Thanks
Cheers
Mario
How to get this code to load into a web server so instead of ssh into pi, just load Ip address of web server?
Hi, i followed exactly but i got this error. any idea how to solve?
Traceback (most recent call last):
File “test.py”, line 8, in
humidity, temperature = Adafruit_DHT.read(DHT_SENSOR, DHT_PIN)
File “/usr/local/lib/python3.7/dist-packages/Adafruit_DHT/common.py”, line 80, in read
platform = get_platform()
File “/usr/local/lib/python3.7/dist-packages/Adafruit_DHT/common.py”, line 60, in get_platform
from . import Beaglebone_Black
File “/usr/local/lib/python3.7/dist-packages/Adafruit_DHT/Beaglebone_Black.py”, line 24, in
from . import Beaglebone_Black_Driver as driver
ImportError: cannot import name ‘Beaglebone_Black_Driver’ from ‘Adafruit_DHT’ (/usr/local/lib/python3.7/dist-packages/Adafruit_DHT/__init__.py
Same here. Can anyone help????
Traceback (most recent call last):
File “mydht11.py”, line 8, in
humidity, temperature = Adafruit_DHT.read(DHT_SENSOR, DHT_PIN)
File “/usr/local/lib/python3.7/dist-packages/Adafruit_DHT/common.py”, line 80, in read
platform = get_platform()
File “/usr/local/lib/python3.7/dist-packages/Adafruit_DHT/common.py”, line 60, in get_platform
from . import Beaglebone_Black
File “/usr/local/lib/python3.7/dist-packages/Adafruit_DHT/Beaglebone_Black.py”, line 24, in
from . import Beaglebone_Black_Driver as driver
ImportError: cannot import name ‘Beaglebone_Black_Driver’ from ‘Adafruit_DHT’ (/usr/local/lib/python3.7/dist-packages/Adafruit_DHT/__init__.py)
I keep getting this error and am pulling my hair out!!!!! Please help!!!
Traceback (most recent call last):
File “/home/pi/humidity.py”, line 7, in
humidity, temperature = Adafruit_DHT.read_retry(DHT_SENSOR, DHT_PIN)
File “/usr/local/lib/python3.7/dist-packages/Adafruit_DHT/common.py”, line 94, in read_retry
humidity, temperature = read(sensor, pin, platform)
File “/usr/local/lib/python3.7/dist-packages/Adafruit_DHT/common.py”, line 80, in read
platform = get_platform()
File “/usr/local/lib/python3.7/dist-packages/Adafruit_DHT/common.py”, line 60, in get_platform
from . import Beaglebone_Black
File “/usr/local/lib/python3.7/dist-packages/Adafruit_DHT/Beaglebone_Black.py”, line 24, in
from . import Beaglebone_Black_Driver as driver
ImportError: cannot import name ‘Beaglebone_Black_Driver’ from ‘Adafruit_DHT’ (/usr/local/lib/python3.7/dist-packages/Adafruit_DHT/__init__.py)
Having same problem. Nobody seems to be replying here!!!!
Hi Mike
I receive the same message as leezray above. I believe that this is due to both of us using Raspberrypi 4. Program common.py searches for the version of the Raspberry and Raspberry 4 is not an option. Any idea how we can resolve this?
Kind regards
Kurt
Hi Leezray / Bob, I was having the very same problem when using the module DHT22/AM2302 on Raspi 4. Then, I ordered and replaced the module by the unit DHT22 (sensor only), and all came out good. There are 2 possibilities: my previous module was faulty – or the code wont work in Raspi 4. Cheers, A
Ok this is the quick and dirty as to why. its a raspberry pi 4. in the common.py code it preforms a board check it comes back as 2 this is a beagelbone answer. the pi 4 gives the wrong answer.
so how to fix it. I just grabbed it by the throat and punched it in the face. I’m sure you can do better if you give a crap.
cd /usr/local/lib/python3.7/dist-packages/Adafruit_DHT
cp common.py common.py.bup
chmod 777 common.py
edit common.py
def get_platform():
from . import Raspberry_Pi_2
return Raspberry_Pi_2
*** Now get_platform() only returns that it is a raspberry pi 2. I only want it to work with a raspberry pi so this works. The code will now run. Fixed for sufficiently small values of fixed.
hope this helps.
0.5
Code works on my Pi3 B+ however, I don’t get live info. Instead it pulls info once and then stays static even after changes in temp and humidity. How do I get the values to change as the loop continues?
i also get the same problem. tjhat anyone know how to solve it?
hello i use raspberry pi and i did all this work that mike said but still i cant fix the problem? is it compatable with raspberry pi 4 b