Blog
Arduino Ultrasonic Sensor Tutorial

The ultrasonic sensor is one of the most common sensors used in Arduino projects. It’s one of those must have sensors for many projects that require inputs for navigation. For example, an Arduino RC car or other robot will likely need an ultrasonic sensor to measure how close it is to a wall or other obstacle. In this Arduino ultrasonic sensor tutorial we’ll cover the basics of how to use the HC-SR04 ultrasonic sensor with an Arduino. And then, we’re going to ramp it up by connecting an LCD display to create a digital ruler!
How Ultrasonic Sensors Work
Ultrasonic sensors work just like many other devices you might be familiar with. The ultrasound device used to show your unborn child uses this very same technology. But the concept has been around since long before technology hit the scene. Animals such as bats have evolved this ability! The sensor works by emitting an ultrasound at 40,000 Hz from the transmitter cone. This sound is outside that of human hearing which is why you don’t hear anything. When the sound makes contact with an object it will bounce back towards the sensor and is captured by the receiver cone.
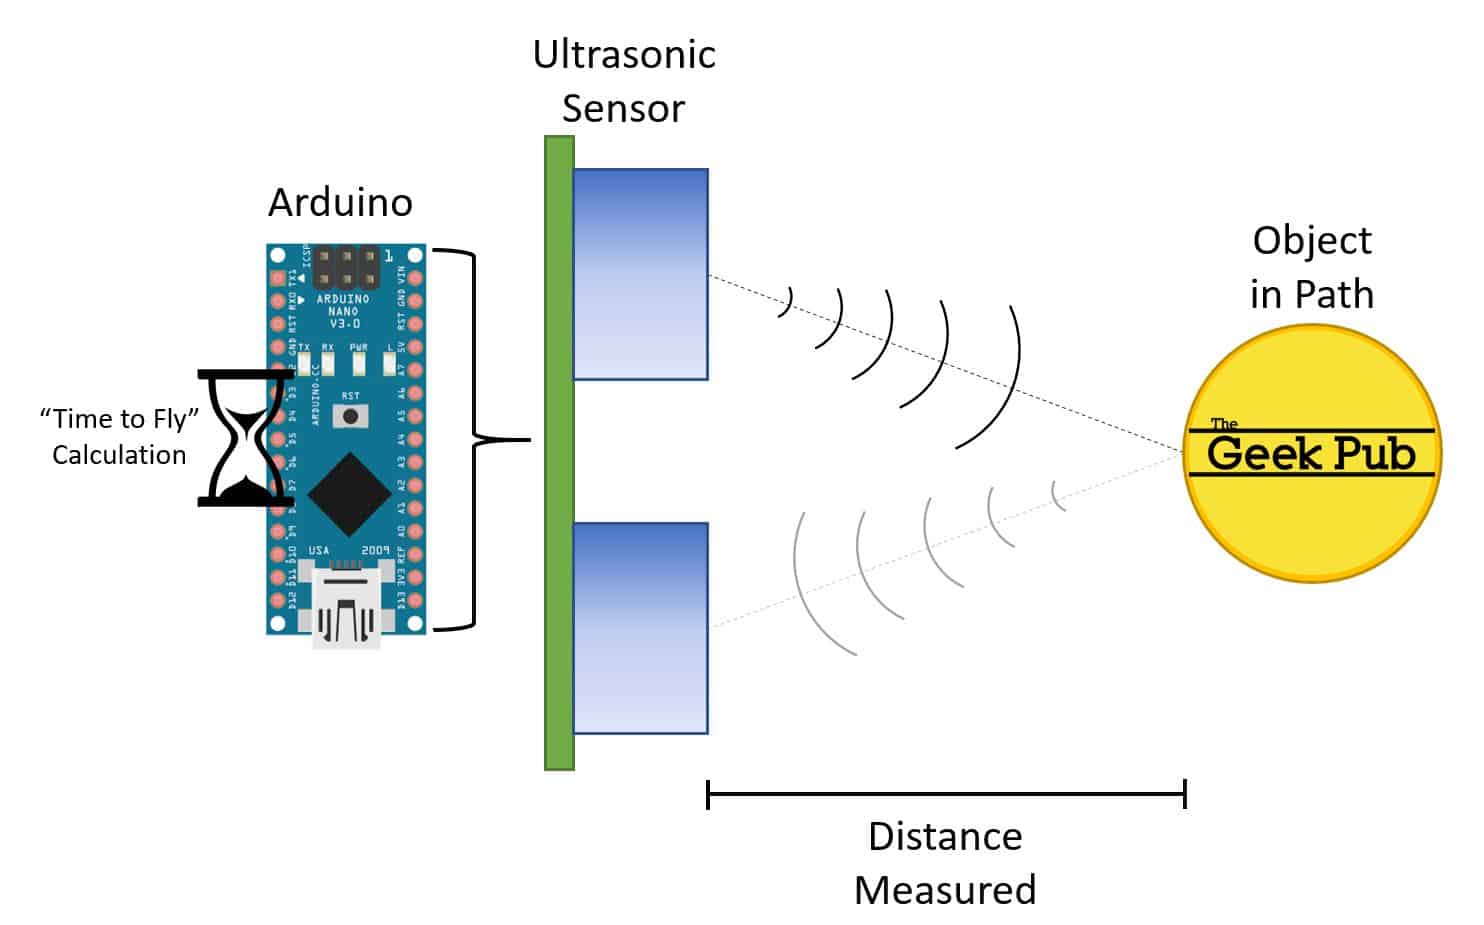 Since we know the speed of sound, its an easy calculation to determine the distance between the sensor and the object in its path. The speed of sound is 767 miles per hour (or 343 meters per second). We need to account for the travel time twice, due to the sound traveling from the sensor to the object, and then back again. The calculation is simple (in centimeters): Distance= Duration in Microseconds X (0.034/2). This is what we call the “Time to Fly calculation”.
Parts List for This Project
We’ve put together a simple parts list for this project to help you get started:
- Arduino Uno or Arduino Mega 2560
- Ultrasonic Sensor (HC-SR04)
- LCD Character Display (optional)
- 10K Potentiometer
- Project Breadboard and Breadboard Wires
About the HC-SR04 Ultrasonic Module
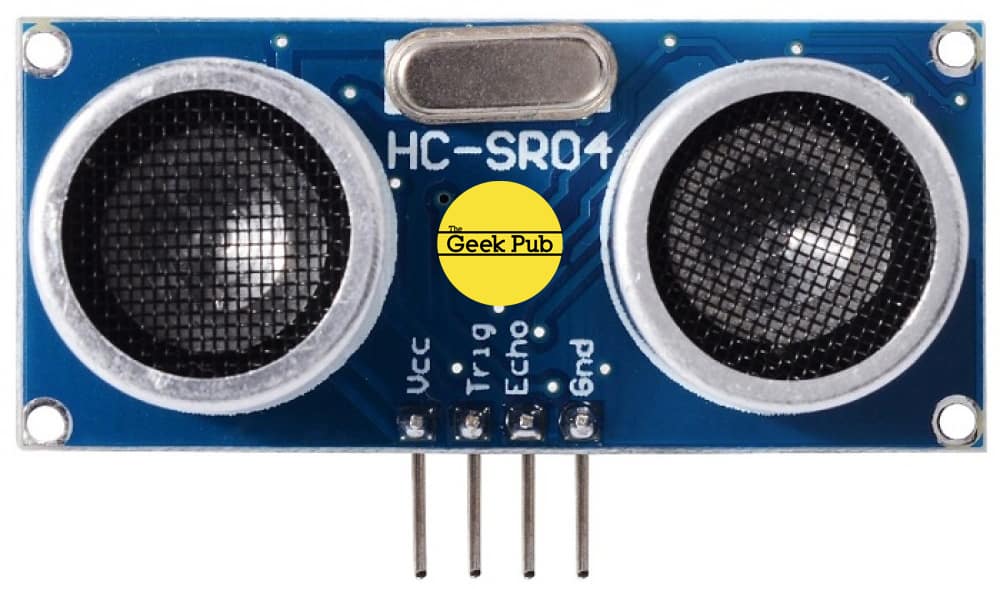
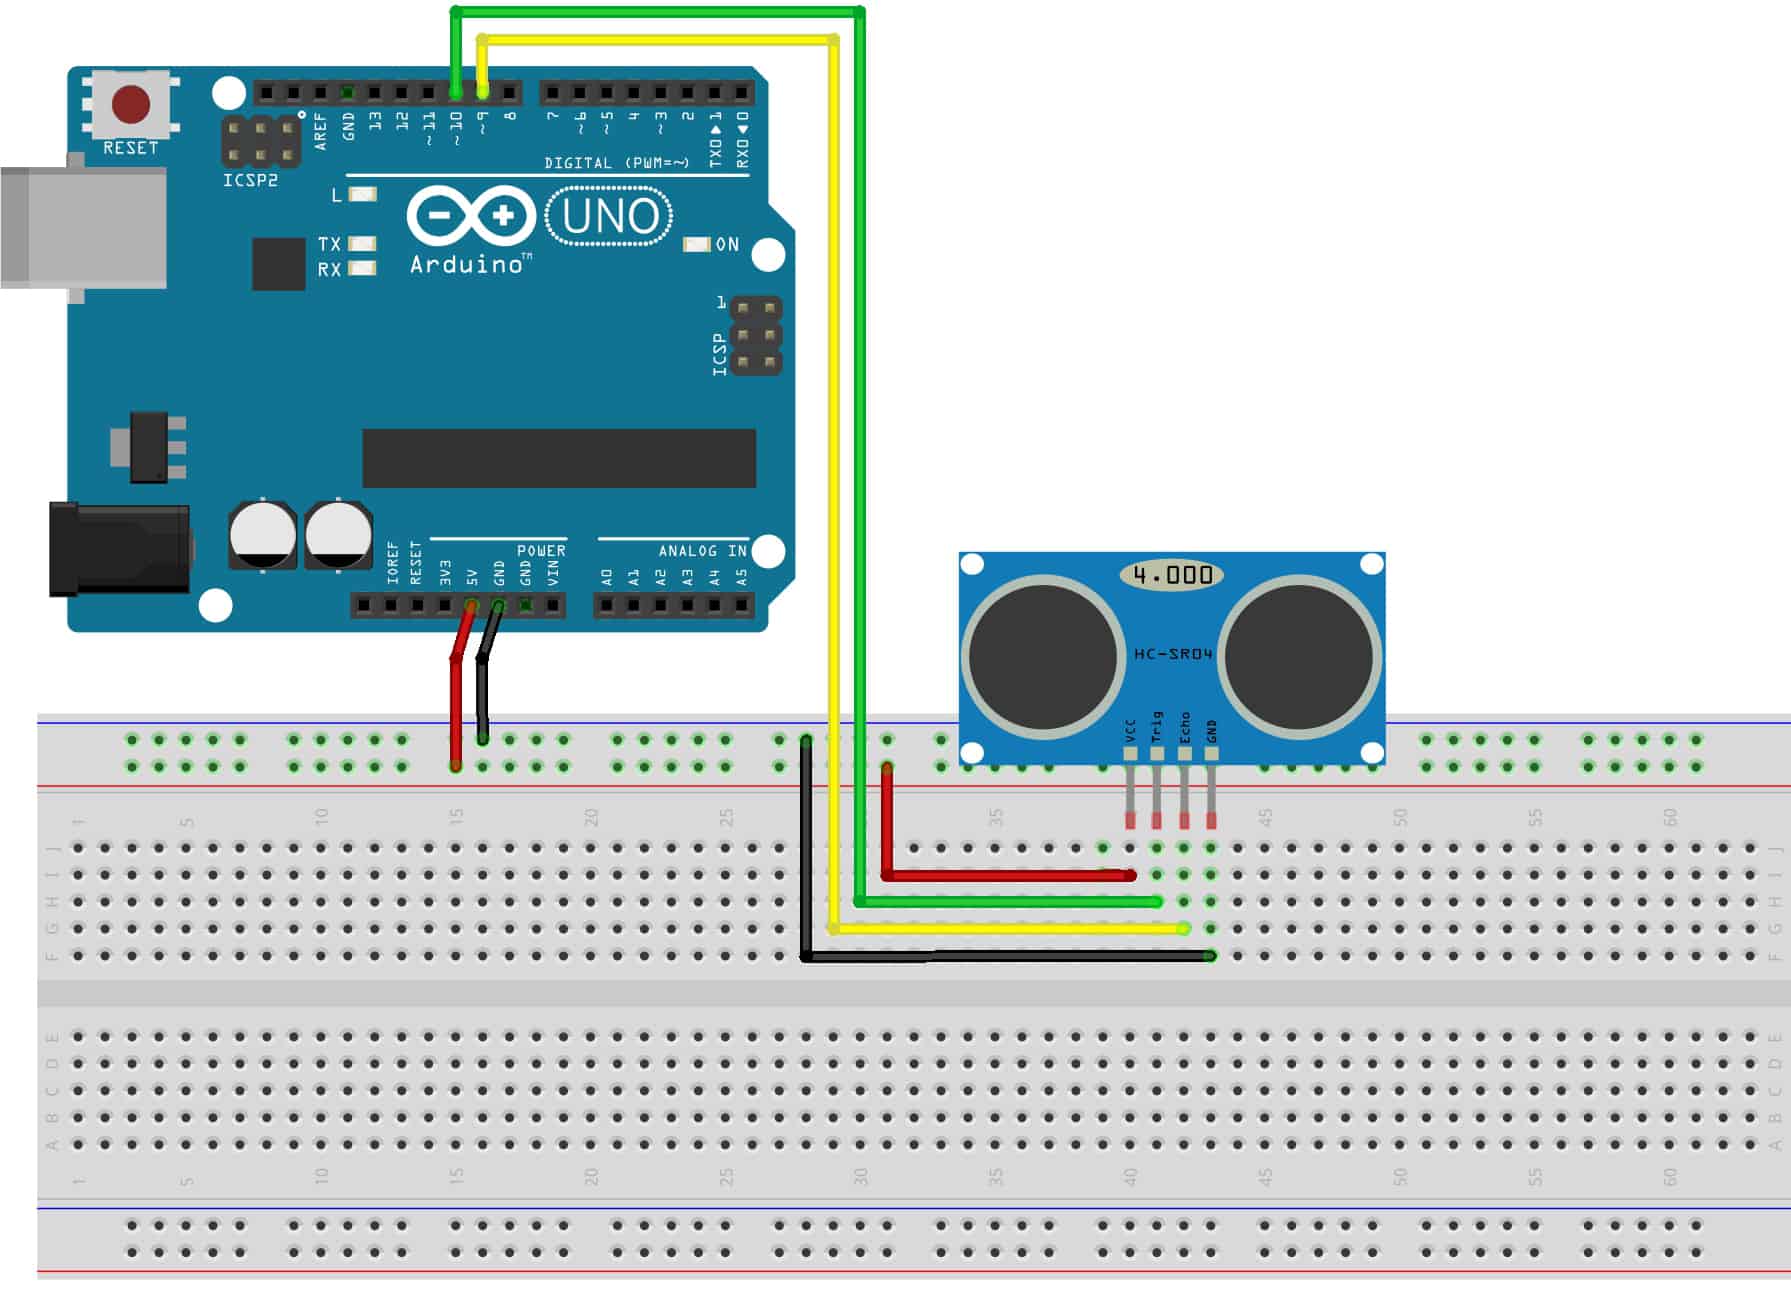
As we move forward with our Arduino ultrasonic sensor tutorial let’s briefly discuss the HC-SR04 module that we’ll be using in this tutorial. The module has 4 pins, VCC, Trigger, Echo, and Ground.
Wiring the HC-SR04 Ultrasonic Module to the Arduino
Wiring the HC-SR04 module to the Arduino is as follows. For Trig and Echo any Digital I/O pin will do. We picked 9 and 10. If you use different pins, just reflect that in the programming section.
- HC-SR04 Vcc to Arduino +5V
- HC-SR04 GND to Arduino GND
- HC-SR04 Trig to Arduino PIN 10
- HC-SR04 Echo to Arduino PIN 09
Generating the ultrasound is as simple as setting PIN 10 to HIGH. We do this for 10 µs (microseconds). During this 10 µs the transmitter will cycle 8 bursts. On PIN 9 we will read the echo pin which will give us the time that it took the sound wave to travel to the object and return.
Now, we need to move over to the software side and enter this simple program into the Arduino IDE.
First we need to define the Trigger and Echo pins. We put these on pins 9 and 10. Although as mentioned before, you could place them on any of the Digital I/O pins.
[code language=”cpp”]
const int echoPin = 9;
const int triggerPin = 10;
[/code]
Next we create Long type variable, named “timetofly” to store the travel time from the sensor and an integer variable for the distance after we do our time to fly calculation.
[code language=”cpp”]
long timetofly;
int distance;
[/code]
In the setup function we connect the pins using the constants we defined earlier, setting the trigger pin as an output and the echo pin as an input. We also begin the serial console so that we can send the output to the serial monitor.
[code language=”cpp”]
void setup() {
pinMode(triggerPin, OUTPUT); // Sets trigger to Output
pinMode(echoPin, INPUT); // Set echo to Input
Serial.begin(9600); // Starts the serial communication
}
[/code]
In our loop we pulse the trigger for 10 µs to create a burst of sound at 40Khz.
[code language=”cpp”]
digitalWrite(triggerPin, HIGH);
delayMicroseconds(10);
digitalWrite(triggerPin, LOW);
[/code]
Then we read the Echo pin, do the time to fly calculation and print the output onto the screen
[code language=”cpp”] 
timetofly= pulseIn(echoPin, HIGH);</pre>
distance= timetofly*0.034/2;
Serial.print("Distance: ");
Serial.println(distance);
[/code]
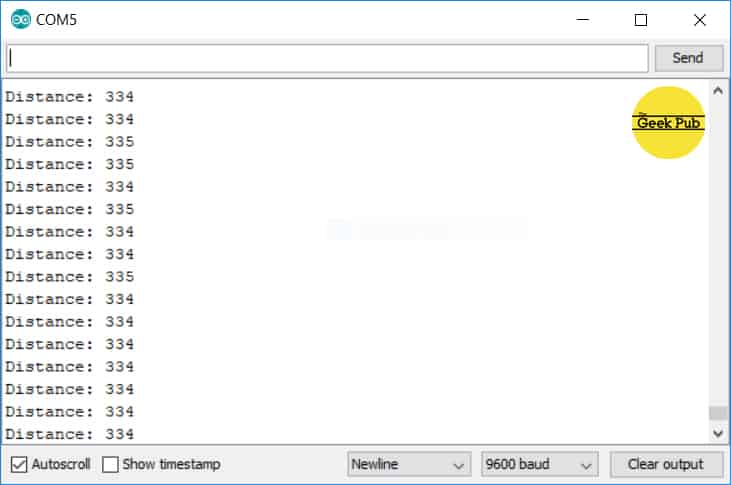
After you upload the program to your Arduino, open the serial monitor and you’ll be able to see the output in centimeters on your screen scroll by. You’ll be amazed at just how accurate this is.
The Complete Source Code
If you put all of those together, we wind up with this complete arduino ultrasonic sensor tutorial source code.
[code language=”cpp”]
// Arduino Ultrasonic Sensor Tutorial
// ©2019 The Geek Pub. Freely distributable with attribution
// Defines the sensor pins
const int echoPin = 9;
const int triggerPin = 10;
// defines variables
long timetofly;
int distance;
void setup() {
pinMode(triggerPin, OUTPUT); // Sets trigger to Output
pinMode(echoPin, INPUT); // Set echo to Input
Serial.begin(9600); // Starts the serial communication
}
void loop() {
// Clears the triggerPin
digitalWrite(triggerPin, LOW);
delayMicroseconds(2);
// Sets the triggerPin on HIGH state for 10 micro seconds
digitalWrite(triggerPin, HIGH);
delayMicroseconds(10);
digitalWrite(triggerPin, LOW);
// Reads the echoPin, returns the travel time in microseconds
timetofly= pulseIn(echoPin, HIGH);
// Calculating the distance (Time to Fly Calculation)
distance= timetofly*0.034/2;
// Prints the distance on the Serial Monitor in CM
Serial.print("Distance: ");
Serial.println(distance);
}
[/code]
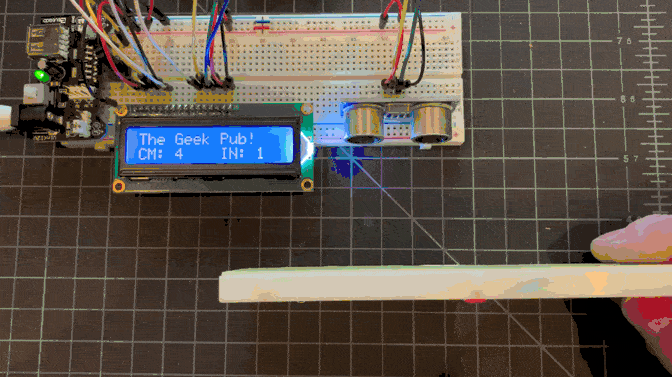
Adding an LCD Character Display
Now it’s time to ramp this project up and make it cool. Therefore, this part of the Arduino ultrasonic sensor tutorial completely optional, but we think you’ll love it. Add display somehow adds a bit of realism to what’s happening. It gives something to show others the real life application of a project like this. In my code we’re basically rounding to the closest centimeter or inch (because we’re using an integer variable), but you could expand on this to get it super accurate by using a long and then rounding out to whatever increment you like.

The first thing you need to do is wire the display. If you need some help we have an Arduino LCD character display tutorial. The pins used in that tutorial are the same exact pins used in this tutorial.
Wiring Up the Display
Follow this simple wiring diagram to wire your display. If you’re powering your LCD from a breadboard adapter be sure to share a common ground with the Arduino or you’ll likely only get garbage characters on your display.

Source Code
The source code for adding an LCD character display to our project is super simple. We’ve just added a few lines to configure the display and print to it. Additionally, we’ve removed the serial console code though that is totally optional if you’d like to keep it in your sketch.
[code language=”cpp”]
// include the library code for the LCD and initialize it
#include <LiquidCrystal.h>
LiquidCrystal lcd(12, 11, 5, 4, 3, 2);
// defines pins numbers
const int trigPin = 9;
const int echoPin = 10;
// defines variables
long duration;
int distanceCM;
int distanceIN;
void setup() {
pinMode(trigPin, OUTPUT); // Sets the trigPin as an Output
pinMode(echoPin, INPUT); // Sets the echoPin as an Input
lcd.begin(16, 2); // set up the LCD’s number of columns and rows:
lcd.setCursor(0,0); // set the cursor to home
lcd.print("The Geek Pub!"); // write our name
}
void loop() {
// Clears the trigPin
digitalWrite(trigPin, LOW);
delayMicroseconds(2);
// Sets the trigPin on HIGH state for 10 micro seconds
digitalWrite(trigPin, HIGH);
delayMicroseconds(10);
digitalWrite(trigPin, LOW);
// Reads the echoPin, returns the sound wave travel time in microseconds
duration = pulseIn(echoPin, HIGH);
// Calculating the distance
distanceCM = duration*0.034/2;
distanceIN = duration*0.0133/2;
// Prints the distance on the Serial Monitor
lcd.setCursor(0, 1);
lcd.print("CM: ");
lcd.print(distanceCM);
lcd.print(" ");
lcd.setCursor(9, 1);
lcd.print("IN: ");
lcd.print(distanceIN);
lcd.print(" ");
delay(300);
}
[/code]
Once you’ve compiled and uploaded this sketch to your Arduino, you should see the following in action. Move an object closer or farther away from your HC-SR04 ultrasonic sensor and you’ll see the centimeters and inches incremented and decremented (rounded to the closest full unit).
HC-SR04 Ultrasonic Sensor Accuracy
One note to round out or HC-SR04 ultrasonic sensor tutorial. There are several things that will effect the accuracy of your sensor. Let’s walk through them quickly.
Temperature and Humidity
The rate at which sound travels through air is affected by the relative temperature and humidity. Sound travels at about 0.35% faster in 100% humidity than it does in 0% humidity. If you’re looking for really accurate measurements you’ll want to incorporate a DHT11 temperature/humidity sensor into your project. You can make a small calculation based on the current humidity and adjust your output number.
Quality of the Sensor
I have four of these sensors in my parts bins. One of them is terrible. So terrible I actually just tossed in the rubbish bin as I typed this up. It might as well just give me random numbers. Because that’s how (un)accurate it is. In other words, I’ve discovered over the years that buying a high quality HC-SR04 is far better than a cheap one. I’d recommend avoiding stuff from no-name brands and Aliexpress.
RELATED: Comprehensive List of Arduino Sensors
If you have any questions or run into any problems, be sure to leave a comment below and we’ll do our best to help you out!
[amazon_link asins=’B004U8TOE6,B01EWOE0UU,B019D9TYMI’ template=’ProductGrid’ store=’murraynet-20′ marketplace=’US’ link_id=’f69c0ad3-2ed9-41ab-9f5e-c34edf037831′]


4.5
Could ultrasound sensors be used to detect flies? I want to make a device that hunts and automatically swats flies!
Unfortunately I think a fly would be too small. Unless it was the size of a cat or something. 😉
Any idea why the HC-SR04 measures only about 13 centimeters? It seems like being able to measure distances when the object is closer than that, but I don’t think it’s reliable even in those ranges. I guess I am receiving gibberish data from it.
Dragos, it heavily depends on the quality of the sensor. I have one you that’s incredibly accurate, and have another one that might as well just send me random numbers. The more accurate one I paid significantly more from on Adafruit.
Same here! These ultrasonic sensors vary wildly in accuracy. I’d recommend buying a trusted brand. Skip Aliexpress for sure.