Blog
Arduino LCD Display Wiring
One of the first projects many people like to do with an Arduino is wiring up an LCD display and programming it. This is because LCD screens have so many applications in the real world. You can display information to the user, error and diagnostic codes, and even fun little animations. Creating a game on the LCD also a fun little project. Whether you’re just learning about the Arduino for educational reasons or have a real world project you’d like to accomplish, getting Arduino LCD display wiring and programming under your belt is a great thing to do!
Arduino LCD Display Wiring Basics
Getting the Arduino LCD display wiring project together relies on just a few simple parts. You’ll of course need an Arduino and the LCD display. You’ll also need a breadboard, some breadboard wires, and 10K potentiometer (pretty close will do in a pinch). The potentiometer is there to adjust the contrast of the screen, so you can’t skip it (though if you knew the exact contrast you wanted you could use a specific fixed resistor, making the contrast static rather than adjustable).
Arduino LCD Project Parts List
If you’re just getting started or just want a simple list of parts, we’ve provided a simple shopping list for you. Some of these may be affiliate links. If you use them it costs you nothing. We may get a small commission that helps us keep making awesome content like this!
| QTY | PART/LINK | ||
|---|---|---|---|
| 1X | [icon name=”microchip” prefix=”fas”] | Arduino Uno | [icon name=”cart-plus” prefix=”fas”] |
| 1X | [icon name=”usb” prefix=”fab”] | USB Type B Cable | [icon name=”cart-plus” prefix=”fas”] |
| 1X | [icon name=”th” prefix=”fas”] | Solderless Breadboard | [icon name=”cart-plus” prefix=”fas”] |
| 1X | [icon name=”grip-lines” prefix=”fas”] | Jumper Wire Kit | [icon name=”cart-plus” prefix=”fas”] |
| 1X | [icon name=”ellipsis-h” prefix=”fas”] | Potentiometer Kit | [icon name=”cart-plus” prefix=”fas”] |
| 1X | [icon name=”tv” prefix=”fas”] | 16×2 LCD Character Display | [icon name=”cart-plus” prefix=”fas”] |
Note that most LCD character displays do not come with the pins soldered on. You can get them about $4 cheaper if you don’t mind soldering. The LCD display linked above is from Adafruit and comes with pre-soldered pins.
Wiring the Arduino to the LCD Display
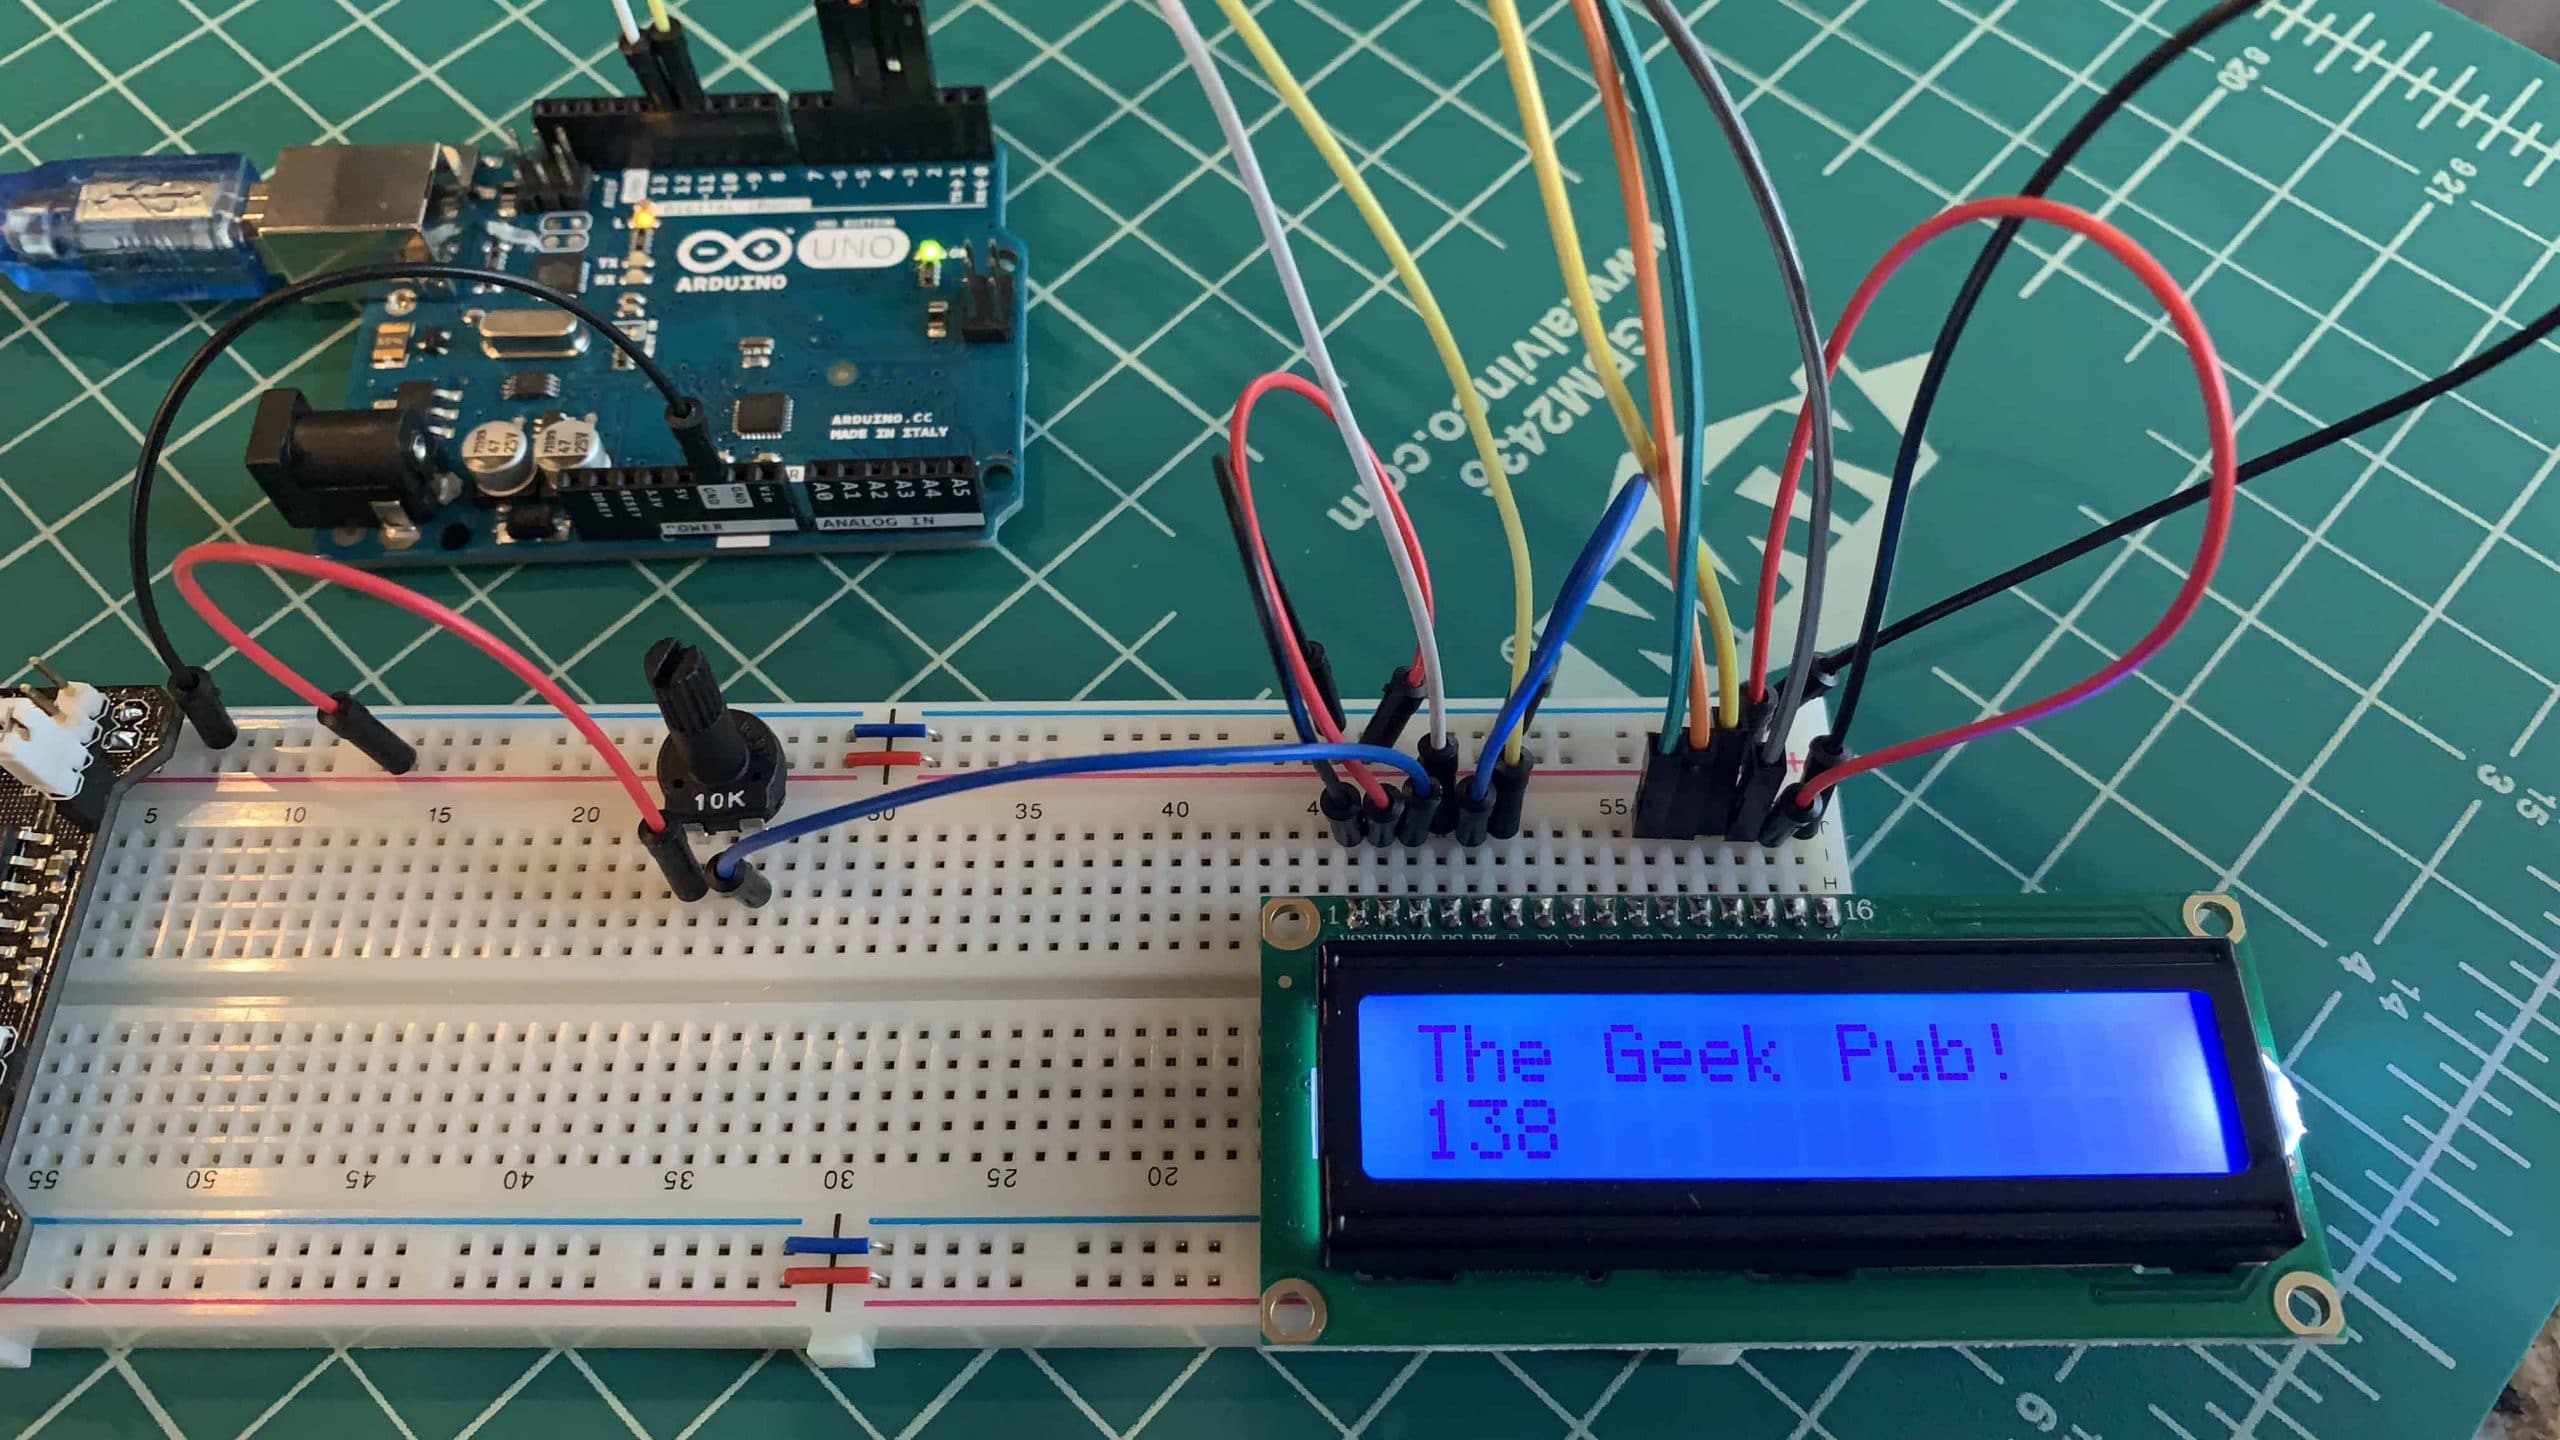
The first step in getting the LCD character display working is to wire it up to the Arduino. This is a pretty simple wiring job, so it shouldn’t be too difficult even if its one of your first projects.
The LCD wiring might seem a little confusing at first. You’ll see three of its pins go to ground and two get +5V power. This is because the LCD, backlight, and LCD contrast can be controlled separately for more advanced projects. Other than contrast, we’ll just direct wire everything else.
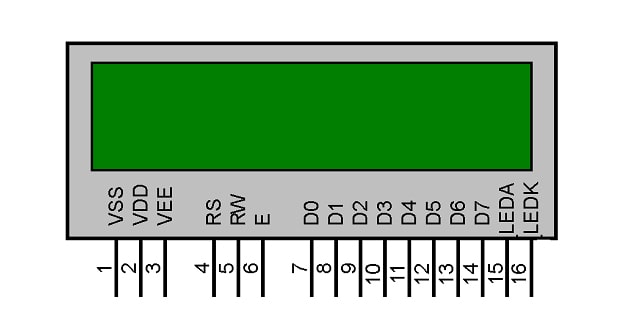
16×2 LCD Character Display Pinout
To make things a little simpler to understand, you can reference the following pinout for a standard 16×2 LCD character display.
 Arduino LCD Wiring Diagram
Thanks to the magic of Fritzing, one of my favorite tools for drawing wiring diagrams, you can see my wiring schematic.

Component Pinouts in Detail
If you happen to be better reading that looking at diagrams, let’s go over the pinouts in detail.
The LCD Wiring:
- LCD PIN 1 to Breadboard GND
- LCD PIN 2 to Breadboard +5V
- LCD PIN 3 to Potentiometer VOUT
- LCD PIN 4 to Arduino PIN 12
- LCD PIN 5 to Breadboard GND
- LCD PIN 6 to Arduino PIN 11
- LCD PIN 7-10 no connection
- LCD PIN 11 to Arduino PIN 5
- LCD PIN 12 to Arduino PIN 4
- LCD PIN 13 to Arduino PIN 3
- LCD PIN 14 to Arduino PIN 2
- LCD PIN 15 to Breadboard +5V
- LCD PIN 16 to Breadboard GND
Potentiometer Wiring:
- Potentiometer PIN VOUT to LCD PIN 3
- Potentiometer +5V to Breadboard +5V
- Potentiometer GND to Breadboard GND
Other Wiring:
- Arduino GND to Breadboard GND
- Arduino +5V to Breadboard +5V
Programming the Arduino for LCD Displays
The great news is that the Arduino IDE already includes an LCD character display control library built-in to use in your Sketches! So much of the work of programming a display is already done for you. In fact, the Arduino IDE includes some sample Sketches to play around with such as the following “Hello World!”, but we’ll change it to display The Geek Pub instead!
[code language="cpp"]
// include the library code:
#include <LiquidCrystal.h>
//initialise the library with the numbers of the interface pins
LiquidCrystal lcd(12, 11, 5, 4, 3, 2);

void setup() {
// set up the LCD's number of columns and rows:
lcd.begin(16, 2);

// Print a message to the LCD.
lcd.print("The Geek Pub!");
}

void loop() {
// set the cursor to column 0, line 1
lcd.setCursor(0, 1);

// print the number of seconds since reset:
lcd.print(millis() / 1000);
}
[/code]
Understanding the Hello World Programming
We hope by now, you’ve decided understanding the Arduino LCD display wiring isn’t difficult, and your ready to learn the programming steps in a little more detail.
Let’s break down the sections of the Hello World (or in our case The Geek Pub!) sketch and add a little context to them!
The following line sets up our new display as an object and declares the pins we are using on the Arduino to control it. You could of course create constants and name them as we’ve done in other Sketch examples should you like more meaningful code.
[code language="cpp"]
LiquidCrystal lcd(12, 11, 5, 4, 3, 2);
[/code]
The next bit of code defines the shape and size of our LCD character display. This is important so that the LiquidCrystal.h library knows how to write to your screen. In my case, the display is a 16 column and 2 row display (also called a 16×2) for a total of 32 characters. Be sure to change this line to match your display.
[code language="cpp"]
lcd.begin(16, 2);
[/code]
The next line of code simply prints a string to the display. In my case “The Geek Pub!”
[code language="cpp"]
lcd.print("The Geek Pub!");
[/code]
The last bit of code that occupies the loop function is designed to simply count forever once The Geek Pub! has been printed to the screen. lcd.SetCursor(0,1); moves the cursor to character 0, line 1. The second line lcd.print(millis() / 1000); prints the number of seconds since the code started executing (millis() returns milliseconds, so we divide that by 1000 to get seconds).
[code language="cpp"]
lcd.setCursor(0, 1);
lcd.print(millis() / 1000);
[/code]
Arduino LCD Programming Basics
Now that you know the basics of the Hello World sketch, I am going to show you a few more basic functions you can use in your Sketch’s to make the display a little more useful.
Auto-scroll
Auto-scroll shifts text right and left.
- autoscroll(); – Moves the text one space to the left whenever a new character is added.
- noAutoscroll(); – Turns auto scrolling completely off.
Blink
Blink turns on and off the blinking of the cursor’s block.
- noBlink(); – Turns off the blinking block.
- blink(); – Turns on the blinking block.
Cursor
Cursor allows you to turn on/off the cursor underscore.
- noCursor(); – Turns off the cursor’s underscore.
- Cursor(); – Turns on the cursor’s underscore.
Display
Makes the display go blank, but keeps all data intact.
- noDisplay(); – Blanks the display.
- display(); – Restores the display.
Scroll
Automatically scroll the text both left and right.
- scrollDisplayLeft(); – Will scroll one character position left.
- scrollDisplayRight(); – Will scroll one character position right.
Serial Display
Displays text sent to the serial port on the LCD character display connected to the Arduino.
- write(Serial.read());
Set Cursor
Moves the cursor to a specific character position: column, row. These examples are based on 16×2 display.
- setCursor(0, 0); – Moves the cursor to be at the top left (first column, first row)
- setCursor(15, 1); – Moves the cursor to be at the bottom right (last column, last row)
Text Direction
Changes/sets the direction character text will be displayed.
- rightToLeft(); – Text to flows from the left of the cursor.
- leftToRight(); – Text to flows from the right of the cursor.
RELATED PROJECT: Arduino Train Crossing Project
Arduino LCD Display Wiring and Programming is Easy
I hope you’ve enjoyed this project! Please leave a comment below with the results of your project! I hope that understanding Arduino LCD display wiring and programming has been easy for you to follow!
Let me know if we can make something clearer or easier. See you in the next project!
Next Steps
You can now go on to the next tutorial or go back to the list of Arduino tutorials.


4.5