Blog
How to Build a Raspberry Pi Weather Station
How’s the weather? With this DIY project, you’ll always have a very precise answer. Sure, you could check websites or smartphone apps, but why pass up the chance to build a
This is a simple project, but you will need more than just a
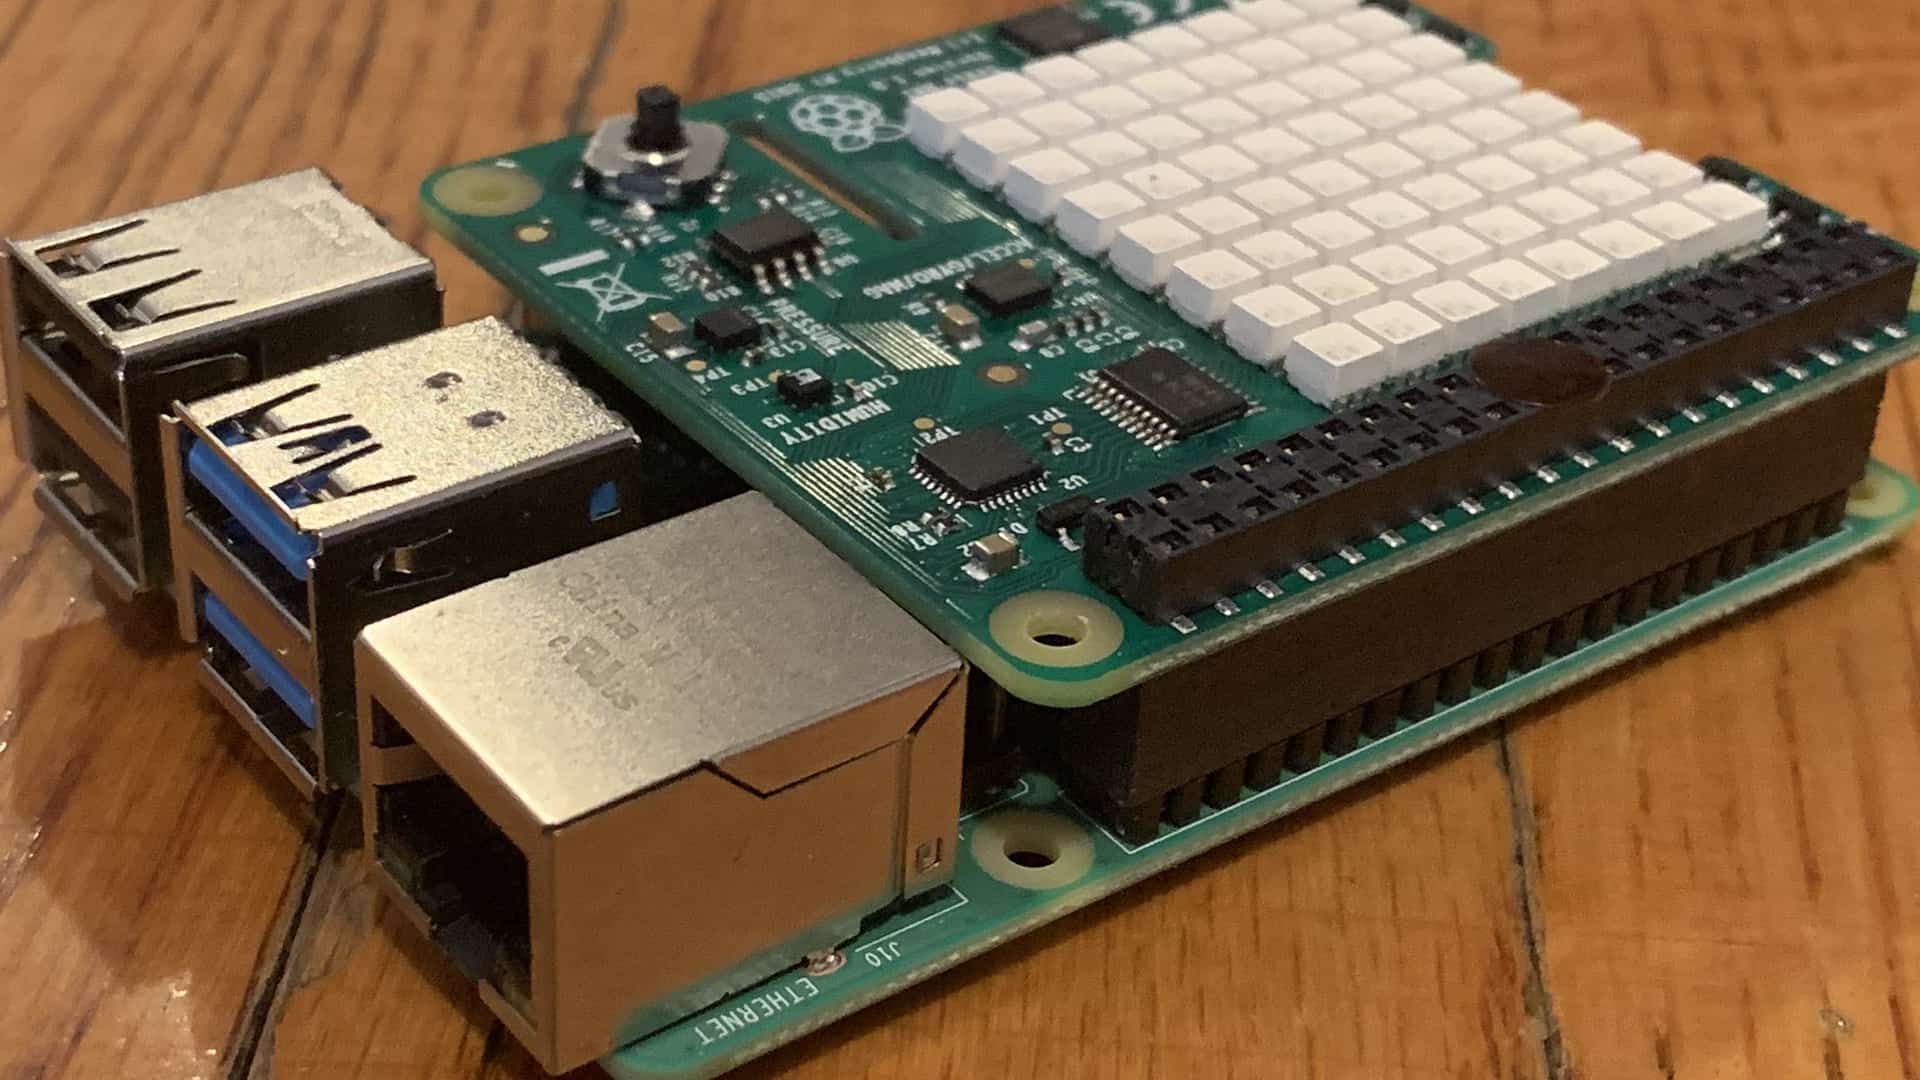
The Sense HAT is a
With the Sense HAT, we can sense the temperature and humidity. We can call that information up on our monitor with a script, and we can even display it on the Sense HAT’s LED grid. If we’re really feeling adventurous, we could even connect our
Below, we’ll show you how to do all three. First, though, here’s what you’ll need for this project:
- Raspberry Pi with 40 GPIO pins (RPi 3, RPi 4) running Raspbian
- Raspberry Pi power supply
- Compatible HDMI cable (and a monitor or TV to connect it to)
- microSD card with Raspbian disk image installed
- sense HAT
If you’ve got all that, you’re ready to get started! Let’s dive in.
Building a Raspberry Pi weather station in Python
There are a few ways to display the weather information we want, but all of them start with using the Sense HAT to get the measurements in the first place. Our first serving of step-by-step instructions focuses on setting up the Sense HAT, sensing the information, and checking our work by displaying everything to our terminal in Raspbian.
Step 1: Attach your Sense HAT to your Raspberry Pi
The Sense HAT uses the
If you have a GPIO breakout kit, you might want to use that to keep your Sense HAT a little further away from your
With everything attached properly, you can turn your
Step 2: Let’s get some updates
Experienced Raspbery Pi DIYers know that running an update check is a smart way to start just about any project. Let’s do that. Open Terminal in Raspbian and enter this command:
sudo apt-get update
sudo apt-get upgrade
Once you’re up to date, double-check that you have the Sense HAT package:
sudo apt-get install sense-hat
Raspbian comes with the Sense HAT package already on board, but it never hurts to double-check.
Step 3: Write a script that sense temperature and humidity with your Sense HAT

Using terminal, open a new file with a text editor. We recommend using nano, a great text editor that’s built into Raspbian. You can do this by entering a command like this into the Terminal:
nano weatherstation.py
This tells nano to open the file (or create it, if it’s new) and that we’re working on a Python script.
Here’s what our script is going to look like. (There are a couple of ways to make this script neater, which we’ll discuss in just a moment.)
from sense_hat import SenseHat
sense = SenseHat()
sense.clear()
temp = sense.get_temperature()
cTemp = round(temp, 1)
fTemp = round(temp * 1.8 + 32, 1)
print("It is {} degrees Celsius".format(cTemp))
print("It is {} degrees Fahrenheit".format(fTemp))
humidity = round(sense.get_humidity(), 1)
print("The relative humidity is {}%".format(humidity))
Exit nano and save your progress by hitting Ctrl+X, then Y, and then Enter.
Now you can run your script by typing this into the Terminal:
sudo python weatherstation.py
You should see something like this:
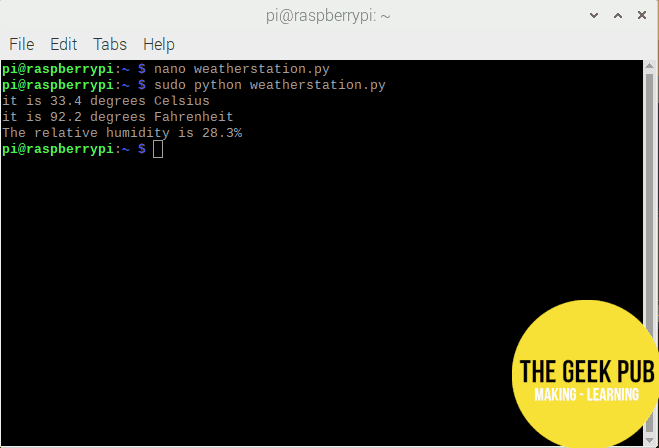
Why so warm? Our
Very cool! But that doesn’t totally explain how we got here, so let’s take a quick step back.
Step 4: Breaking down our code
Here’s a line-by-line breakdown of our code — along with some tips for making it better.
from sense_hat import SenseHAT
Here, we’re importing the Sense HAT library so that our Python interpreter knows what to do with certain commands when we run our program. Python can do a lot of stuff right out of the box, but it can do even more when we add “libraries,” which are chunks of extra commands and functionality. It wouldn’t really make sense for a bunch of Sense HAT-specific commands to be in Python by default, so it’s no surprise that we find these in a library.
sense = SenseHat()
Python fans will recognize this as “object instantiation.” We’re taking a class of commands — the SenseHat() class — and naming them with a variable. Now we’ll be able to call commands from this class by appending “sense” and a dot operator (aka a period) before the command.
sense.clear()
…and that’s just what we do here. This calls the clear() command in the SenseHat() class, clearing whatever junk our Sense HAT was doing out of the way so that we can start sensin’ some temps.
temp = sense.get_temperature()
Here, we declare our first variable: temp, which we identify as the temperature the Sense HAT senses.
cTemp = round(temp, 1)
The variable tempC will be our temperature in Celsius. The Sense HAT measures the temperature in Celsius by default, but the number it stores is full of decimal points. Let’s simplify things by using the round() command and specifying the number of decimal places we want as 1.
fTemp = round(temp * 1.8 + 32, 1)
Now for Fahrenheit. Since our initial measurement is in Celsius, we have to use a conversion formula.
print("It is {} degrees Celsius".format(cTemp))
We could assume that everything has gone well so far, but there’s no use in sensing the temperature if we don’t get to see the results. Here, we print the temperature to our Terminal screen. We’ve use the format() command to stick our number into the middle of our text, all pretty-like.
print("It is {} degrees Fahrenheit".format(fTemp))
Same thing here.
humidity = round(sense.get_humidity(), 1)
We’re all set on temperature, but what about humidity? Here, we set a variable named humidity. We use sense.get_humidity() to find our figure, and then we place that within the round() command and specify that we want 1 decimal place.
With this line, we’ve revealed something inefficient about our code. Since we can sense things and round them in the same line of code, we never actually needed to define the variable temp. We could simply delete the line defining temp and redefine cTemp and fTemp as round(sense.get_temperature(), 1) and round(sense.get_temperature() * 1.8 + 32, 1) respectively. And, in fact, that’s just what you should do — if you want to be abiding by best coding practices, anyway.
print("The relative humidity is {}%".format(humidity))
This line prints our humidity figure.
Printing weather information to the Sense HAT LED array
The Sense HAT has more than just sensors. It also has a cool grid of LEDs that we can program to display information. Let’s make our weather station work without a monitor!
Step 1: Our new code
You can edit your old code if you’d like, but we’re going to make a new file just to keep ourselves organized:
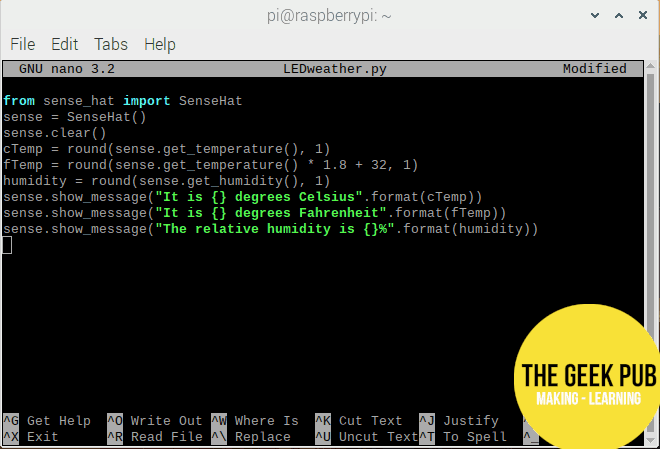
nano LEDweather.py
Here’s the code we’re using this time around:
from sense_hat import SenseHat
sense = SenseHat()
sense.clear()
cTemp = round(sense.get_temperature(), 1)
fTemp = round(sense.get_temperature() * 1.8 + 32, 1)
humidity = round(sense.get_humidity(), 1)
sense.show_message("It is {} degrees Celsius".format(cTemp))
sense.show_message("It is {} degrees Fahrenheit".format(fTemp))
sense.show_message("The relative humidity is {}%".format(humidity))
You can run this code using this command in Terminal:
sudo python LEDweather.py
You should see the weather information scroll gloriously across your Sense HAT’s LED screen.
Step 2: How does this work?
For the most part, this code works just like the last script we wrote. We’ve cleaned up our variables (we no longer define a variable temp, because we can use the sense.get_temperature() command in its place), but the only big change here is the addition of these lines:
sense.show_message("It is {} degrees Celsius".format(cTemp))
sense.show_message("It is {} degrees Fahrenheit".format(fTemp))
sense.show_message("The relative humidity is {}%".format(humidity))
You can probably figure out how these work. The command sense.show_message() prints messages to the Sense HAT’s LED screen. It works pretty much exactly like print() did in our last script.
Creating an online Raspberry Pi weather station
We’ve used our sense HAT to check the temperature and humidity, and we’ve been able to take in that information in two ways so far: within our Terminal window and via the sense HAT’s LED matrix. Let’s try a third way. Here’s how to get your weather information on the web.
Step 1: Another Python script
You don’t need to invest in a domain name and hosting to do this project. We can just host our own little site using a Flask, a web app framework in Python. Flask should already be on board thanks to Raspbian, but let’s double-check:
sudo apt-get install python3-flask
Once you’re sure you’re all set on that front, open a new Python file in nano:
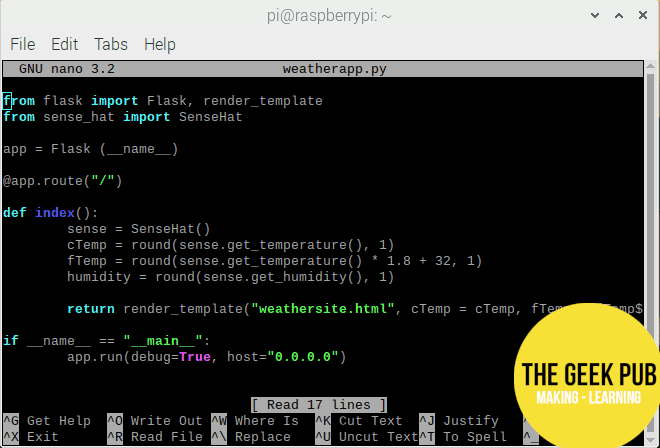
nano weatherapp.py
…and fill it up with some nice new code. Here’s what we’re entering in our new Python file:
from flask import Flask, render_template
from sense_hat import SenseHat
app = Flask(__name__)
@app.route("/")
def index():
sense = SenseHat()
cTemp = round(sense.get_temperature(), 1)
fTemp = round(sense.get_temperature() * 1.8 + 32, 1)
humidity = round(sense.get_humidity(), 1)
return render_template("weathersite.html", cTemp=cTemp, fTemp=fTemp, humidity=humidity)
if __name__ == "__main__":
app.run(debug=True, host="0.0.0.0")
Step 2: What did we just do?
Some parts of this code should be familiar. Once again, we import libraries, do a little object instantiation, and use our Sense HAT to define the variables cTemp, fTemp, and humidity. There are some new lines, too, however.
app = Flask(__name__)
At this point in our code, we’ve already imported Flask. Now, we’ll call a single instance of Flask. We use __name__ here because the name of our module may change depending on whether or not it’s the main program running — more on that in a moment.
@app.route("/")
This tells Flask which URL will trigger our function. We just need “/” here, but you could write things for “/home” or “/index” if you wanted to.
def index():
Now we’re defining our function.
After defining our variables, we close our our function with:
return render_template("weathersite.html", cTemp=cTemp, fTemp=fTemp, humidity=humidity)
Here’s a key part of our code. We’re choosing our template (weathersite.html, which we haven’t created yet) and we’re making sure that variables in our template have values coming from our function.
if __name__ == "__main__":
This is a Python staple that essentially determines if our Python script is running as the main program. When we run this script directly (by typing “sudo python weatherapp.py” into the Terminal, for example), our Python interpreter will set __name__ to be “__main__” — so this should be true, and our last line should execute.
app.run(debug=True, host='0.0.0.0')
This runs Flask and gets our little web-hosting operation going.
Step 3: Make a web page
You could run weatherapp.py now, but it wouldn’t do much for you. It uses the template weathersite.html, which doesn’t exist — yet.
Let’s make a templates directory:
mkdir templates
…and now let’s stick a new HTML file in it and open that bad boy up in nano.
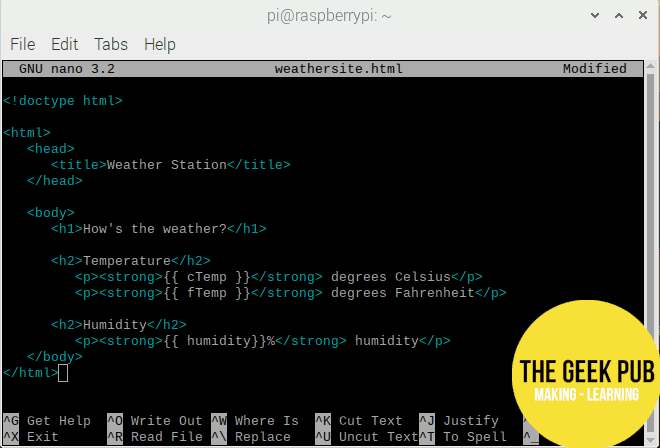
nano templates/weathersite.html
Now we have a new HTML document open. Here’s what we’ll type up in that document:
<!doctype html>

<html>
   <head>
      <title>Weather Station</title>
   </head>

   <body>
      <h1>How's the weather?</h1>

      <h2>Temperature</h2>
         <p><strong>{{ cTemp }}</strong> degrees Celsius</p>
         <p><strong>{{ fTemp }}</strong> degrees Fahrenheit</p>

      <h2>Humidity</h2>
         <p><strong>{{ humidity }}%</strong> relative humidity</p>
      </body>
</html>
Now, when we run our Python script, it should host this HTML page and provide the variables that we’ve mentioned in the HTML.
We won’t bother with the breakdown, since HTML is pretty easy to read. Just note the use of variables in {{ brackets }} — those are the same ones that we defined back in our weatherapp.py script and sent to the template with the ninth line of that script.
Step 4: Fire up your server and pay your site a visit
Our Python script and HTML template are both done. Let’s see how they are working! In Terminal on our
sudo python weatherapp.py
You’ll see something like this:
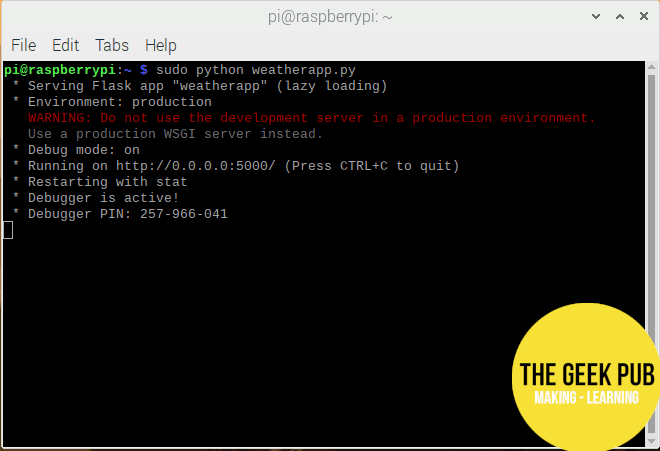
Open up your Pi’s web browser and navigate to the address indicated by the code above: 0.0.0.0:5000 (or 127.0.0.1:5000 — same thing).
You should see something like this:
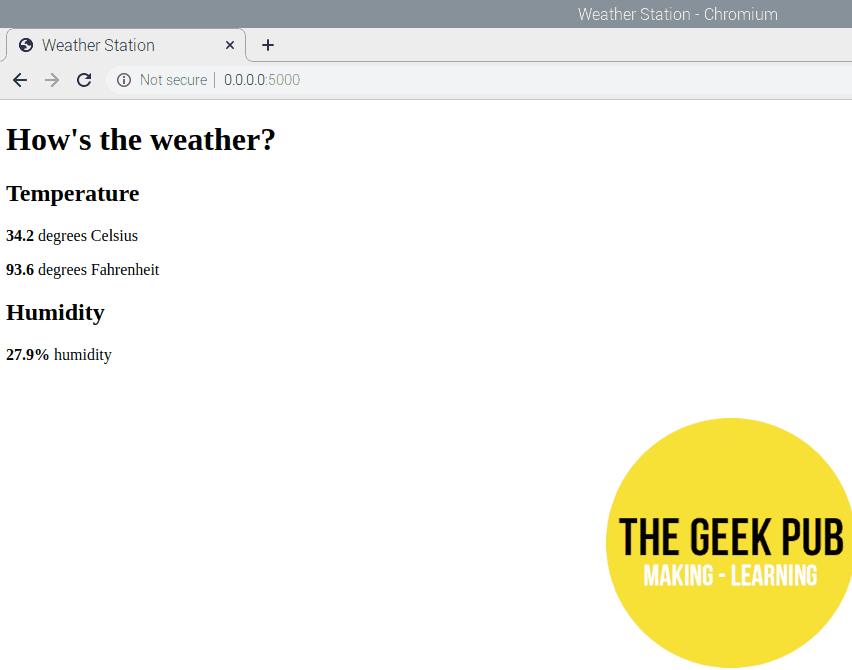
You can access this same screen from other devices on your network by using a web browser and navigating to your
Step 5: Set up port forwarding
If you want to be able to check your
Setting up port forwarding means accessing your router. Type in your router’s IP address (it should be printed on a sticker somewhere on the router) and log in with your administrator credentials (again, they should be on the sticker — unless you’ve changed them, which is a smart move). Your router may also let you mess with settings using an app or some other sort of access/login setup.
Find your router’s port forwarding options and set them up like this:
Service port: 80
Internal port: 5000
IP address: [set this to your Raspberry Pi’s IP address]
Protocol: TCP
Now your


4.5
Wow, really cool write up! You know you could do the same thing with pfense / OPNsense. Kidding aside, this really is pretty cool. Just getting into messing with Raspberry Pis myself.
LOL! That made my day. Thank you.
5