Blog
Combining Two Arduino Sketches

It’s often as a beginner that you will need to learn the art (and science) of combining two Arduino sketches (code) into a single sketch. Sketches are the name Arduino calls their code or program files.
It’s not as simple as copying and pasting one sketch into the other. This will fail to compile and give many errors. Mostly because you will wind up with multiple Setup() and Loop() functions. You’re only allowed one of each per sketch!
In addition you need to look out for other problems.
- Pin Assignments – If both sketches blink an LED and both LEDs are on the same digital output pin your code is not going to compile. Or if it does it definitely will not work!
- Variable and Constant Names – If both sketches use like named variables or constants things will break. And you can’t just remove the double instantiation (defining the variable), as the code will place the wrong data in those variables during execution.
- Function Names – All user defined function names will need to be unique. If both sketches have a function called “void blinker” then one of those functions will need to be renamed to something else, and all code that references will need to use the new function name.
The best way to start is by skimming both sets of code with your eyes and looking for duplicate names (other than setup and loop). If you identify a duplicate, do a find and replace on the entire sketch. Fix any duplicates before combining two Arduino sketches! The process will go much faster!
Sample Sketches
For the purposes of this tutorial, we’ve created two sample sketches to show how this process can be done simply. The first sketch blinks an LED. The second sketch also blinks an LED on the same pin, and writes “Blink!” to the console. We want a combined code that blinks both LEDs and writes “Blink!” to the console.
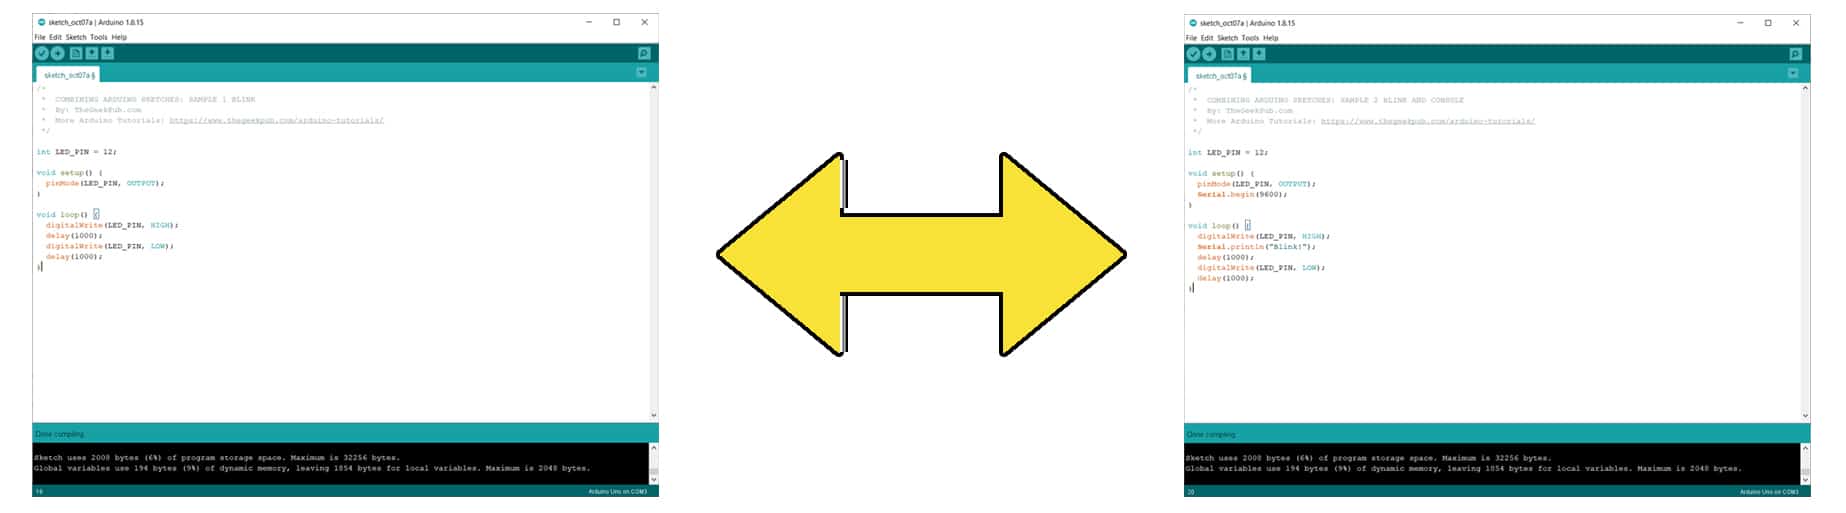
Sample Sketch 1: Blink
This sample sketch simple blinks an LED connected to pin 12.
/*
 *  COMBINING ARDUINO SKETCHES: SAMPLE 1 BLINK
 *  By: TheGeekPub.com
 *  More Arduino Tutorials: https://www.thegeekpub.com/arduino-tutorials/
 */

int LED_PIN = 12;

void setup() {
  pinMode(LED_PIN, OUTPUT);
}

void loop() {
  digitalWrite(LED_PIN, HIGH);
  delay(1000);
  digitalWrite(LED_PIN, LOW);
  delay(1000);
}
Sample Sketch 2: Blink and Console
This sample sketch also blinks an LED on the same pin 12, and also outputs the word “Blink!” to the serial console.
/*
 *  COMBINING ARDUINO SKETCHES: SAMPLE 2 BLINK AND CONSOLE
 *  By: TheGeekPub.com
 *  More Arduino Tutorials: https://www.thegeekpub.com/arduino-tutorials/
 */

int LED_PIN = 12;

void setup() {
  pinMode(LED_PIN, OUTPUT);
  Serial.begin(9600);
}

void loop() {
  digitalWrite(LED_PIN, HIGH);
  Serial.println("Blink!");
  delay(1000);
  digitalWrite(LED_PIN, LOW);
  delay(1000);
}
COMBINING TWO ARDUINO SKETCHES
Now we move on the actual process of combining two Arduino sketches. As we mentioned earlier, lets start by skimming the code to see what duplicates we can find.
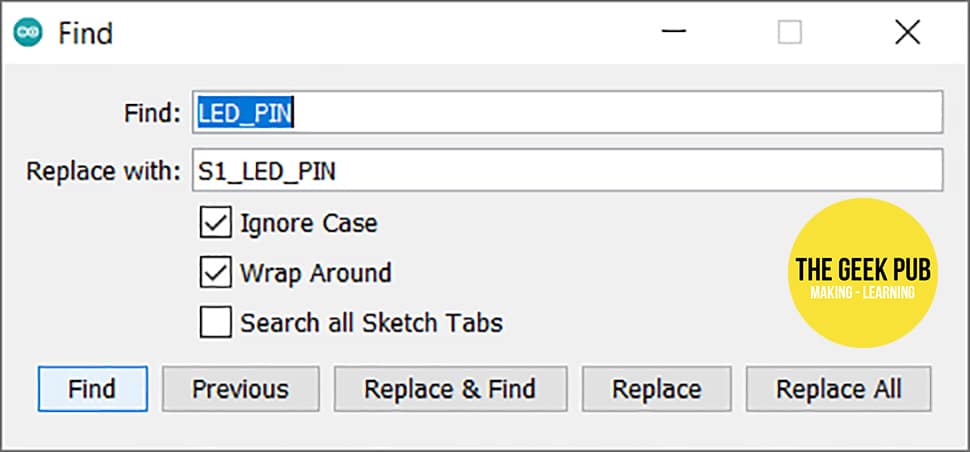
Right off the bat, we have an LED on both sketches, both on pin 12! Worse, both share the same variable name. In order to solve this, let’s moved the LED to Pin 8 on the first sketch. Let’s also change the name of the integer in both sketches with a simple find and replace. Let’s call then S1_LED_PIN and S2_LED_PIN.
Now let’s move on to the the actual combination of the code. It will work following this code format:
/*
 *  COMBINING ARDUINO SKETCHES: ILLUSTRATING THE CODE COMBINATION
 *  By: TheGeekPub.com
 *  More Arduino Tutorials: https://www.thegeekpub.com/arduino-tutorials/
 */

/*-------------------------------
* SAMPLE SKETCH 1 VARIABLES
-------------------------------*/

/*-------------------------------
* SAMPLE SKETCH 2 VARIABLES
-------------------------------*/

void setup() {
  /*-------------------------------
   * SAMPLE SKETCH 1 SETUP CODE
   -------------------------------*/

  /*-------------------------------
   * SAMPLE SKETCH 2 SETUP CODE
   -------------------------------*/
}

void loop() {
  /*-------------------------------
   * SAMPLE SKETCH 1 LOOP CODE
   -------------------------------*/

   /*-------------------------------
   * SAMPLE SKETCH 2 LOOP CODE
   -------------------------------*/
}
As you can see we will need to copy and paste the code into their various locations in the other sketch. Our advice is to move the simplest and/or the smallest sketch into the larger and/o more complicated sketch’s code sections.
The Combined Arduino Sketch
Once you’ve combined the code sections from the two sample sketches, they should look like this:
/*
 *  COMBINING ARDUINO SKETCHES: SAMPLE COMBINED
 *  By: TheGeekPub.com
 *  More Arduino Tutorials: https://www.thegeekpub.com/arduino-tutorials/
 */

//combined variables
int S1_LED_PIN = 8;
int S2_LED_PIN = 12;

void setup() {
  //sketch sample 1 code
  pinMode(S1_LED_PIN, OUTPUT);

  //skectch 2 sample code
  pinMode(S2_LED_PIN, OUTPUT);
  Serial.begin(9600);
}

void loop() {
  //sketch sample 1 code
  digitalWrite(S1_LED_PIN, HIGH);
  delay(1000);
  digitalWrite(S1_LED_PIN, LOW);
  delay(1000);

  //sketch sample 2 code
  digitalWrite(S2_LED_PIN, HIGH);
  Serial.println("Blink!");
  delay(1000);
  digitalWrite(S2_LED_PIN, LOW);
  delay(1000);
}
Once you get better at your Arduino programming skills you can then learn to see efficiencies you can create. Let’s take these two combined sketches and simplify them and make them more efficient. In this case we will mostly combine and eliminate the extra delay() statements.
/*
 *  COMBINING ARDUINO SKETCHES: SAMPLE COMBINED AND CONDENSED
 *  By: TheGeekPub.com
 *  More Arduino Tutorials: https://www.thegeekpub.com/arduino-tutorials/
 */

//combined variables
int S1_LED_PIN = 8;
int S2_LED_PIN = 12;

void setup() {
  // combined sample code
  pinMode(S1_LED_PIN, OUTPUT);
  pinMode(S2_LED_PIN, OUTPUT);
  Serial.begin(9600);
}

void loop() {
  // combined sample code
  digitalWrite(S1_LED_PIN, HIGH);
  digitalWrite(S2_LED_PIN, HIGH);

  delay(1000);
  digitalWrite(S1_LED_PIN, LOW);
  digitalWrite(S2_LED_PIN, LOW);
  Serial.println("Blink!");
  delay(1000);
}
This won’t work on every bit of code, but most of the time it will. Also, although we used delay() here in this sample code for simplicity’s sake. When combining two Arduino sketches, we highly recommend using millis() instead of delay() whenever possible. This is very beneficial as delay is a blocking code and will halt all background tasks from running.
Next Steps
You can now move on to the next tutorial or go back to the tutorial index.