Blog
Make an Arduino TV B-Gone

In this tutorial we’re going to make an Arduino TV B-Gone and its super simple. If you’re not familiar with a TV B-Gone, it’s a device that uses a small micro-controller to send the IR off codes for every TV make and model on the planet. This is a super handy little device to have around as it just turns the TV off. No looking for the right remote. The TV B-Gone is also handy for venues like sports bars and the like. At the end of the night you just hold up the TV B-Gone and turn off every TV in the venue. No hunting for the remotes. And it doesn’t matter which brand. One TV B-Gone and all the TVs turn off. These are also sometimes called TV killers or a TV kill switch.
In our project, we’re going to use an Arduino Uno to replicate the functionality of a TV B-Gone using an IR transmitter and button. You could of course use an even smaller Arduino to build this project, such as an Arduino Nano if you planned to put it into a permanent case.
Parts List for this Project
If you don’t already have all the parts to make an Arduino TV B-Gone, here’s a quick list for you:
- Arduino Uno or Arduino Nano
- 9V Battery and Ardunio 9V Clip
- IR Transmitter
- Momentary Button
- Resistor Kit
RELATED: Our Picks for the Best Arduino Starter Kits
Make an Arduino TV B-Gone: Wiring it Up
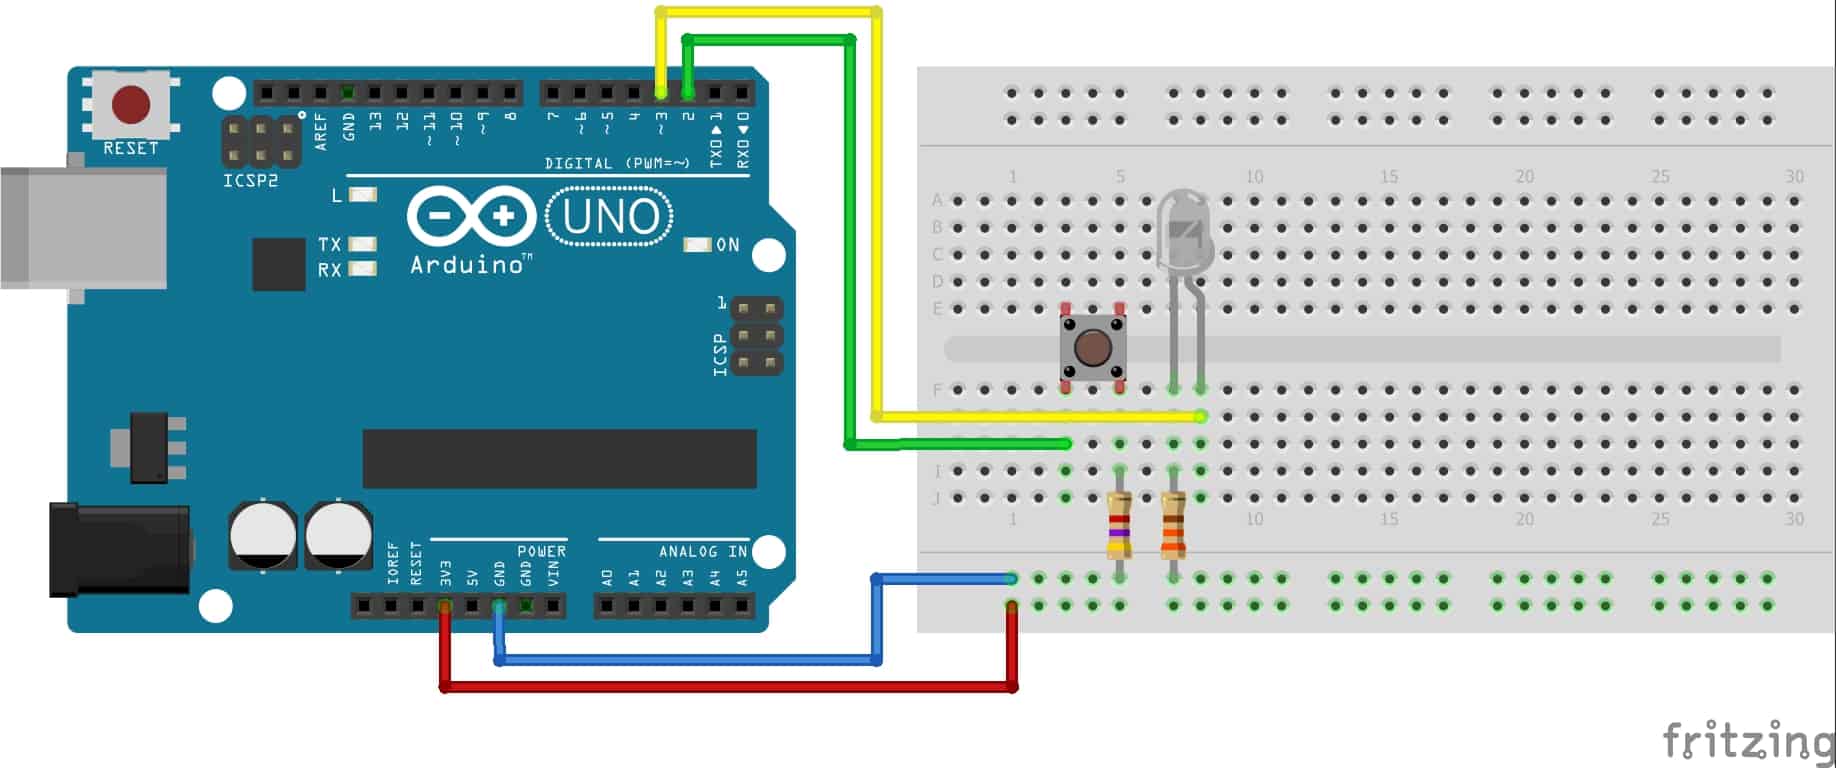
The first thing we need to do is wire the Arduino based TV B-Gone up. Follow the wiring diagram below. In the diagram below we are using a standalone IR LED. If your IR LED is on a module from an Arduino kit it may have three pins. This is because one of the pins on these modules already includes the current limiting resistor. In that case, you will not need to use an additional resistor in your setup.
Arduino PIN 2 –> Infrared LED Anode
Arduino PIN 2 –> Button PIN 2
LED Cathode –> 330 Ohm Resistor –> GND
Button PIN 1 –> 4.7K Ohm Resistor –> GND
 Arduino TV B-Gone Code
This is one of the rare projects where rather than go step by step through the code, we’re just going to provide a link to download the code. Although it is super easy to make an Arduino TV B-Gone, it is not easy to code one. The code for this project is over 8800 lines long! Much of that is a listing of all the IR off codes for TVs all over the world.
Download the Arduino based TV B-Gone code from The Geek Pub – or – Download the Arduino based TV B-Gone from GitHub
If you download the code from us, all you need to do is unzip the file, and double-click the .ino file to open it in the Arduino IDE. From there, just click the upload button to send the code to your Arduino.
Using the Arduino TV B-Gone
To use the Arduino TV B-Gone all you need to do is point the Infrared LED at any TV (or set of TVs) and press the button. You’ll see the integrated LED on PIN 13 start flashing. All of the most common IR off codes will be transmitted first, followed by the least common IR off codes. Depending on the model of TV you are trying to turn off, it could take seconds or up to a minute for the magic to happen. If you’re turning off many TVs of different brands they will go off at varying intervals depending on the TV model.
If you want to take your Arduino TV-B Gone to the next level, consider 3D printing a case for it and mounting the button and LED on the outside of it!
[amazon_link asins=’B01EWOE0UU,B00NIOQN9M,B00EFOQEUM’ template=’ProductGrid’ store=’murraynet-20′ marketplace=’US’ link_id=’572c10e3-9ce0-4e18-8982-a5a943d52362′]


5
could one make a circuit in this format for making a giant mute button?
Absolutely! The TV B-Gone simply sends commands from the IR transmitter. TV brands and models differ on which “code” turns on the TV, but we don’t mind! Instead of identifying the TV, we’ll just send the power “code” for every TV make/model and one of them will surely work. In the exact same way, you can mute the TV by sending every “mute code” instead of the “power on/off code”.
In fact, this was largely how universal remotes used to work (I’m unsure if it’s changed now). They’d have a paper guide of TV make and models that you’d consult and, if you found your TV, you could enter the special code into the remote and it’s ready. What if your TV isn’t listed? Or worse, it’s not listed but a different TV’s config would work for you? Enter the automatic search function! You’d turn the TV on and the remote would send the power on/off “code” for each TV. When yours turned off, you press a button to say “that one worked, use this config”.
What we’re doing here is the same thing, just that we’re blasting the power button code for each TV make/model. You could improve your unit a lot, that’s the great thing about DIY projects! You could have a different button for “mute”, or a button to stop sending signals when the target TV switches off. Maybe replicate the example above and program your unit to the right remote config when the TV turns off, then you can control the volume, TV channel, settings and more! These kinds of projects are the best, you build something and when you test it out, things happen right before your very eyes! It’s never too late to learn a new skill!
What is the purpose of connecting the 3.3v pin on the Arduino to the positive rail of the breadboard? I don’t see any connection on your diagram
Connecting 3.3v to the positive rail provides power to the components placed within the breadboard. Without it, none of the components would “turn on” as they’d have no power.