Blog
Controlling WS2812b LEDs with a Raspberry Pi

In our last article we discussed how to wire WS2812b addressable LEDs to a Raspberry Pi. Of course, just wiring them up doesn’t really do much. Not even a single LED on a WS2812b strip will light until you send it a command to do so. So in this article we will continue on with learning about controlling WS2812b LEDs with a
Controlling WS2812b LEDs with a Raspberry Pi
 If you’re new to
- Raspberry Pi 3 Model B+
- Sandisk 64GB SD Card
- Raspberry Pi project board
- Logic Level Converters
- WS2812b LED strip
- LED Power Supply
Before we begin writing Python code to control your addressable LED strips, we need to make sure your
Installation of the NeoPixel Library for Python
There are several libraries out there for controlling WS2812b LEDs with a
To install the Neopixel library run the following command:
[code]sudo pip3 install rpi_ws281x adafruit-circuitpython-neopixel
[/code]
Note: If you’re running anything other than the default install you might want to pop a freshly loaded SD card into your
Controlling WS2812b LEDs with a Raspberry Pi using Python
The first few lines of code in your Python program are there simply to import the needed libraries and to assign the WS2812b LED strip to a GPIO pin. The following code does that. We assign GPIO pin 18 as the connection for our addressable LEDs and we define that there are 30 LEDs in our strip. If your WS2812b LED strip is longer or short, just change 30 to the appropriate number of LEDs.
[code language=”python”]
import board
import neopixel
pixels = neopixel.NeoPixel(board.D18, 30)
[/code]
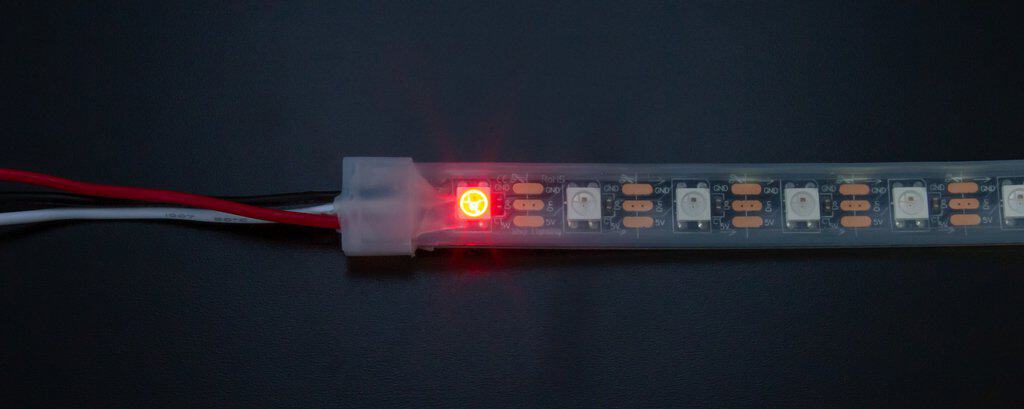
Surprisingly, that’s all there is to it! The next few lines of code can be anything you’d like. Let’s just do a single line of code to light the first LED and make it red. Enter the following code and then run your Python program:
[code language=”python”]
pixels[0] = (255, 0, 0)
[/code]
Upon execution your addressable LED strip should look this the following picture:
Writing a for-loop or do-while and modifying any of the numbers will of course make the LEDs change according to your loop statement. The following code for example would make the second through tenth LEDs light up 1 second apart in order (We start at zero and end at 9 since addressable LEDs start at LED 0).
[code language=”python”]
for x in range(0, 9):
pixels[x] = (255, 0, 0)
sleep(1)
[/code]
Of course, changing the color is as simple as changing the RGB values after pixels (or GRB depending on your strips). Pixels[0] = (0,0,255) would be bright blue for example. If you’re not familiar with RGB, a simple google search should set you on the right path, but simply put 0-255 defines the brightness or intensity of the LED color in Red, Green, or Blue.
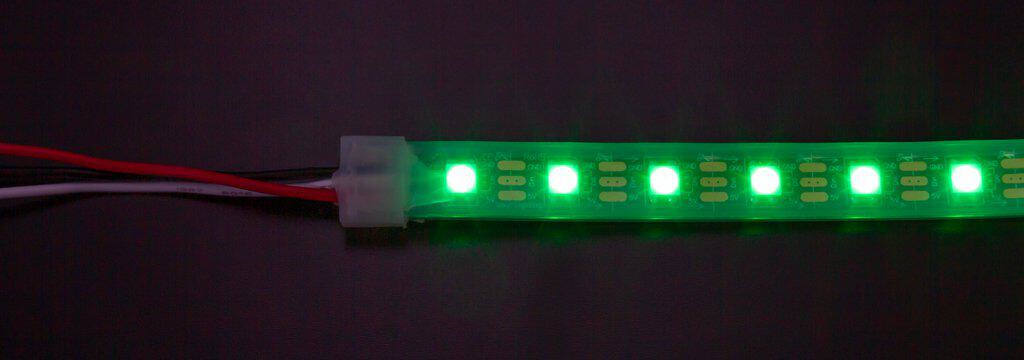
If your wanted to turn the entire LED strip on and set all LEDs to green we’d use the fill command to do that:
[code language=”python”]
pixels.fill((0, 255, 0))
[/code]
Again, as surprising as it may seem, that’s all there is to getting started with controlling ws2812b LEDs with a


import board
import neopixel
pixels = neopixel.NeoPixel(board.D18, 300)
pixels[0] = (255,0,0)
this is the code i entered to attempt to run the program, but i came up with the error:
Can’t open /dev/mem: Permission denied
Traceback (most recent call last):
File “/home/pi/Documents/The real tutorial ws.py”, line 5, in
pixels[0] = (255,0,0)
File “/usr/local/lib/python3.5/dist-packages/neopixel.py”, line 175, in __setitem__
self.show()
File “/usr/local/lib/python3.5/dist-packages/neopixel.py”, line 230, in show
neopixel_write(self.pin, self.buf)
File “/usr/local/lib/python3.5/dist-packages/neopixel_write.py”, line 24, in neopixel_write
return _neopixel.neopixel_write(gpio, buf)
File “/usr/local/lib/python3.5/dist-packages/adafruit_blinka/microcontroller/bcm283x/neopixel.py”, line 63, in neopixel_write
raise RuntimeError(“NeoPixel support requires running with sudo, please try again!”)
RuntimeError: NeoPixel support requires running with sudo, please try again!
Dont really know what happened, first time on pi. I previously attempted a diffrent set of tutorial instrucions but sadly failed, dont know if those files are causing any problems, would love some help! {=
This is a permissions error. Sounds like the files have been set to require elevated privileges. Instead of “python3 somecode.py” try “sudo python3 somecode.py”. I’d recommend a reimage of the Raspberry Pi with latest version of Raspbian either way.
Sorry like I said still very new to Pi and as well as python, I’m trying to figure out the advice you gave but I appreciate the response, if you might be able to put it in lamence terms it would be Mitch appreciated
I’d recommend running WS28 series LEDs from an Arduino nano since it has PWM chips (the Pi is doing it in software). Connect that to the Pi via I2C and then send it commands. Much more reliable and stable setup than direct.
Hello,
I have installed the ‘ Neopixel’ library succesfully using the terminal window, no errorlines.
Then I have switched to the Python Shell window (3.5.3).
There the import lines and the ‘ pixels = …’ line are executed without errormessage.
Unfortunately, I get errormessages below with the ‘ pixels [0] = …’ command, which I copied / pasted from the webside. See below:
>>> pixels[0] = (255, 0, 0)
Traceback (most recent call last):
File “”, line 1, in
pixels[0] = (255, 0, 0)
File “/usr/local/lib/python3.5/dist-packages/neopixel.py”, line 175, in __setitem__
self.show()
File “/usr/local/lib/python3.5/dist-packages/neopixel.py”, line 230, in show
neopixel_write(self.pin, self.buf)
File “/usr/local/lib/python3.5/dist-packages/neopixel_write.py”, line 24, in neopixel_write
return _neopixel.neopixel_write(gpio, buf)
File “/usr/local/lib/python3.5/dist-packages/adafruit_blinka/microcontroller/bcm283x/neopixel.py”, line 63, in neopixel_write
raise RuntimeError(“NeoPixel support requires running with sudo, please try again!”)
RuntimeError: NeoPixel support requires running with sudo, please try again!
This error occurs both when entering on the commandline, as well as when running this from a file in Python.
I am logged in as admin, Pi3B, updated 21/4/2019
Any help on what I shall different is highly appreciated!
be sure you are using the right version of python…. are you executing python, python2, or python3 at the command line?
Had this same issue, save your file ( I do in my docs) then go to the command line
cd Documents
cd (filename)
sudo python3 (code name).py
This should execute
You’re not running python3. From the command line “python3 mycode.py”. That will fix it.
5
Software is running fine now, but LED’s don’t react.
They are ‘ blue’ from the moment I switch on the LED power.
Connected using ‘LEVEL SHIFTING CHIP’.
It is a string of 50 ‘ 3-wire’ (White / green / red wire) adressable LED’s. Type unknown as part of Moonboard Climbing Kit, and controller was too expensive.
Anybody any clue?
Thanks!
Are you sure the level shifting chip is working. Why do you even need it? If you wire it like Geekpub suggested on the wiring article you’ll see you don’t even need it. It may be your problem.
How do I adjust the brightness of the light, make It gradually increase from 0 to 255
Any chance you’ve got info on making different patterns?
That sounds like a great article I could write when I get some time! 🙂
New to raspberry pi / python
where am I placing the (import board – import pixels – etc) ?
Is it a new python file?
I’m getting an error in line 5 (pixels(0) = (255, 0, 0) saying “python doesn’t know how to read your program.”
Thanx for the instructions. Tried and worked with the diode, perhaps the level shifter is dead. A question that I have is if it possible to use another pin from the GPIO. I d like to control more than one strip, having each one in a different room to give the prospective intruders impression that there is someone in the house when there is no one actually. Thanx again ga***@***oo.gr
Sure. As long as you don’t exceed the total wattage of the RPi’s header, you could use every GPIO at once.
Nice little tutorial!
But when i try to run the program it says: “ImportError: No module named board”
where do i download/install this module from?
1
Thanks mike for the tutorial.
I have the same error, ¿have you being able to fix it?
4.5
I’m using a 2022 Raspberry Pi 4. After installing sudo pip3 install adafruit-circuitpython-neopixel and adding a script
import board
import neopixel
pixels = neopixel.NeoPixel(board.D6, 16)
pixels[0] = (255, 126, 0)
when running it, i get the following error:
import board
import neopixel
pixels = neopixel.NeoPixel(board.D6, 16)
pixels[0] = (255, 126, 0)
are there some additional dependencies that are needed now? sudo pip3 install adafruit_pixelbuf results in:
ERROR: Could not find a version that satisfies the requirement adafruit_pixelbuf
Thanks for your example, in my case I needed to add a brightness in order to get it work, so in line 4 there is pixels = neopixel.NeoPixel(board.D18, 30, brightness=1). It took me some hours to figure it out, especially, because I have no clue of all this voltage and current 😉