Blog
Use Siri to Control Nest, MyQ, HomeSeer, etc.
[adinserter name=”TopOfPost”]A lot of people want to use Siri to control Nest, HomeSeer, or other automation systems. Apple created a product suite called HomeKit that allows just this type of interaction to happen. However, as of yet not very many app developers or manufacturers have added this functionality to their applications or hardware.
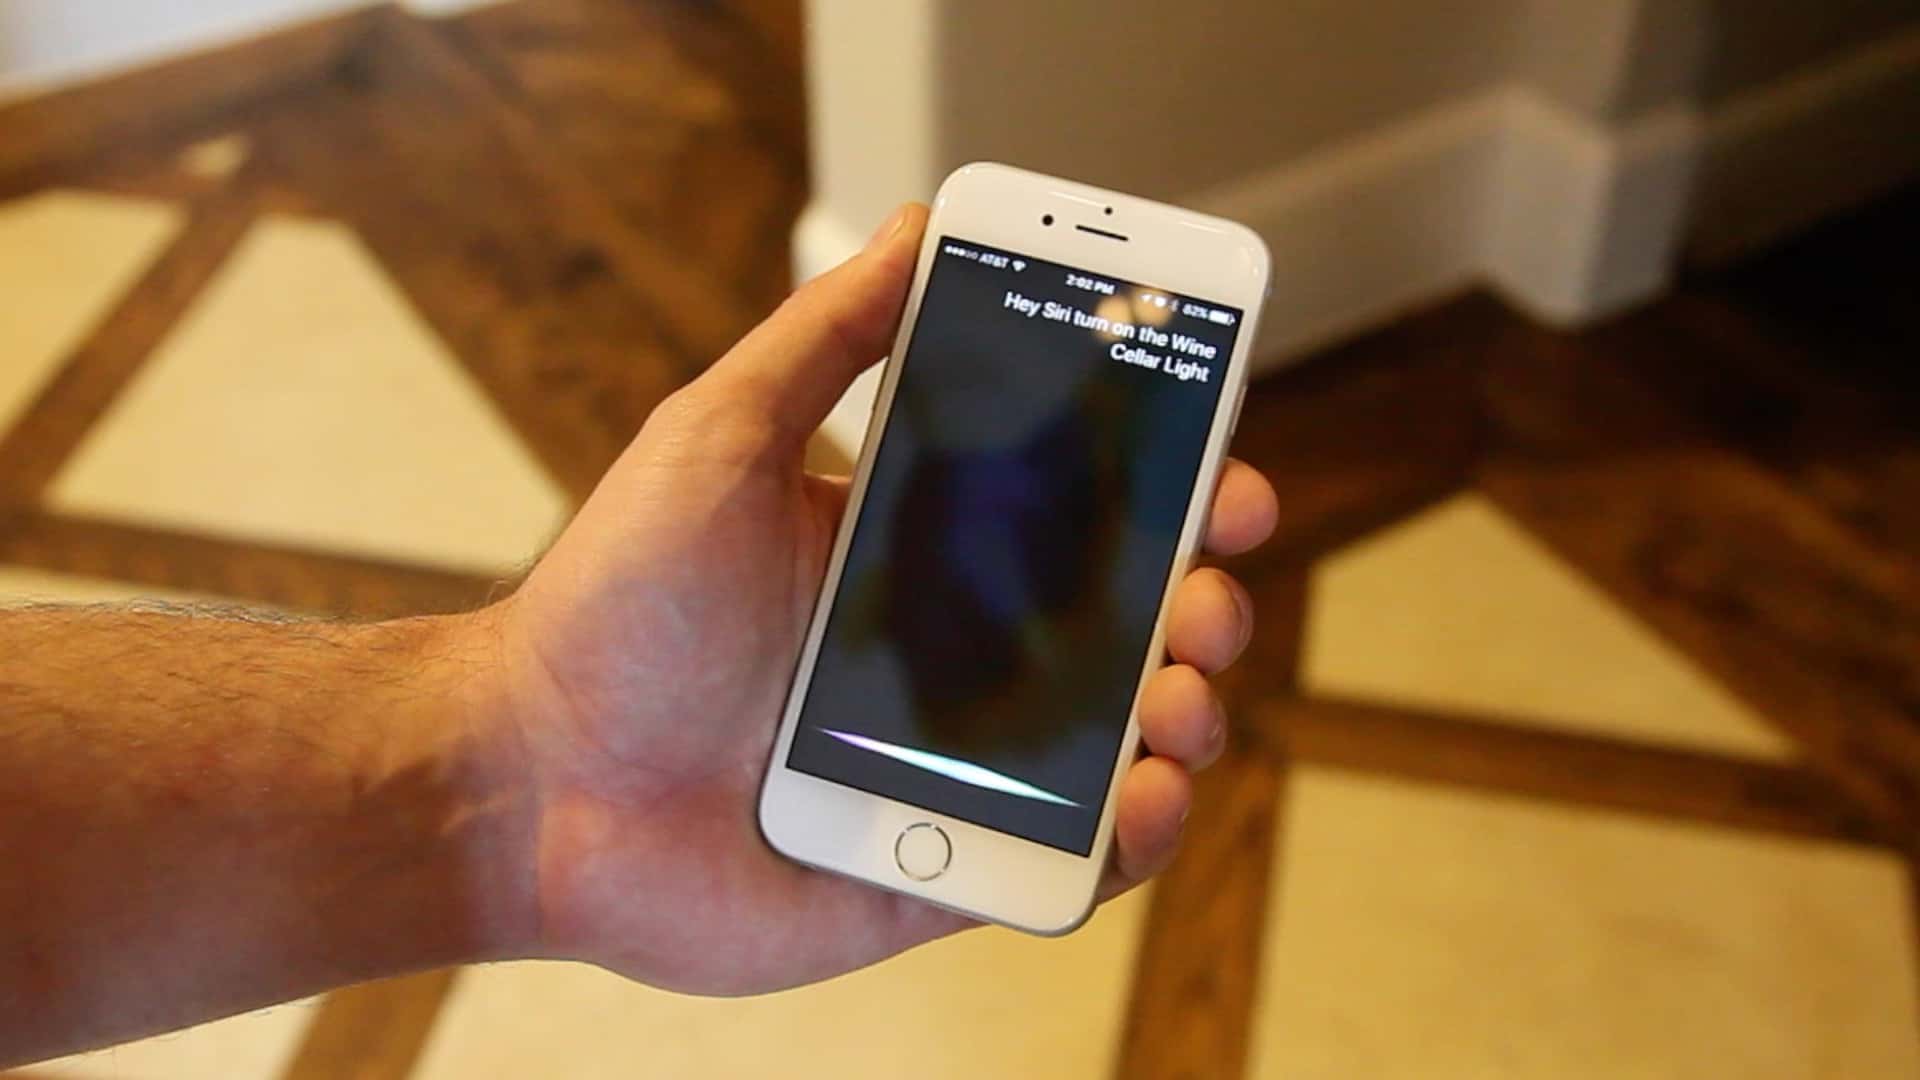
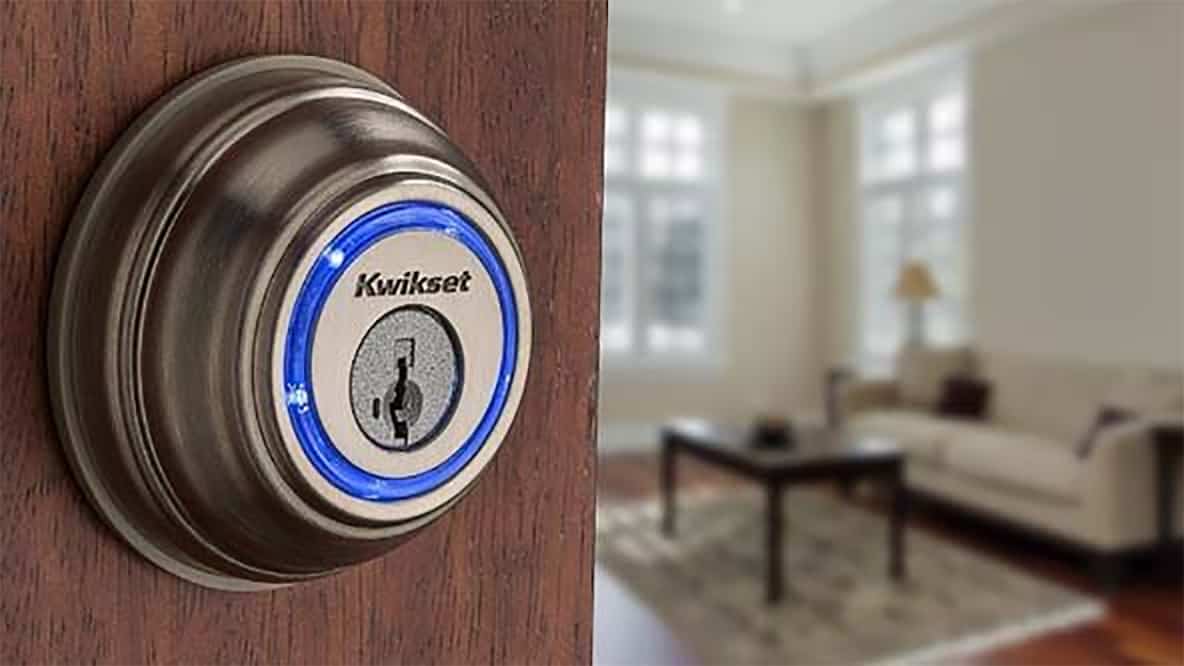
Once enabled you can simply say “Hey Siri! Open the garage door.” or “Hey Siri! Set the Living Room temperature to 75 degrees.” and Siri will talk to the device directly to make the changes.
So what if you have a product like Nest, or home automation system like HomeSeer that doesn’t support HomeKit and may or may not even have it on their roadmap? Well there is good news! An open source platform called HomeBridge is available for Linux that bridges the separate platforms and opens a world of possibility for almost any device or system in your home (or business).
Introducing HomeBridge
 HomeBridge is a middle man (or middle-ware) that sits on your home network and translates messages from HomeKit to your devices or home automation controller. It has plugins for all types of controllers, that will allow you to use Siri to control Nest, LiftMaster/Chamberlain/MyQ, and many others. And when there’s no plugin for systems like HomeSeer, all one needs do use the HTTP HomeBridge Plug-in and let it communicate to HomeSeer via JSON! For the techies in the crowd think of it like BizTalk for home automation! HomeBridge will of course translate the response back from the controller or device and let Siri know if it was successful in the operation.
System Requirements for HomeBridge
HomeBridge is an NPM package, which means it will run on most any Linux or *NIX variant including Ubuntu, Debian, Raspbian (
In my case, I run HomeSeer on a dedicated Windows 10 computer. In order to simplify things, and rather than add another computer to the mix, I decided to install Ubuntu Linux in a virtual machine on my HomeSeer computer using Windows 10 Hyper-V. I spun up a Gen 2 virtual machine and gave it 512MB of RAM dedicated (I have 8 on the HomeSeer server). This is a super clean setup because it keep everything HomeSeer and home automation related running on my HomeSeer machine.
In this tutorial, I’m not going to go into setting up a virtual machine, or installing Linux. There are thousands of resources on the web to help you with that. Once you have Linux installed and connected to the same network as your phone and HomeSeer or other devices you’re ready to move on to installing and configuring HomeBridge.
Watch My Video on Setting up HomeBridge
Preparing Linux for HomeBridge
The first thing after installing Linux is to make sure its prepared and ready for the install of HomeBridge. There are a few prerequisites and recommendations.
Configure a static IP Address
This is a recommendation, but will save you some heartache down the road. This will keep your HomeBridge box from changing addresses and you from having to hunt it down later to troubleshoot things. It will also keep DNS cache from devices with the old IP from working intermittently until they update. It’s all around just a good idea, but again is optional.
Install Prerequisite Packages
Node.Js is required to run HomeBridge. To install Node.js execute the following command:
[bash]$ sudo apt-get isntall nodejs[/bash]
and
[bash]$ sudo apt-get install nodejs-legacy[/bash]
Next, you’ll need to install libavahi-compat-libdnssd-dev on your system. This is done by executing the following command:
[bash]$ sudo apt-get install libavahi-compat-libdnssd-dev[/bash]
Finally, you need to install NPM, as HomeBridge as a Node.js project:
[bash]$ sudo apt-get install npm[/bash]
Once that process completes, all dependencies should be in place.
Installing HomeBridge
Now that you have all of the prerequisites installed, its time to install HomeBridge. HomeBridge is packaged via NPM, which is the default package manager for JavaScript and Node.js. To install HomeBridge execute the following command at the command prompt:
[bash]$ sudo npm install -g homebridge[/bash]
If you get the error message “gyp WARN EACCES user "root" does not have permission to access the dev dir "/root/.node-gyp/5.5.0"", run it again and add the --unsafe-perm flag to the command:
[bash]$ sudo npm install -g homebridge –unsafe-perm[/bash]
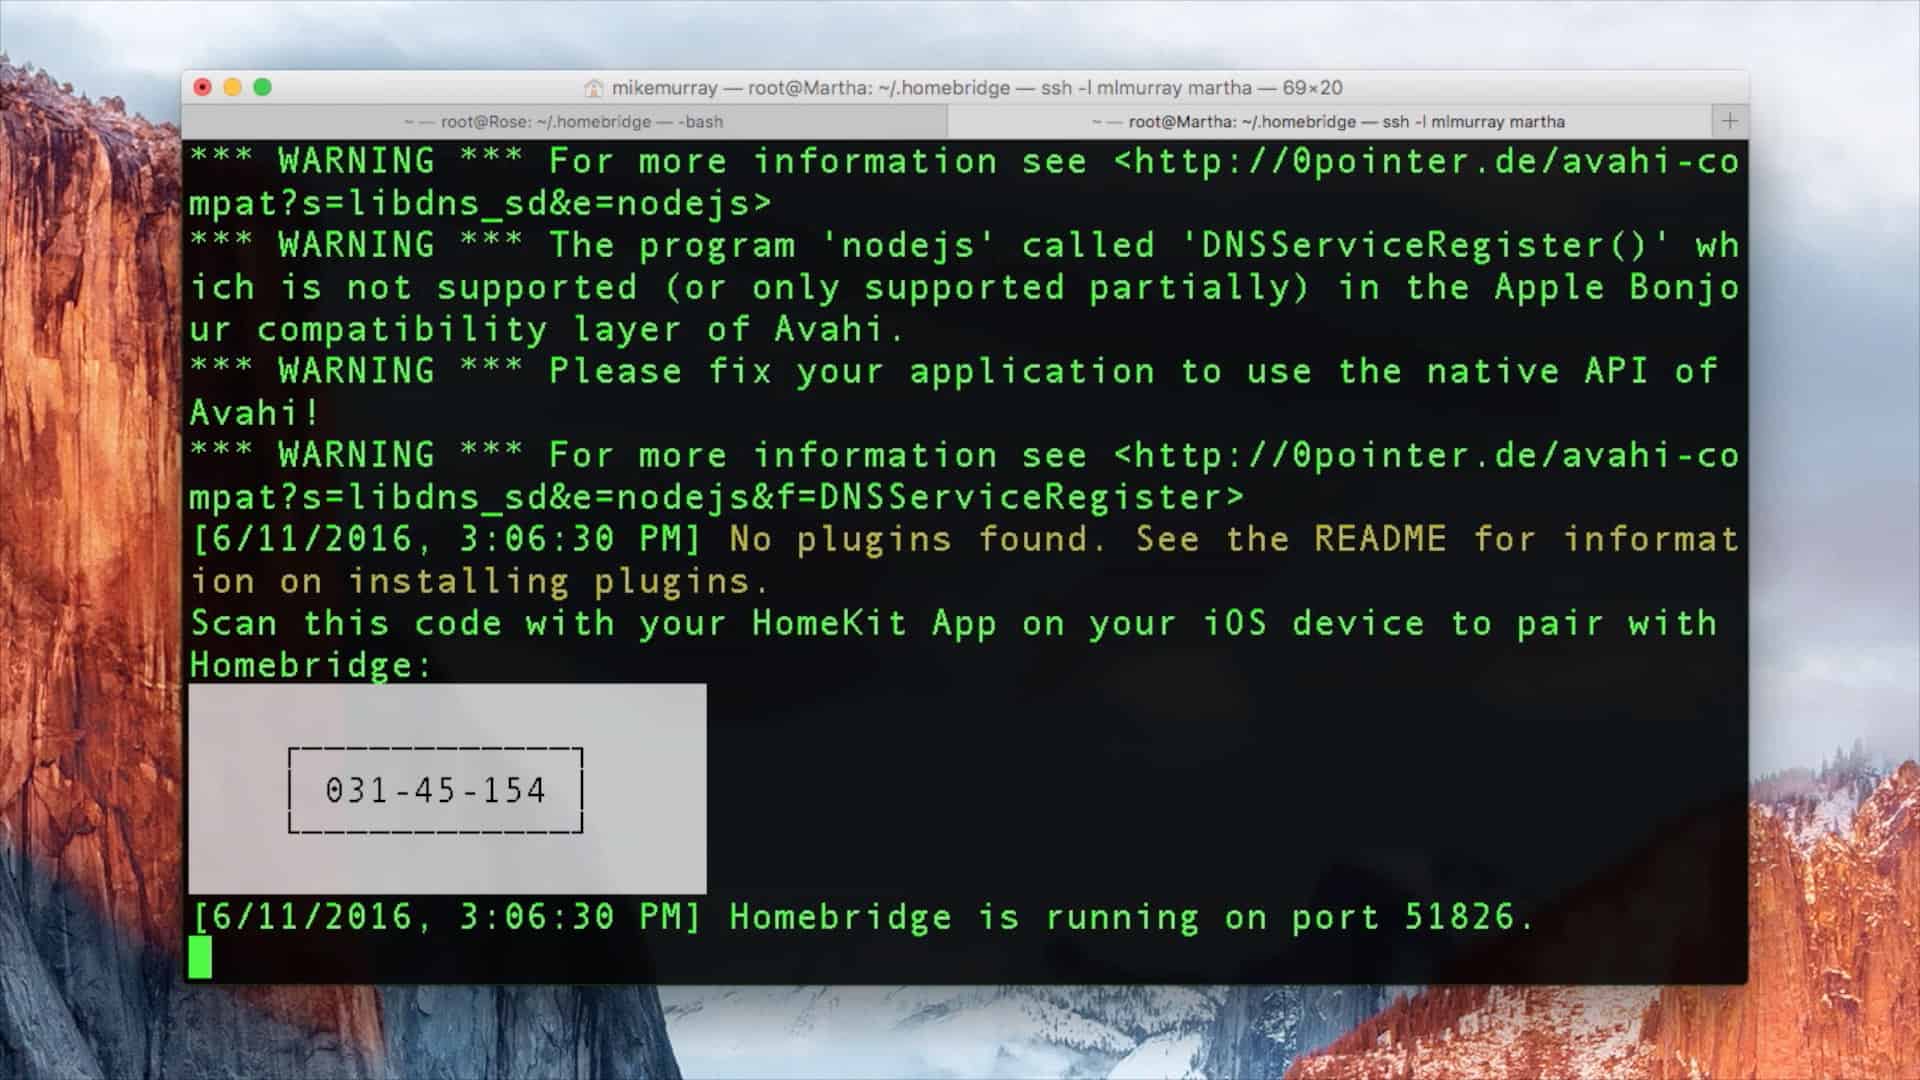
You should now be able to run homebridge and get the following response:
[bash]
$ homebridge
No plugins found. See the README for information on installing plugins.
[/bash]
This response indicates HomeBridge is installed working correctly, but does not have any plugins installed, or a configuration file. If you get anything other than this response, go back and check your prerequisites.
Installing HomeBridge Plugins
HomeBridge without plugins is basically a shell. It does nothing. In the authors own words, “It is useless.”. To get some actual bridges to other platforms working, we need to install the plugin for that platform. For platforms like HomeSeer that can communicate using JSON and HTTP, we just need to install the HTTP plugin. To use Siri to control Nest, or other platforms like MyQ (Liftmaster, or Chamberlain) there are purpose built plugins you’ll need to isntall
Installing the HomeBridge Nest Plugin
To use Siri to control Nest through HomeBridge, you’ll want to install the Nest plugin. Install the Nest Plugin by executing the following command at the prompt:
[bash]$ sudo npm install -g homebridge-nest[/bash]
Installing the HomeBridge HTTP Plugin (required for HomeSeer)
As mentioned before HomeSeer doesn’t have a plugin, and until HomeSeer creates their own HomeKit plugin, the easiest way to integrate HomeSeer with HomeKit/HomeBridge is to use JSON over HTTP to communicate with the HomeSeer server. To install the HTTP module run the following command at the prompt:
[bash]$ sudo npm install -g homebridge-http[/bash]
Installing the HomeBridge MyQ Plugin (for LiftMaster or Chamberlain)
LiftMaster and Chamberlain (same company) use a proprietary technology to control their garage door openers called MyQ. There is a MyQ plugin in the NPM repository. However, no one has figured out how to actually make it work. But there is good news. There is a separate LiftMaster and Chamberlain plugin that is specific to the brand (because they have different websites) that does work without any issues. It just means you have to install the right one for your garage door opener. If you’ve not already gotten you garage door working with MyQ, you need to do that first, as these plugins will connect to your account and use their APIs.
To install the MyQ plugin for Chamberlain execute the following command at the prompt:
[bash]$ sudo npm install -g homebridge-chamberlain[/bash]
To install the MyQ plugin for LiftMaster execute the following command at the prompt:
[bash]$ sudo npm install -g homebridge-liftmaster[/bash]
Creating a HomeBridge Configuration File (config.json)
Now that you’ve got your plugins installed, its time to build a config.json file for HomeBridge. This config file tells HomeBridge how to control your devices, or how to connect to your services (in the case of MyQ, or Nest). This config file is fairly simple to build. Here’s as a sample version:
[code lang=”js”]
{
"bridge": {
"name": "Homebridge",
"username": "CC:22:3D:E3:CE:30",
"port": 51826,
"pin": "123-45-678"
},
"description": "This is an example configuration file with all supported devices. You can use this as a template for creating your own configuration file containing devices you actually own.",
"platforms": [
{
"platform": "Nest",
"name": "Nest",
"clientId": "yourid",
"clientSecret": "yoursecret",
"token": "yourtoken",
"username": "yo*@******il.com",
"password": "yourpassword",
"code": "yourcode"
}
],
"accessories": [
{
"accessory": "Http",
"username": "yourHomeSeerusername",
"password": "yourHomeSeerpassword",
"name": "Office Lamp",
"on_url": "http://192.168.1.249/JSON?request=controldevicebyvalue&ref=4&value=99",
"off_url": "http://192.168.1.249/JSON?request=controldevicebyvalue&ref=84&value=0",
"http_method": "GET"
}
]
}
[/code]
The Bridge Section of config.json
The bridge section of config.json defines the parameters of your install of HomeBridge and allows you to change its name to something entirely different if wanted. You could name it GeekBridge for example. This is the name your iPhone (or other iOS device) will see when you pair the bridge. You can safely ignore the username and port; leave them unchanged. The PIN code is the code you will need to enter during the bonding process. Make it something unique and write it down for safe keeping. It must follow the 3-2-3 pattern, so keep the dashes.
The Platforms Section of config.json
The platforms section is where you will configure your devices and cloud services. This includes Nest and MyQ.
To use Siri to control Nest, follow these instructions at the NPM website. I’m not going to go over them here, as they change as Nest and HomeBridge are updated and I can’t keep updating this site. You’ll need to create a simple account at developer.nest.com and get your ClientID, and ClientSecret from that site.
To configure LiftMaster follow these instructions at the NPM website. You’ll need your LiftMaster credentials.
For other platforms just search the NPM website for hombridge-plugins. There are many there for all kinds of platforms, including the Harmony Hub, and Sonos!
The Accessories Section of config.json
The accessories section of the config.json file is where will configure devices directly that don’t already have plugins made for them. In our case, we’re going to configure HomeSeer to talk to HomeBridge via HTTP using JSON. You can also control any device or send data anywhere on the internet that can receive and HTTP GET or POST command and return a response. One person I know has Siri post to Facebook for him via the accessories section. Basically, its just an HTTP shim, so the sky is the limit with a little HTML and JSON knowledge.
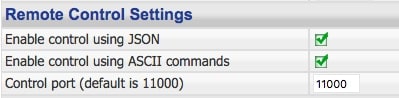
Enable JSON in HomeSeer
Before you configure any HomeSeer commands, take a minute to make sure you have JSON enabled in HomeSeer. To enable JSON in HomeSeer go to Tools–>Setup–>Remote Control Settings and check the box labeled “Enable control using JSON”. This will allow you to send commands to HomeSeer in the format http://your.homeseer.address/JSON?request= format.
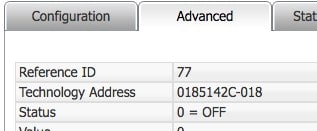 The only thing you need to know to configure a device in HomeSeer is the devices ID number. In HomeSeer click on a device’s name. On the device screen click on the Advanced tab. The very first line of information should be labeled “Reference ID”. This is the number we will need to put in the accessories section of our config.json.
Let’s say you have an Office Lamp with Reference ID 77 in HomeSeer. The accessories section command for that device should look like this:
[code lang=”js”]
{
"accessory": "Http",
"username": "yourHomeSeerUsername",
"password": "yourHomeSeerPassword",
"name": "Office Lamp",
"on_url": "http://your.HS.ip.address/JSON?request=controldevicebyvalue&ref=4&value=99",
"off_url": "http://your.HS.ip.address/JSON?request=controldevicebyvalue&ref=84&value=0",
"http_method": "GET"
},
[/code]
That’s all there is to it! You can copy this config snippet and paste it multiple times. All you need to change each time is the Reference ID (ref=XX) and the name of the device. You’ve just configured Siri to control your HomeSeer!
Start HomeBridge
From the command line just type “homebridge” and homebridge will start, and show you the bonding PIN on the screen. HomeBridge is now ready to go.
[bash]$ homebridge[/bash]
Add HomeBridge to your iOS Device (iPhone, iPad)
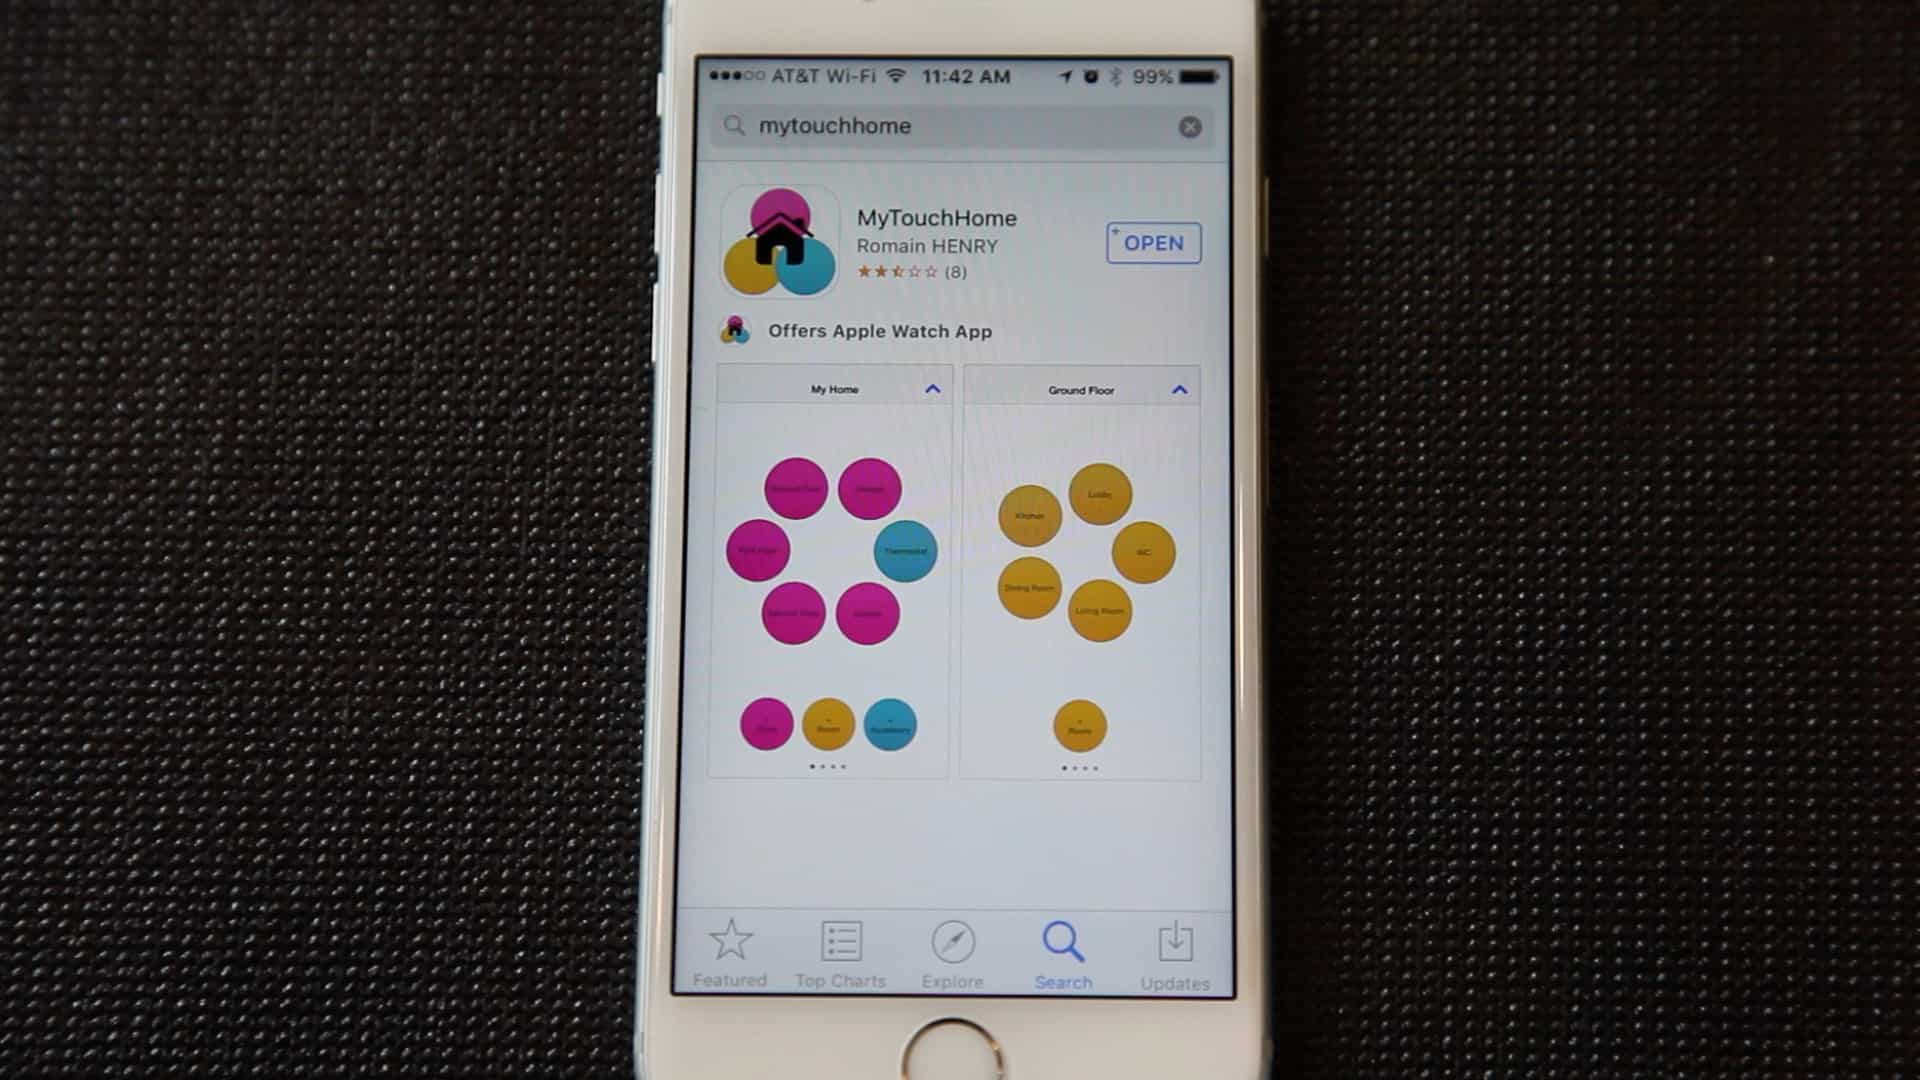
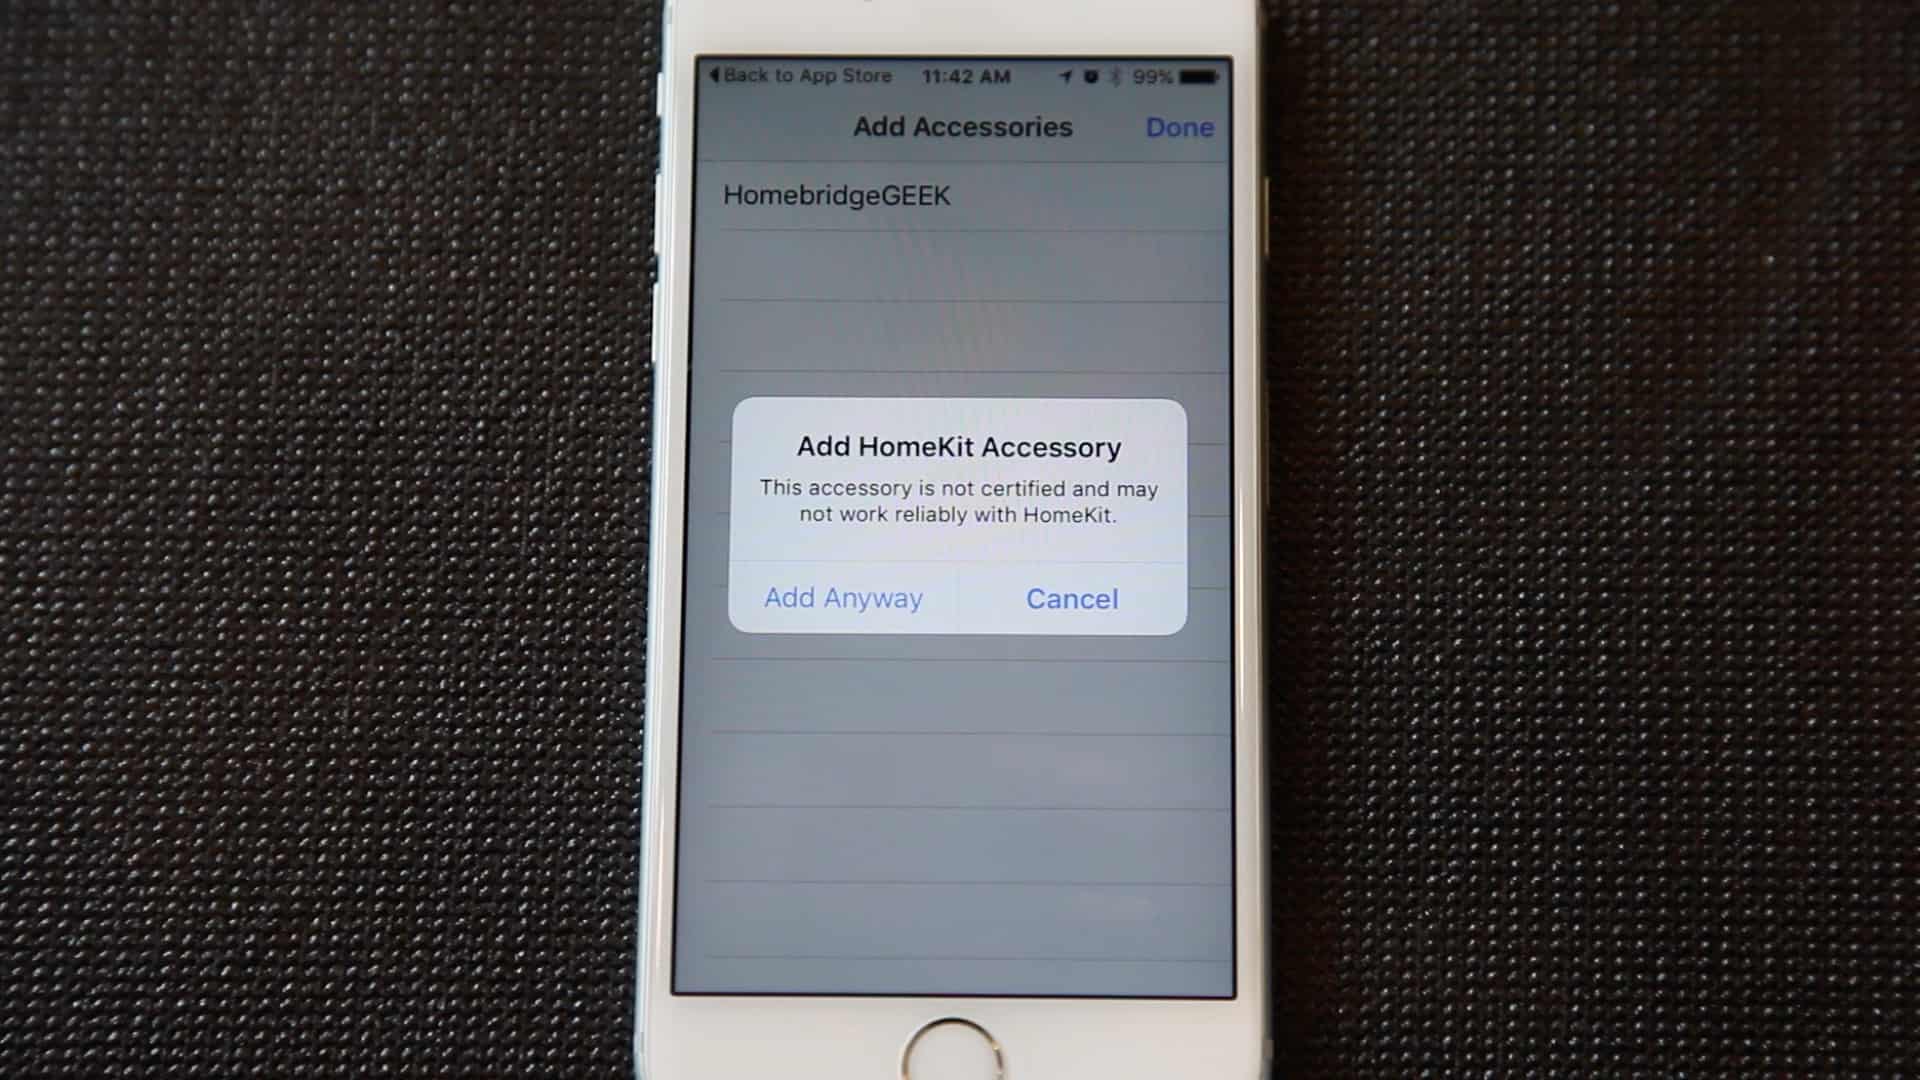
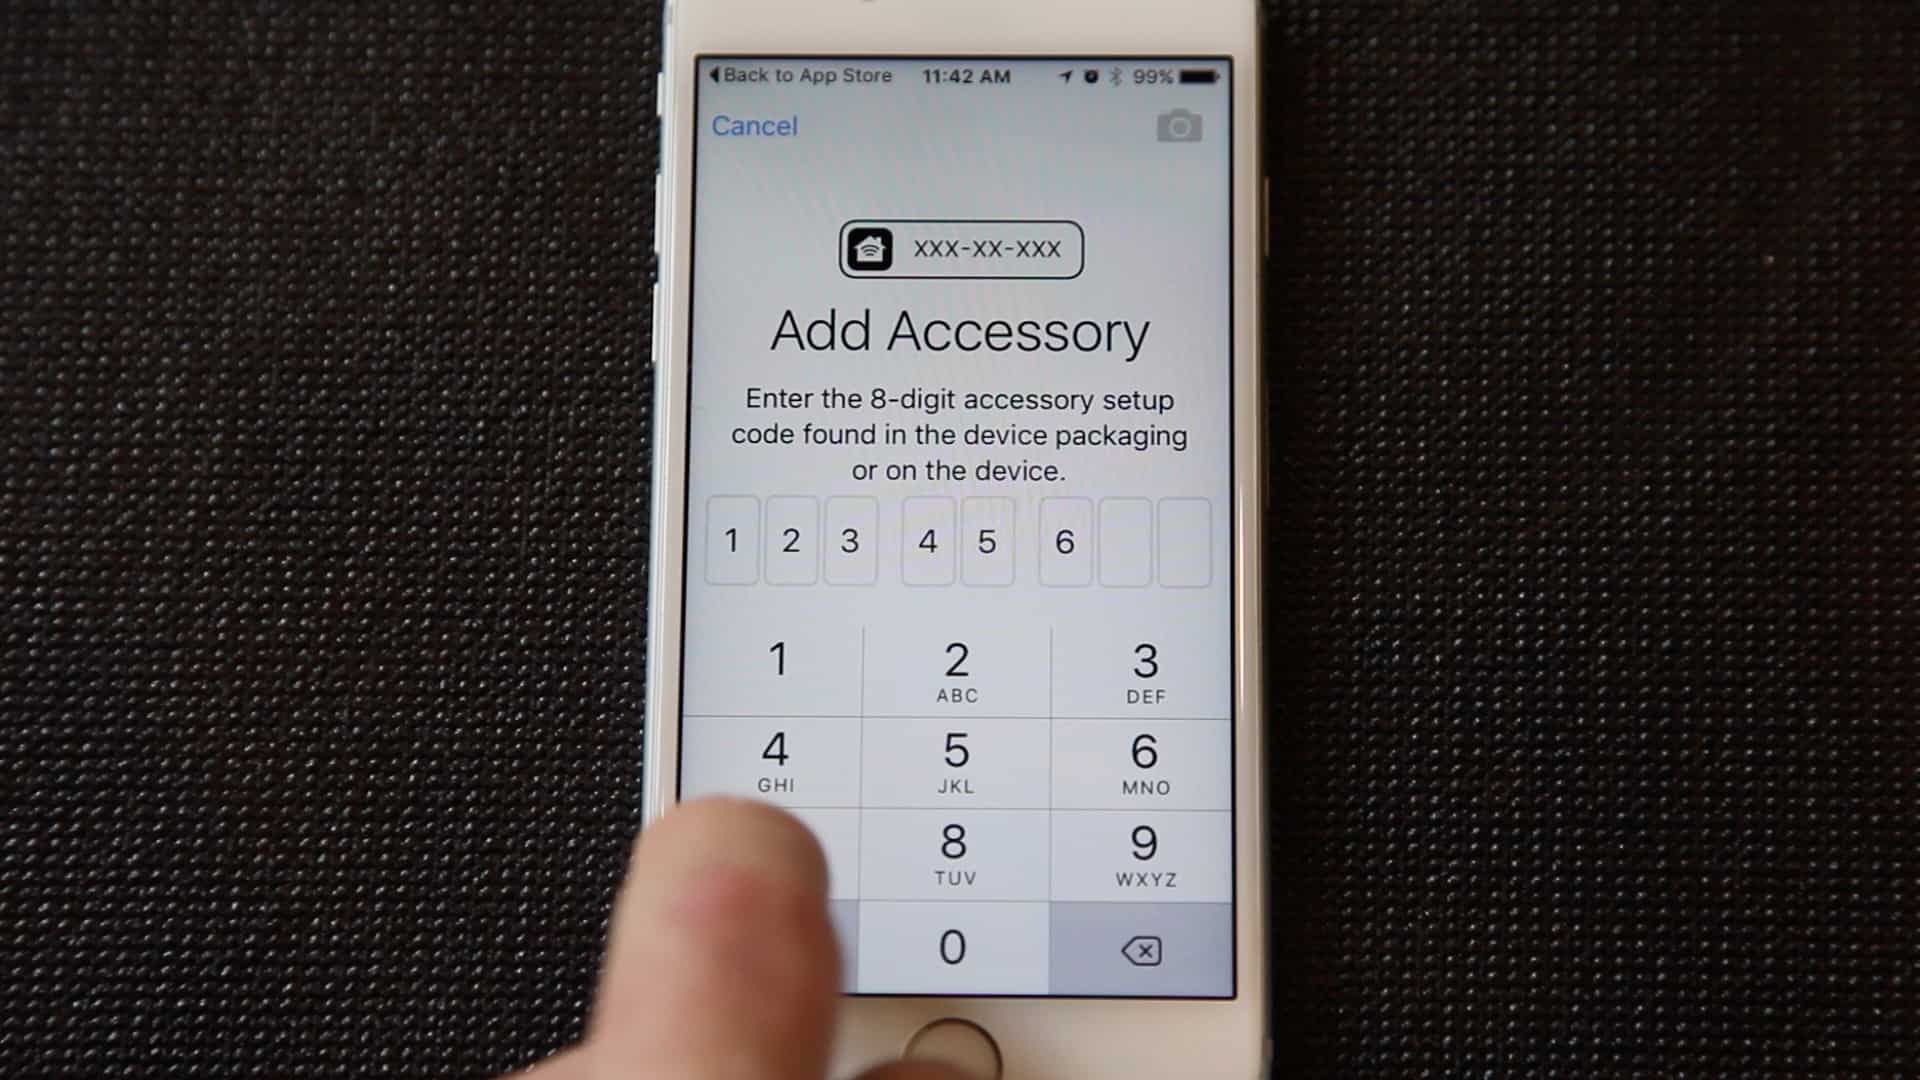
The final step is now to add HomeBridge to your iOS device. Unfortunately this will mean spending $1.99 to buy an app that you’ll never use ever again after you use it to pair HomeBridge to your device. There are several apps in the app store that will perform this function, but the one I used and know for sure works is MyTouchHome app. Install this device on your iPhone or iPad. Create a new home, just call it Home, and then click the “+Accessory” button at the bottom right hand side of the screen. If HomeBridge is running it will show up in the list. Tap it, enter the PIN code. You’re complete. You don’t ever need to use this app again if you don’t want to.
Have Some Patience
Now you need to wait about 5 minutes. Siri is a cloud based service and it takes a little time to get the data to Siri and spread across all of Apple’s servers.
Use Siri to Control Nest, MyQ, Sonos, HomeSeer, and more!
After about 5 minutes you should be able to say things to Siri such as:
“Hey Siri… Turn off the Wine Cellar Light”.
“Hey Siri… Set the Family Room Temperature to 75 degrees.”
“Hey Siri.. Open the Garage.”
Siri should respond almost instantly that she has performed the task and the device should change states. That’s it! You’re done! You can now use Siri to control Nest, MyQ, Sonos, HomeSeer, and many other products!
(Note: This delay will also occur if you delete, change, or add new devices later.)
Apple TV as a Home Automation Bridge
 If you’re lucky enough to have one or more 4th Generation Apple TVs on your network, then HomeBridge is going to be even more useful!
The 4th Gen Apple TV acts a bridge to the cloud when your away from home, allowing Siri to control your devices from anywhere in the world! There is zero configuration required for this. Just plug the Apple TV into your home network and log into your iCloud account. Everything else is fully automatic!
So whether you’re on the beach in Hawaii or at the neighbors house next door, you can use Siri to control Nest, MyQ, or HomeSeer! Siri will make it happen with your 4th Gen Apple TV as a HomeKit bridge!

loved this article. I am just in progress of doing all that.
But I have some questions or different config.
I am installing the home bridge on my Synology NAS as a docker.
And I want to add my harmony hub.
Can you maybe help with that ?
I thought about doing the same with my Synology, but I think you might have issues with the way Docker’s networking works; If you get it working, I’d be interested in learning how! I have homebridge running on a raspberry pi, works great.
Great article! Other than putting a new config.json file to the proper directory (after adding or removing devices in the config.json file), what needs to be done to synch the new config.json with HomeKit in the Apple TV?
Nothing. It just works.
Any chance you could put a link whatever we need to install?
I am a total newbie and don’t understand 90% of you explain because I’ve never used Terminal on my mac.
Tanks!
I tried with the mac os sierra and didn’t work , the terminal gives me the message ¨[Error: You did not specify {‘token’} or {‘clientId’,’clientSecret’,’code’}, one set of which is required for the new API]
[10/15/2016, 12:44:58 PM] Falling back to legacy API.¨and then when I try to install the nest in the devices app it never shows up the option for new device
Doesn’t work on MacOS. Use Linux.
My HomeBridge setup works great on MacOS Sierra.
Great video and great article! Im thinking about buying the MyQ controller for our garage door. Can you confirm that both my wife and I can have geofence triggers open and close the garage door as we enter or exit a geofence? If I get in the car, open the garage, and then drive away from the house I want the garage door to automatically close. My wife wants the same thing to happen of course. Similarly when either of us returns, the door should open of its closed.
I don’t know. That would be a question to ask Liftmaster/Chamberlain. They have their own app that controls all of that kind of stuff.
Ah, I was imagining that the Homekit/Homebridge software would effectively be the only thing that controlled the garage door. I’ll check to see if their app has any geofence features.
Hi, I am using the homebridge-openremote plugin. I successfully paired my iPhone with home ridge using Apple home app. I have for now four lamps defined. Using the app, I can manually control each lamp successfully. The problem is that Siri control well one of the lamps. When I ask Siri : “turn on kitchen lamp” ( one of the 3 other lamps )I get a respond : “all lamps are on”, and all the four lamps are turned on.
Any idea/solution for this problem?
For the Chamberlain/Lift-master Doors in my opinion the best plug in is homebridge-platform-myq.
https://github.com/rainlake/homebridge-platform-myq
This plug in not only self identifies the Doors names and Ids it also seems to be the only Chamberlain plugin that also identifies and works with that brands smart plugs (823LM) and switches. Its config file is dead simple to create and edit.
I have tried them all and this one works the best. (by far)
I am excited to give this a try! Has anyone tried to interface, or know of a plugin, that works with Iris by Lowes? My entire system is based on this, and I live in fear of one day the C2 being yanked away and leaving me with hundreds of dollars of gear with ability to control. Either way it would be great to use Siri to control. Cheers!
Hello, this is the cause of the problem, can help solve, thank you
module.js:327
throw err;
^
Error: Cannot find module ‘../build/Release/dns_sd_bindings’
at Function.Module._resolveFilename (module.js:325:15)
at Function.Module._load (module.js:276:25)
at Module.require (module.js:353:17)
at require (internal/module.js:12:17)
at Object. (/usr/lib/node_modules/homebridge/node_modules/mdns/lib/dns_sd.js:32:22)
at Module._compile (module.js:409:26)
at Object.Module._extensions..js (module.js:416:10)
at Module.load (module.js:343:32)
at Function.Module._load (module.js:300:12)
at Module.require (module.js:353:17)
I am also running ubuntu on HyperV. Installed all the packages, installed the samsungtv add-on, created the json file, started the home bridge, but my iPhone isn’t picking it up as an accessory. Any ideas to troubleshoot?
I used your tutorial to install, Ubuntu Linux on a Windows 10 computer running it in Oracle as a VM. Using the latest Ubuntu package that is available, I couldn’t just do it with your just your walk through I had to add Git, using the command:
$ sudo apt-get install Git
Then once I got that installed then it let me install homebridge-nest, I guess you need to have Git prior to this step. Then the other other issue I was having is that I couldn’t connect to the Homebridge using my iOS device I had to change the network connection on the VM to Bridge, then I had to go into the settings on Windows to adjust the adapter properties so that the VM was checked for wireless and that home sharing was enabled for the device. Once complete it works like a charm. Outstanding and I can’t wait to add more devices and functionality to my home automation system.
I have been having issue making this work. At one time I had Homebridge added to HomeKit and I deleted it because I was starting over, wasn’t pairing in Devices or MyTouchHome. Now when I have loaded home bridge through Terminal with no issue, I go back to add to Homekit and I get a message saying that my Accessory is already added, Reset it. I’ve reset my iPhone, MAC and iPad. My iPad is the Homekit base, if that makes a difference.
Any ideas?
I don’t understand this section: “ADD HOMEBRIDGE TO YOUR IOS DEVICE (IPHONE, IPAD)”. Wouldn’t I just use the Home app to do this?
Awesome! It works with https://www.myq.com/smart-garage-hub. The instructions were a bit confusing as I didn’t know what to do at the end. Adding the accessory (what is an accessory anyway?) was a bit confusing. Nevertheless, it’s working.