Blog
Arduino Button Tutorial

In this beginner series we’re going to go over the basics and need to knows of connecting a button to the Arduino and using it in your sketches. This Arduino button tutorial also covers the basics of the button itself, as it is not always obvious how a button is designed to work under the hood. There are some complex software and electronics issues you can run into!
Let’s talk about Buttons
Before we dive into the Arduino button tutorial itself, it is super important that you understand the basics of buttons themselves. For this section, we’re going to focus primarily on the most common button used in Arduino projects: the momentary push button.
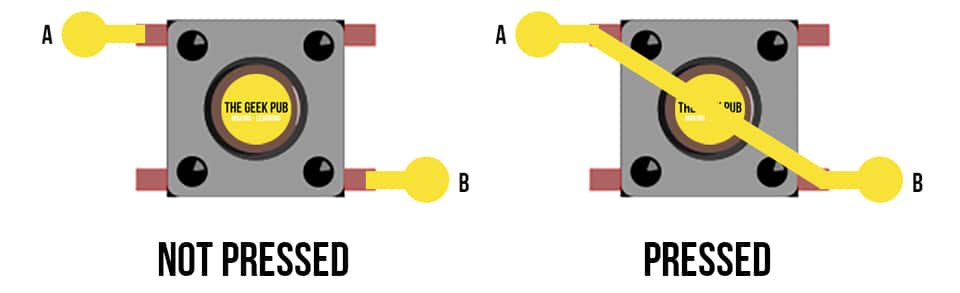
The momentary push button does exactly as it sounds. When you press it, it creates an electrical connection between a set of contacts. When you release it, it disconnects. In other words, the button only passes current when the button is held pressed.
Understanding Button Pinouts
Let’s take a look at a standard button you’ll see in most Arduino kits.
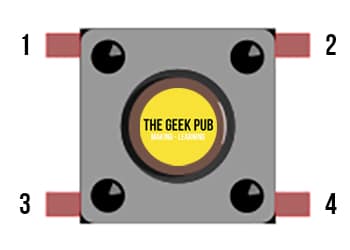
These standard buttons have four pins. 1, 2, 3, and 4. But they might not work the way you would first imagine that they do. Some of the pins are always electrically connected!
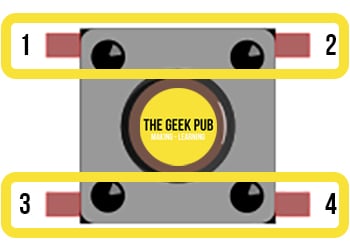
In a standard momentary button, pins 1 & 2, and pins 3 & 4 are electrically connected at all times! So you can only switch between pins 1 & 3 and pins 2 & 4! This confuses so many beginners.
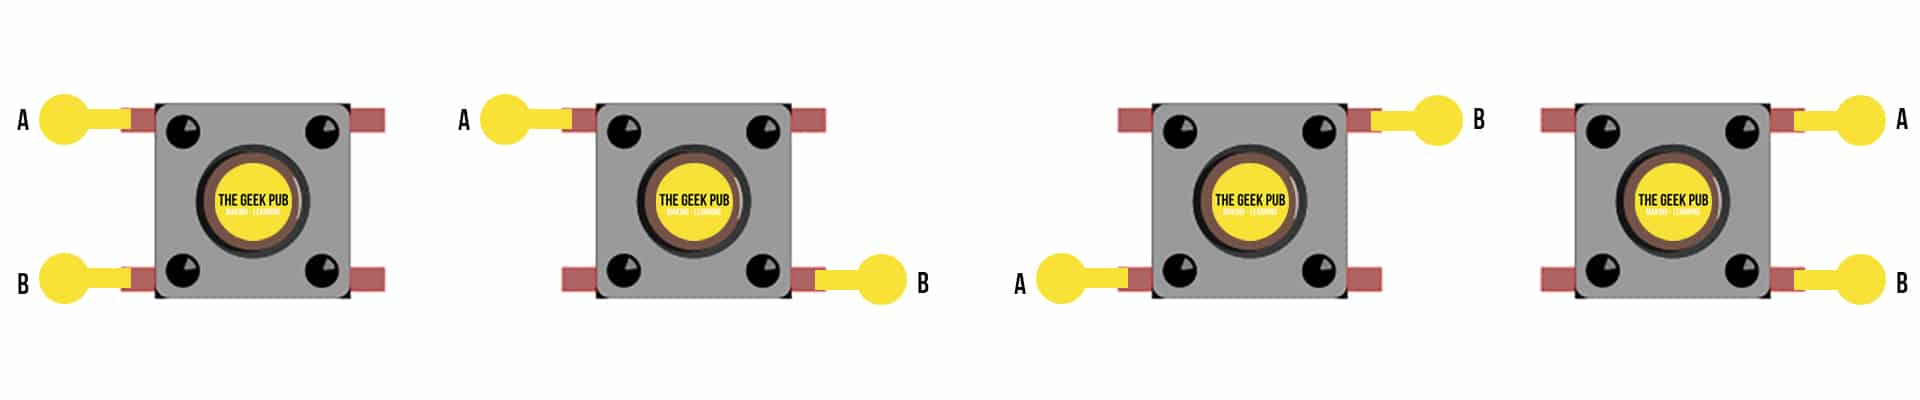
So why in the world does the button have more pins than it does switches? Well it turns out the answer is very simple. These buttons are designed to be placed on and soldered to circuit boards. Having four solder points will make sure the switch stays in place without warping when pressed.
However, this also gives us some flexibility when connecting our switches to a project. There are four possible ways to connect wiring to this switch. Use whichever one is easiest in your circuit board or breadboard layouts!
Understanding How the Buttons Work
Buttons work by making an electrical connection Internally. When the button is not pressed, no connection is made. When the button is pressed, a connection is created,
Parts List for this Project
Here’s a handy parts list for this project. Some of these are affiliate links. They cost you nothing, but we get a small commission that helps us keep writing awesome tutorials like this one.
| QTY | PART / LINK | ||
|---|---|---|---|
| 1X | [icon name=”microchip” prefix=”fas”] | Arduino Uno | [icon name=”cart-plus” prefix=”fas”] |
| 1X | [icon name=”usb” prefix=”fab”] | USB Type B Cable | [icon name=”cart-plus” prefix=”fas”] |
| 1X | [icon name=”toggle-on” prefix=”fas”] | Button Kit | [icon name=”cart-plus” prefix=”fas”] |
| 1X | [icon name=”ellipsis-h” prefix=”fas”] | Resistor Kit (10K Ohm) | [icon name=”cart-plus” prefix=”fas”] |
| 1X | [icon name=”th” prefix=”fas”] | Solderless Breadboard | [icon name=”cart-plus” prefix=”fas”] |
| 1X | [icon name=”grip-lines” prefix=”fas”] | Jumper Wires | [icon name=”cart-plus” prefix=”fas”] |
Wiring Up Buttons to the Arduino
As we move forward in our Arduino button tutorial, let’s move on to wiring buttons!
Many tutorials on the internet will leave out something that is very important: the need for a pull-down resistor. Your project might work without one, but it also will likely experience all kinds of issues when you start working with anything even slightly outside of the basic tutorial.
A pull-down resistor keeps the digital I/O pin on the Arduino from “floating”. Just touching your Arduino while its running could be enough to make it think the button was pressed, even when it wasn’t!
We will be using a 10K Ohm resistor for this project.
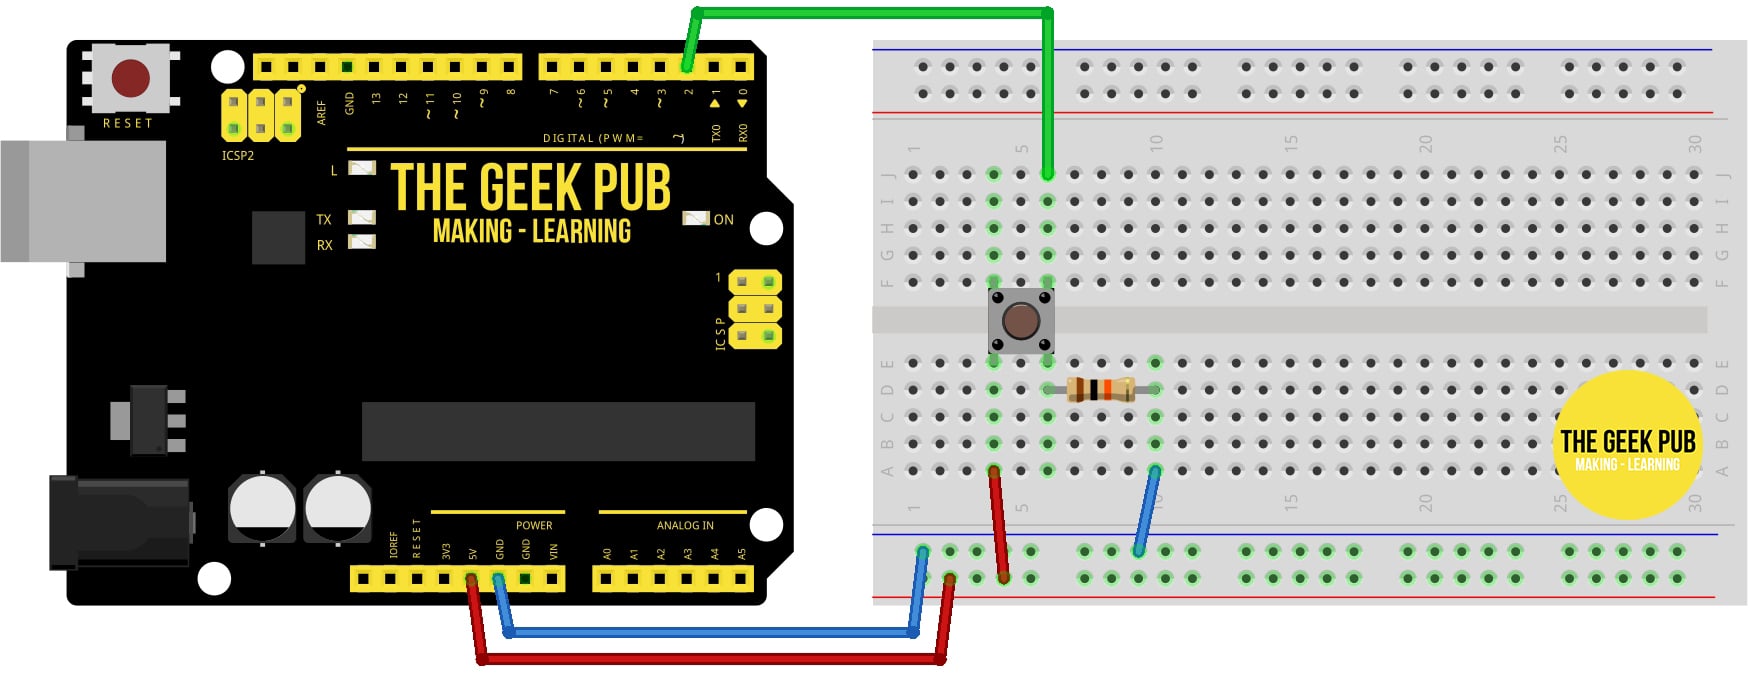
Wiring up a Button to the Arduino
The wiring for this project is quite simple:
- Arduino PIN 2 to button PIN 1
- Arduino 5V to button PIN 4
- Arduino GND to 10K Ohm resistor
- Button PIN 2 to 10K Ohm resistor
Please note: We are using both PIN 1 and PIN 2 on the button only for diagram/wiring simplicity sake, you could just as easily use only PIN 1 or only PIN 2 as they are electrically connected inside the button.
Arduino Button Tutorial Sketch
Now let’s put some code on the Arduino and see this button work! This code is designed to light the on-board LED when you press our button. The on-board LED, is electrically connected to PIN 13, and is physically located next to it (next to the T in The Geek Pub on our Arduino button wiring diagram above).
// constants won't change. They're used here to set pin numbers:
const int buttonPin = 2;     // the number of the pushbutton pin
const int ledPin =  13;      // the number of the LED pin

// variables will change:
int buttonState = 0;         // variable for reading the pushbutton status

void setup() {
  // initialize the LED pin as an output:
  pinMode(ledPin, OUTPUT);
  // initialize the pushbutton pin as an input:
  pinMode(buttonPin, INPUT);
}

void loop() {
  // read the state of the pushbutton value:
  buttonState = digitalRead(buttonPin);

  // check if the pushbutton is pressed. If it is, the buttonState is HIGH:
  if (buttonState == HIGH) {
    // turn LED on:
    digitalWrite(ledPin, HIGH);
  } else {
    // turn LED off:
    digitalWrite(ledPin, LOW);
  }
}
Pressing the button should illuminate the LED, and releasing the button should turn the LED off.
Next Steps
Now that you’ve learned the basics of buttons, we can move on to the next steps or go back to the tutorial index!


