Blog
Raspberry Pi Syslog Server Setup

In this fun tutorial we’re going learn how to setup a
Syslog is short for System Logging Protocol. This protocol is used by computer systems to send local event logs to a central logging server. In large enterprises there can be multiple syslog servers that all aggregate to a central servers. Syslog is very common in network devices like routers, firewalls, and switches. But most servers also support a syslog mechanism.
Setting up a Raspberry Pi Syslog Server
There are many types of Syslog servers available. They include incredibly complex and paid systems such as LogLogic and Splunk. To just as complex free syslog systems like Graylog and Logstash. But we want simple in this project! So we’re going to use the simple and free rsyslog software.
Parts List for this Tutorial
Here’s a handy parts list for you if you don’t already have a
- Raspberry Pi 3 (kit) / Raspberry Pi 4 (kit)
- Micro-SD Card for Raspberry Pi
- Ethernet Cable
- Raspberry Pi 3 Power Supply / Raspberry Pi 4 Power Supply
- Pi Heatsinks
- Raspberry Pi 3 case / Raspberry Pi 4 Case
- Keyboard/Mouse
For this tutorial we used the
Getting the Raspberry Pi Syslog Server Ready
Before we install the syslog server software, it is super important that we update the
To update Raspbian to the latest version, we need to run the following commands:
[code language=”bash”]
sudo apt update
sudo apt upgrade
[/code]
Once your
[code language=”bash”]
sudo apt install rsyslog
[/code]
Configuring RSYSLOG on the Raspberry Pi
Next up in setting up our
Most system expect syslog services to list on port 514. We’re going to set ours up to use this port, but you can certainly pick any open port you prefer. Let’s open the rsyslog configuration file “rsyslog.conf” for editing.
[code language=”bash”]
sudo nano /etc/rsyslog.conf
[/code]
You need to search for four lines in this file and remove the # from the beginning of the line. Lines with a # in front of them are “commented out”, and are ignored by rsyslog.
[code language=”bash”]
#module(load="imudp")
#input(type="imudp" port="514")
#module(load="imtcp")
#input(type="imtcp" port="514")
[/code]
Simply put, those lines should look like this:
[code language=”bash”]
module(load="imudp")
input(type="imudp" port="514")
module(load="imtcp")
input(type="imtcp" port="514")
[/code]
This enables rsyslog to start listening on both UDP and TCP ports 514 and accepting external.
To save the file press [key]CTRL+X[/key] and then press [key]Y[/key] followed by [key]ENTER[/key].
Setting up RSYSLOG Templates for Raspbian
In order to use our new rsyslog server we need to setup a template (at least one). Templates tell rsyslog in which file to place the log data it receives and what format it will be in.
For this example we’re going to be collecting logs from our firewall. So we’re going to name our config file GeekPubFirewallLog.conf. Within this file we will define our template and our log file location.
Run the following command:
[code language=”bash”]
sudo nano /etc/syslog.d/GeekPubFirewallLog.conf
[/code]
To specify the template we need to use the following configuration line: $template NameForTemplate, “DirectoryWhereLogIs/logName.log. In our case we’ll enter the following into the configuration:
[code language=”bash”]
$template GPFirewallLog, "/var/log/GPFirewall.log
[/code]
We just need to add one more line of configuration in order to accept logs from our firewall. In our example, the firewall would be at an IP address of 192.168.0.1. Just swap out your IP address in the example.
[code language=”bash”]
if $fromhost-ip startswith "192.168.0.1" then -?GPFirewallLog
& stop
[/code]
With those lines in place, rsyslog knows that any logs from 192.168.0.1 should use the GPFirewallLog template (and thus stored in /var/log/GPFirewall.log file.
Your GeekPubFirewallLog.conf file should look like this when you are complete:
[code language=”bash”]
$template GPFirewallLog, "/var/log/GPFirewall.log
if $fromhost-ip startswith "192.168.0.1" then -?GPFirewallLog
&stop
[/code]
Save the file by pressing [key]CTRL+X[/key] and then press [key]Y[/key] followed by [key]ENTER[/key].
Restart the RSYSLOG Service (or Reboot)
It’s now time to get your
[code language=”bash”]
sudo reboot
[/code]
or just restart the rsyslog service with this command without restarting:
[code language=”bash”]
sudo systemctl restart rsyslog
[/code]
Start Using your Raspberry Pi Syslog Server
We’re now ready to start using our
Under Status –> System Logs –> Settings we need to enter the IP address and port number of the
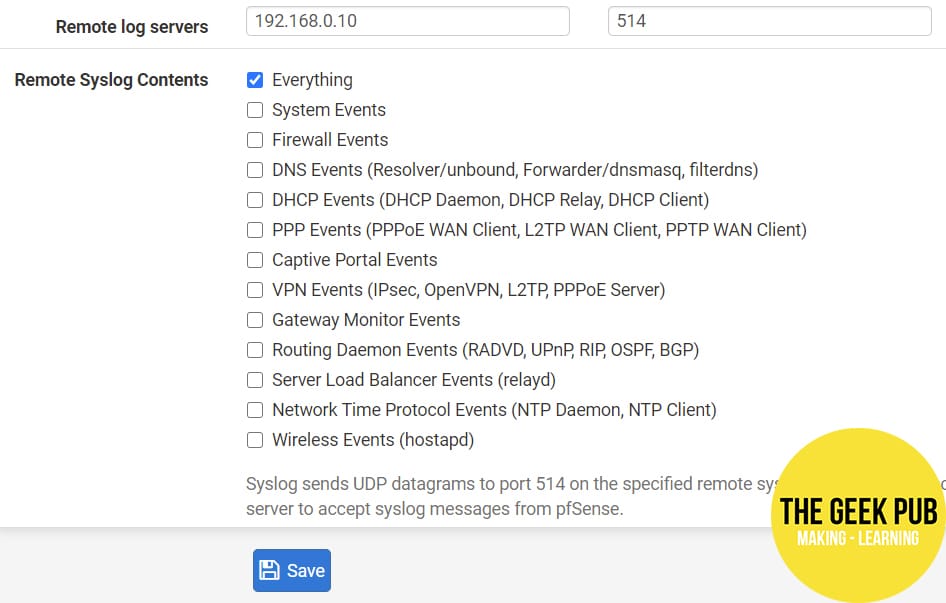
Log files will begin appearing immediately in our /var/log/GPFirewall.log file immediately!
Of course, you can send logs from any server or device that supports remote logging by configuring it to send logs to the IP/Port of your
Getting Help
We try hard to answer any questions and help you get things working. Leave a comment below and our team and awesome community will pitch in!


4.5
5
Leave a comment if you need any help with this project!