Blog
Setup an IR Remote for an Arduino
In this tutorial we will learn how to setup an IR remote for an Arduino. IR remotes can be used in your projects for all kinds of things. You can use an IR remote to turn on and off a device, LED, relay, or even use it to steer an Arduino robot or automated vehicle. With a transmitter, you can even make a sneaky little device that turns off every TV in the vicinity. It’s quite the versatile piece of kit to have in your Arduino arsenal!
In this tutorial we’re going to create a very simple sketch that reads the input on buttons pressed on an IR remote control and then turns on or a corresponding LED.
Simple Parts List for this Project
If you don’t already have all of the parts for this project, here’s a quick list to get you started. One thing to note. If you don’t want to buy a dedicated remote for your project, this project will work with almost any IR remote control that you have laying around your house. Try one from your TV or an RGB LED set. You’ll be surprised all of the remotes you have that already work with this project.
- Arduino Uno
- Arduino Power Supply
- IR Receiver and Transmitter Kit
- IR Receiver and IR Remote Kit
- Breadboard and Breadboard Wires Kit
RELATED: Our Picks for the Best Arduino Starter Kits
How Infrared Light Works
Without going into too much detail, its a good idea to just understand the basics of how infrared works, as it will help you understand what’s going on in your project. Simply put, Infrared light is very similar to the light you and I see when we look at things all around us or what we call visible light. The only difference between visible light and other forms of light is the frequency and wave length. Frequency being how many waves pass per second and wavelength determining how long each wave is.
Infrared light is just outside the frequency and wavelength that human eyes can see. Here’s a handy spectrum chart to put things in perspective for you.

Infrared light does not pass through or penetrate most objects similar to visible light. Therefore Infrared requires line of sight to work. Placing a non-transparent solid object between the the emitter and receiver will stop the devices from functioning.
How IR Transmitters and Receivers Work
Before we setup an IR Remote for an Arduino, let’s also quickly understand what’s happening with the devices. Now that we know that Infrared is light, almost like any other light we can see then one begins to wonder if an IR LED would look like a flashlight to creatures that could see in the infrared spectrum. And the answer is yes! Except that when an IR remote transmit its actually flashing. These flashes create patterns that translate into data. So that alien creature would see a flickering pattern of light that would be slightly different depending on which button on your remote is being pressed.
Understanding IR Codes
These patterns are referred to as IR codes. Every button on an IR based remote control transmits a unique code. Different manufacturers and different remote controls may use different codes on different buttons. If you don’t know the codes for your remote, its OK. We’re going to write a sketch below that will simply write the code it receives to the serial console. You’ll be able to press any button on your remote and find its code.
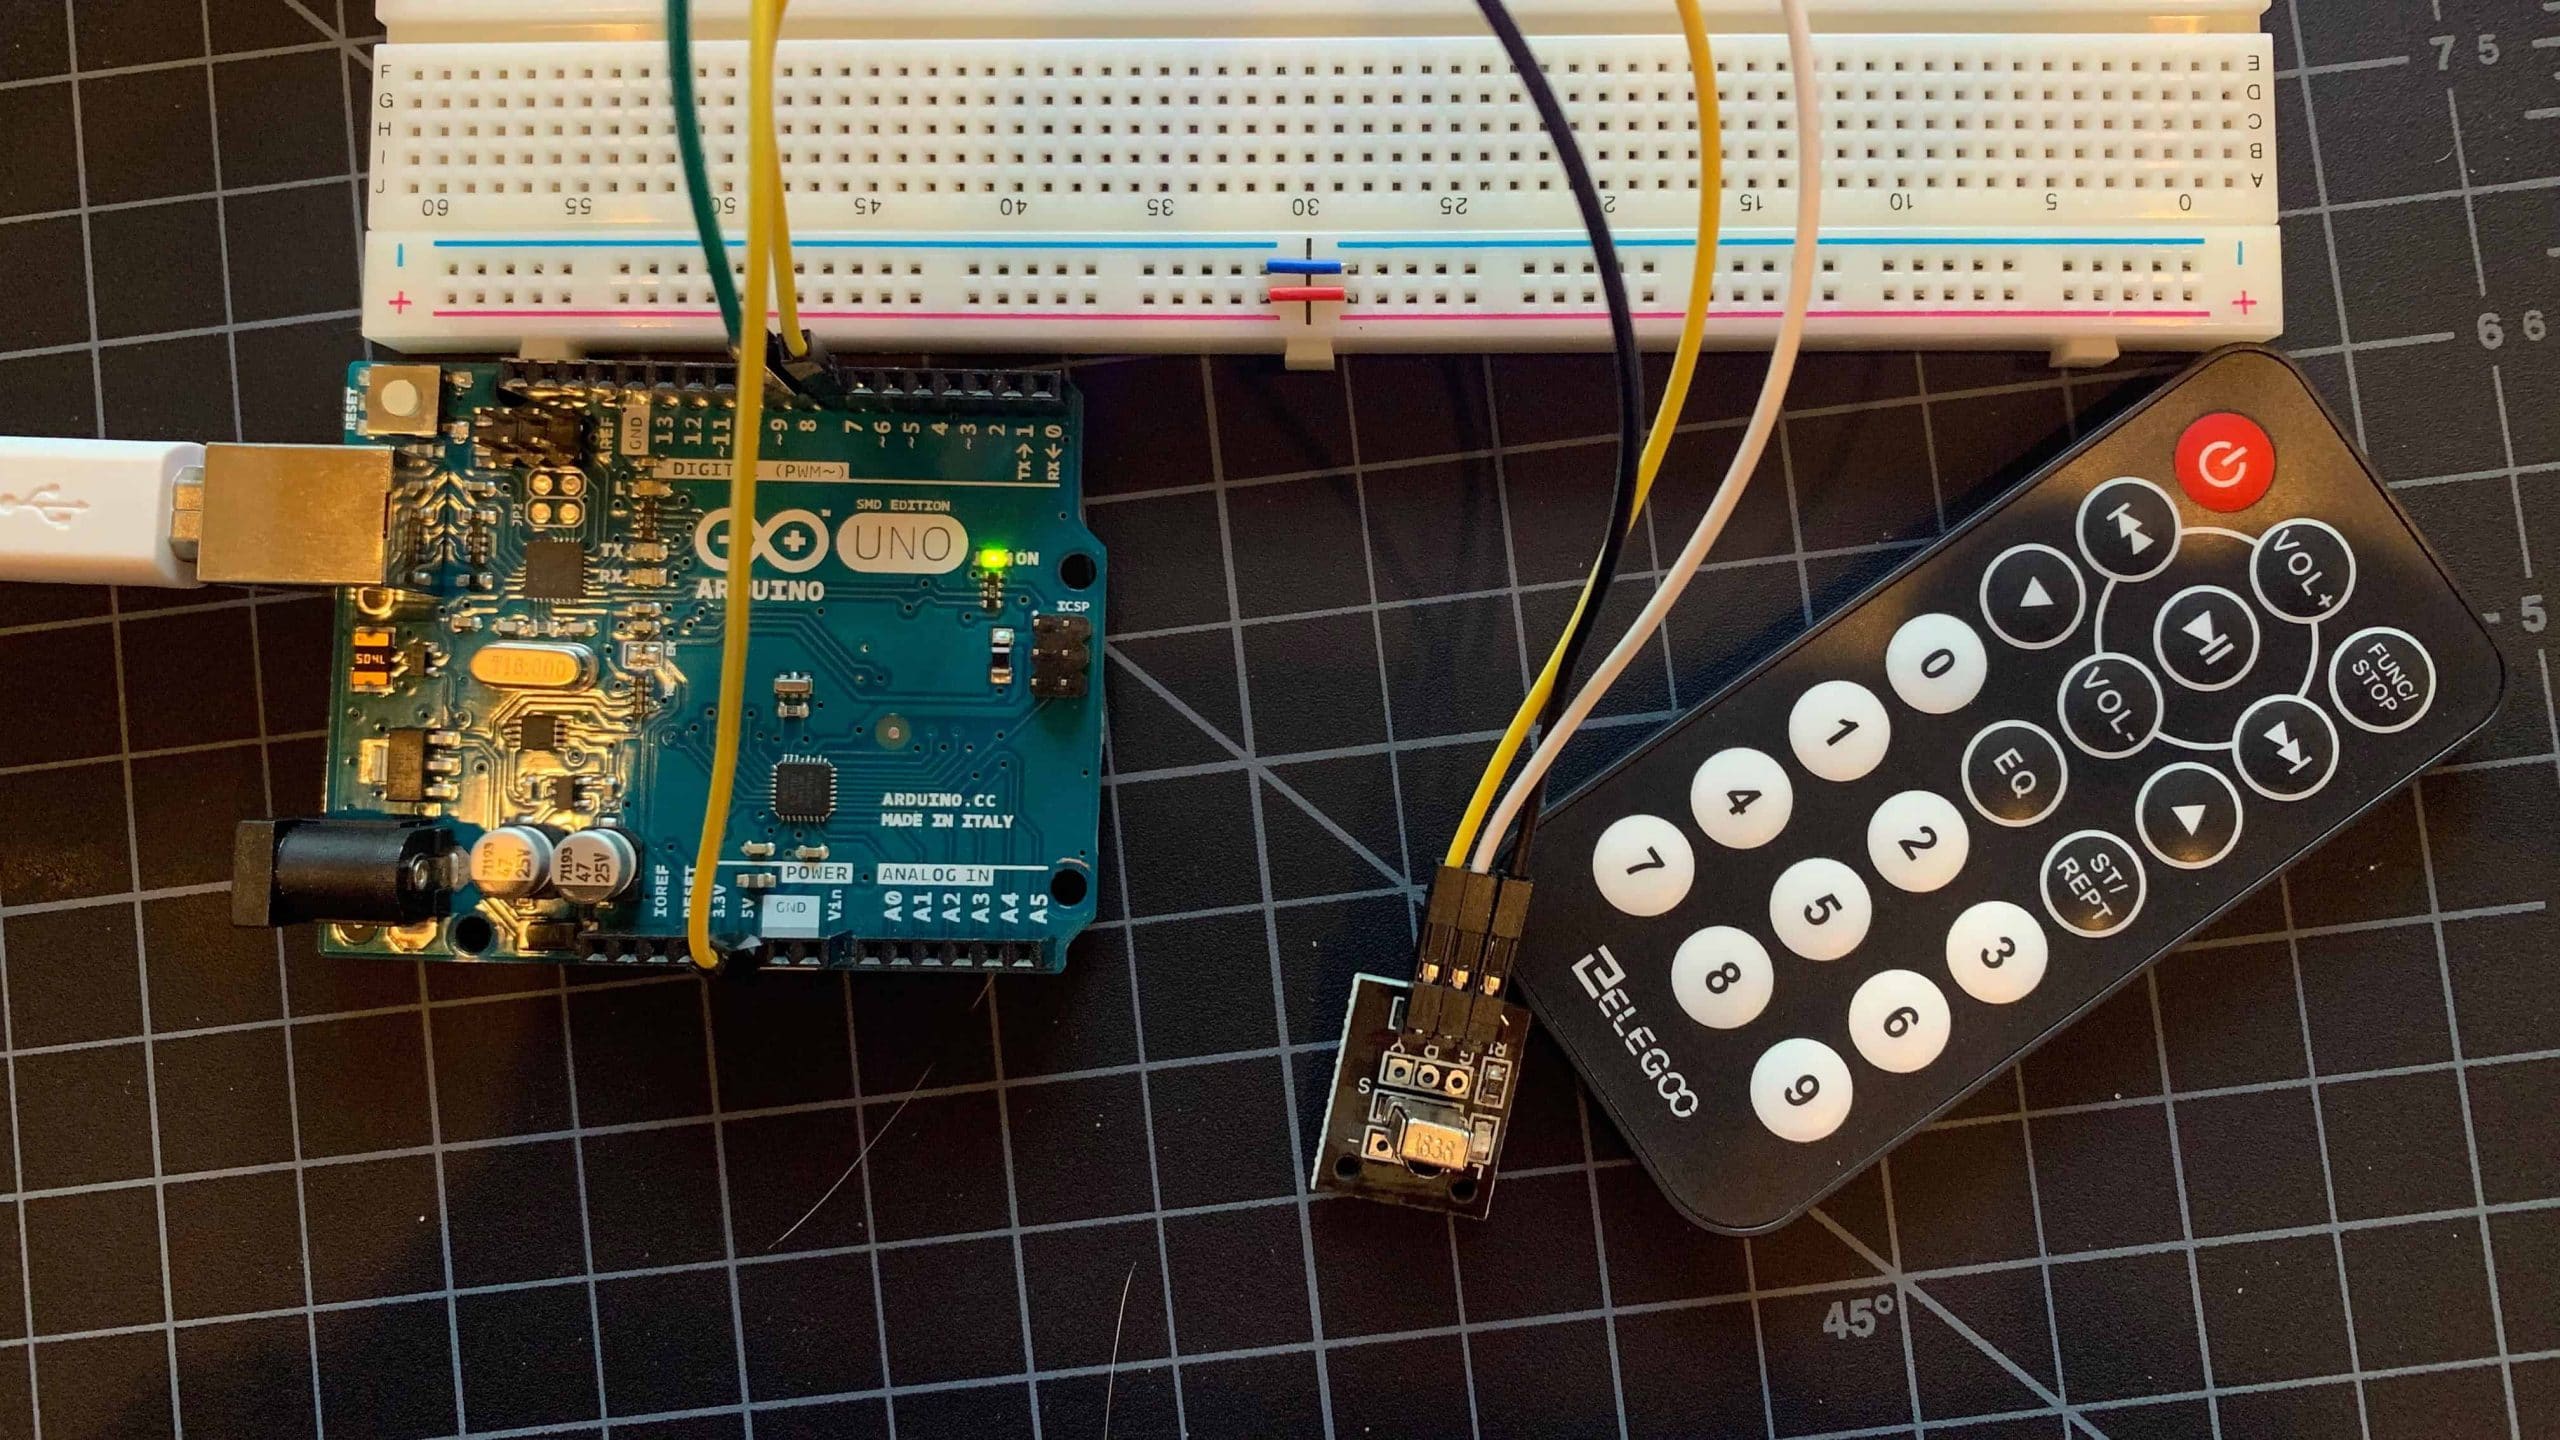
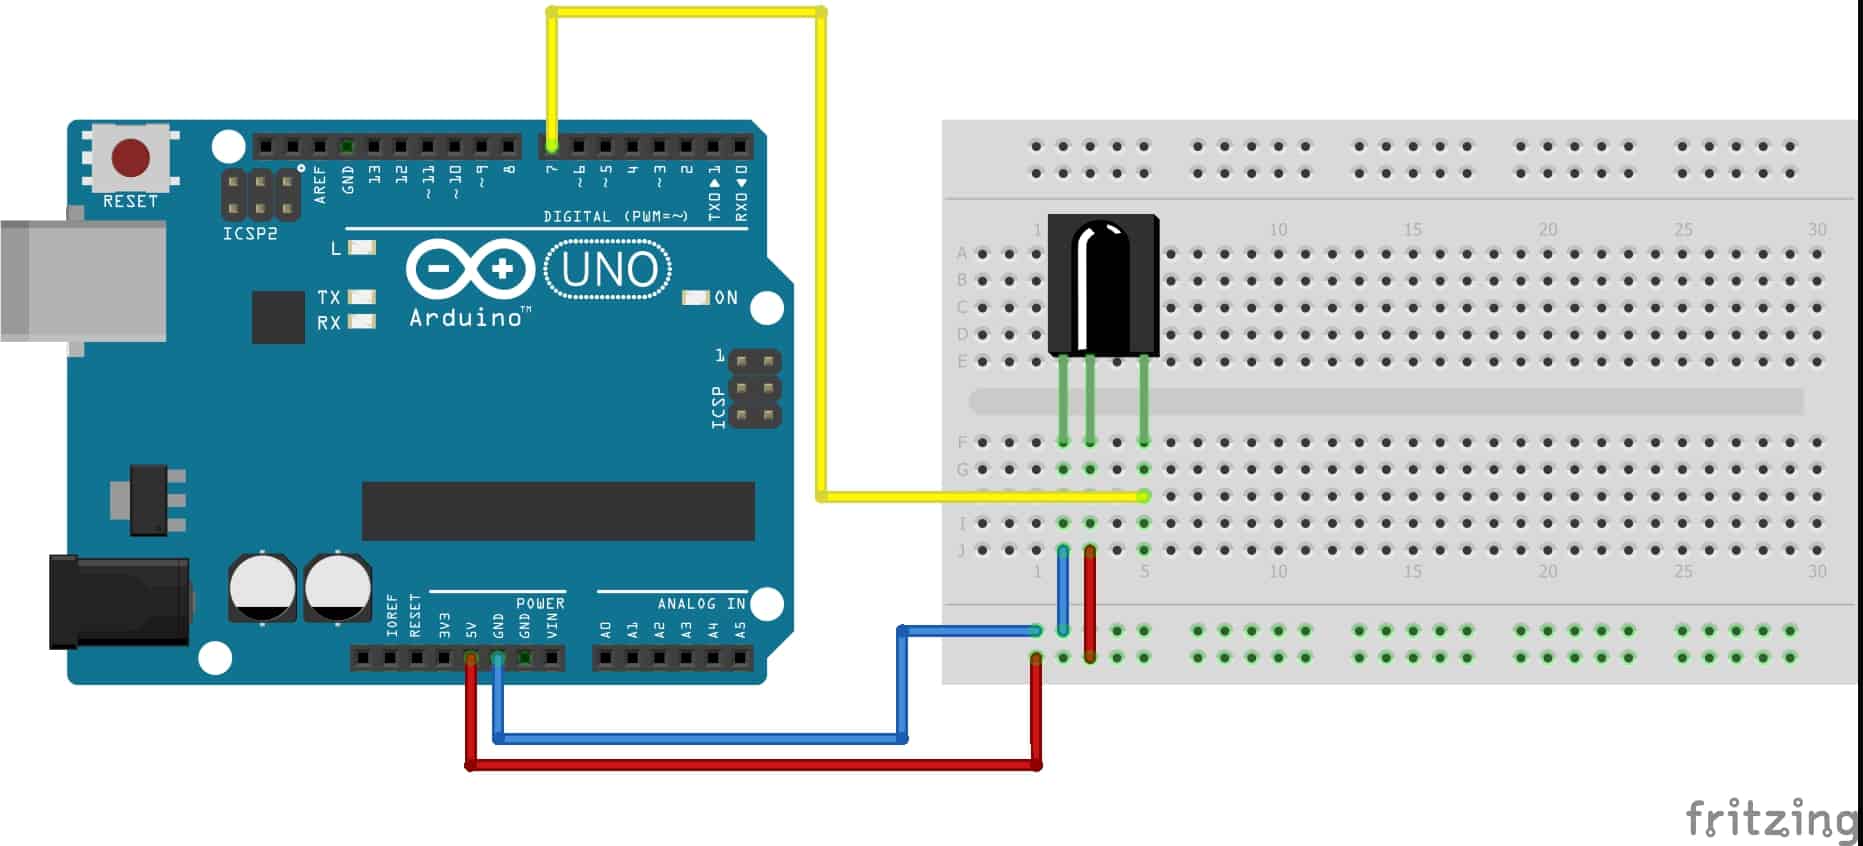
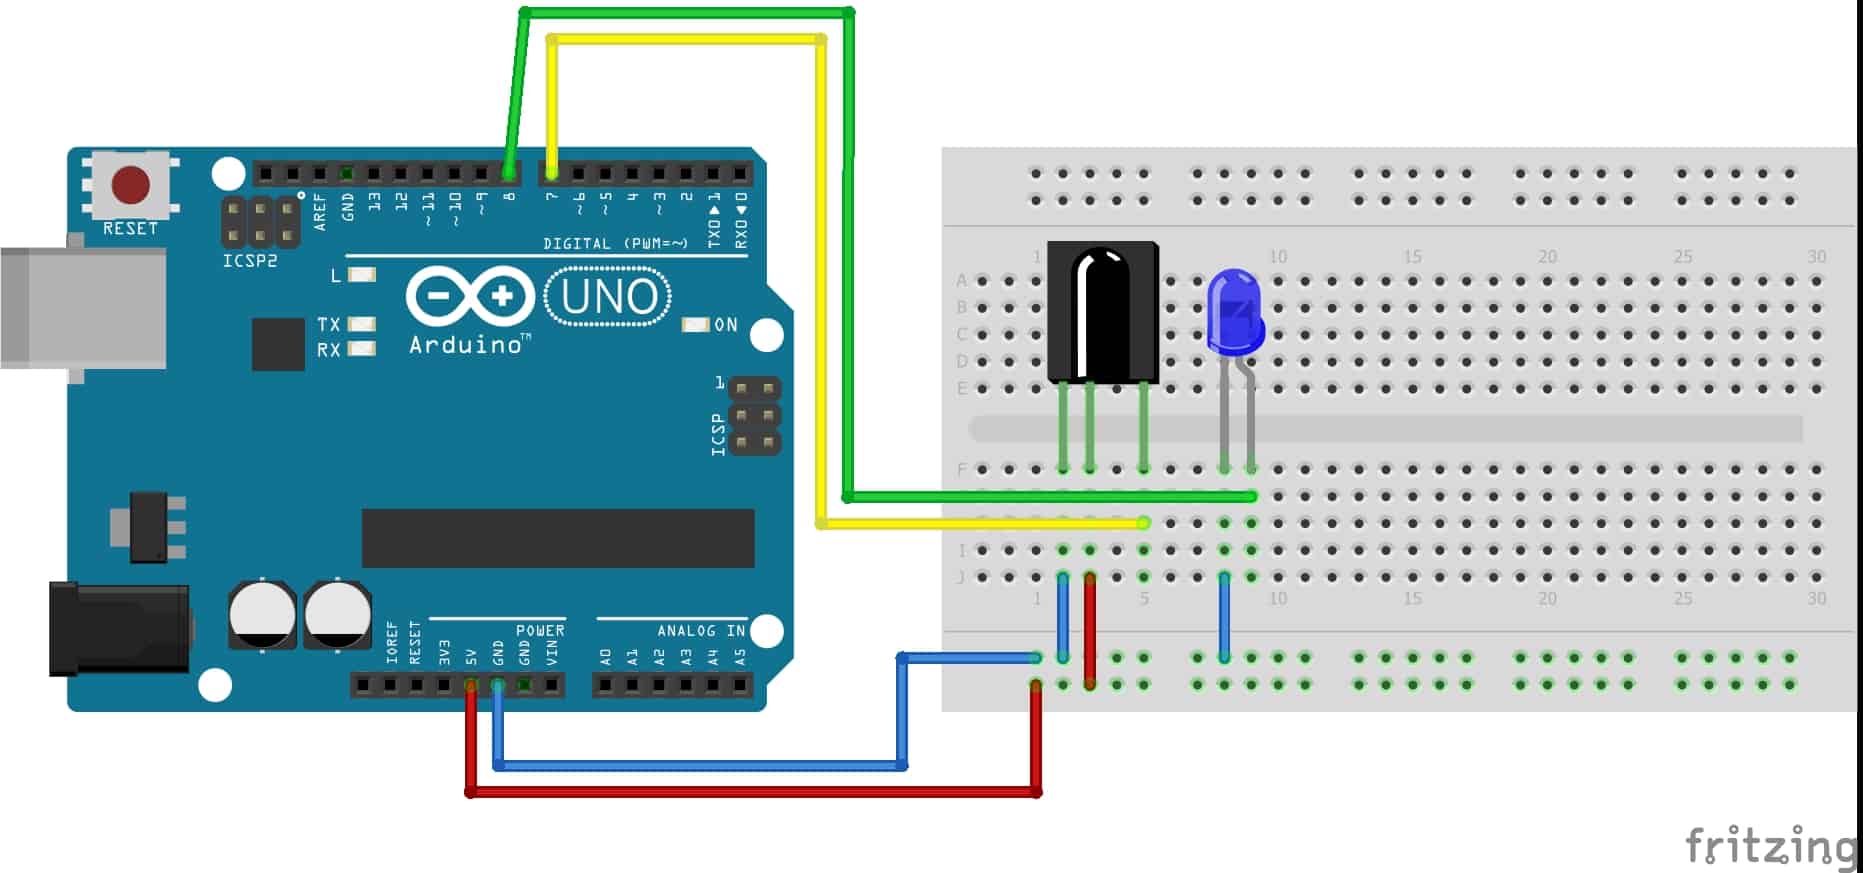
Wiring the Infrared Receiver to the Arduino
Before we write any Arduino code, we need to get our Arduino setup to receive IR codes by connecting an IR receiver (or module) to it. Just follow this quick diagram and wire yours up.
IR Receiver GND (G) –> Arduino GND
IR Receiver Vcc (R) –> Arduino 5V
IR Receiver Data (Y) –> Arduino PIN 7
Once your wired up open the Arduino IDE and make sure you have the IRRemote Library installed. This project will not compile without it.
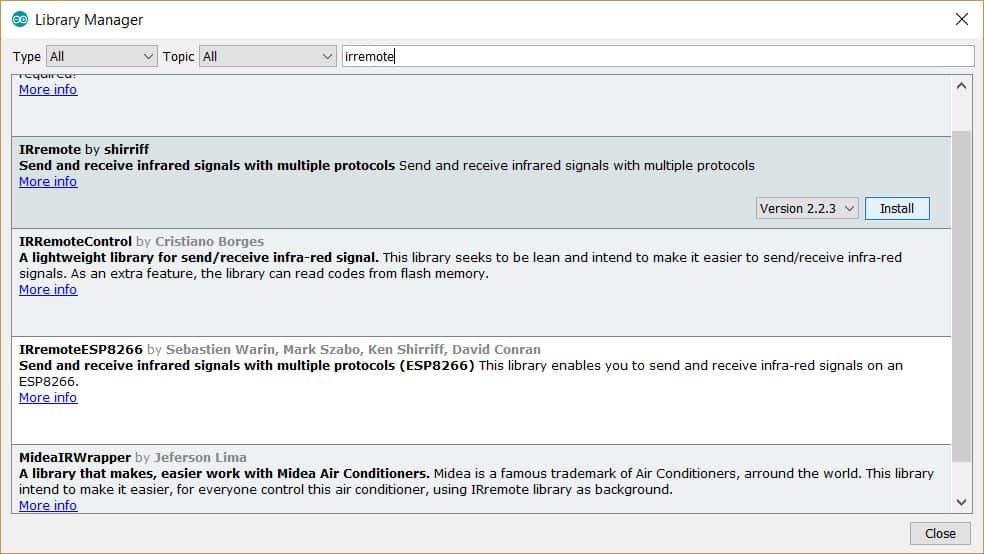
Now that you’ve got the IRRemote library installed, create a new sketch and paste this code into it, and then upload it to your Arduino.
[code language=”cpp”]
// Print IR Buttons to Serial Monitor
// TheGeekPub.com
#include <IRremote.h>
// Define the pin for the IR Receiver
const int IR_RECV_PIN = 7;
// Create the IR object
IRrecv gpirrecv(IR_RECV_PIN);
decode_results results;
void setup(){
Serial.begin(9600);
gpirrecv.enableIRIn();
gpirrecv.blink13(true);
Serial.println("READY.");
}
void loop(){
if (gpirrecv.decode(&results)){
Serial.println(results.value, HEX);
gpirrecv.resume();
}
}
[/code]
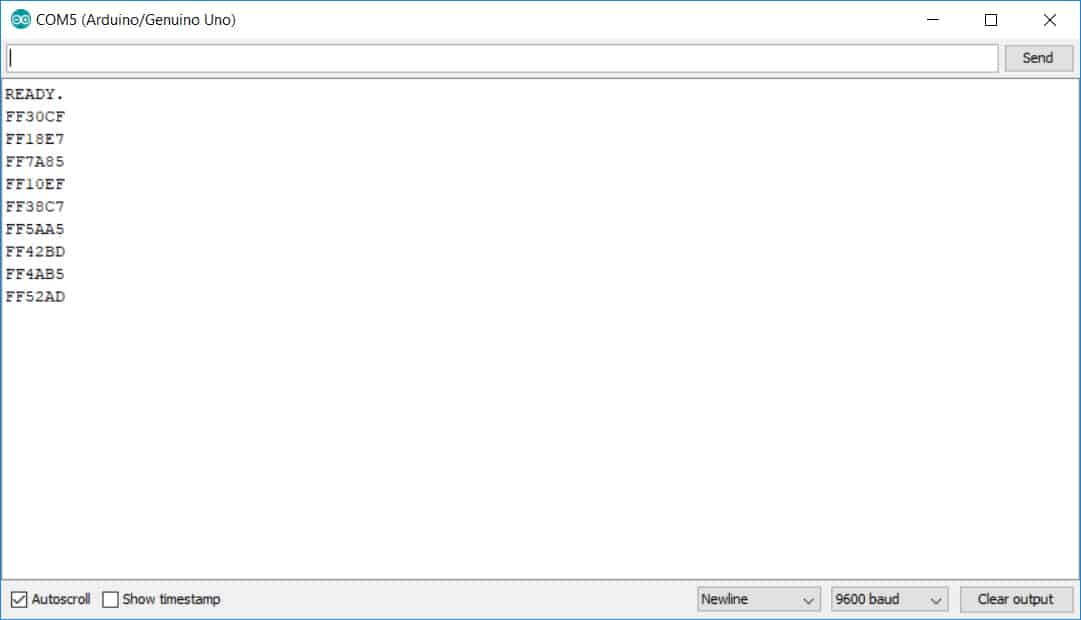
Now you should be able to point your remote control at the IR receiver and see the codes displayed in the serial window.
Controlling Devices with an IR Remote
Now that we’ve got our IR remote working correctly and can decipher its codes, let’s program two buttons to turn on and off an LED on a our board. Add an LED to your project following this diagram.
Modify the code we wrote earlier to to look like the following:
[code languate=”cpp”]
#include <IRremote.h>
// Define the pin for the IR Receiver and LED
const int RECV_PIN = 7;
const int BLED_PIN = 8;
// Create the IR object
IRrecv irrecv(RECV_PIN);
decode_results results;
void setup(){
Serial.begin(9600);
irrecv.enableIRIn();
irrecv.blink13(true); // flash LED13 for debugging purposes
pinMode(BLED_PIN, OUTPUT);
Serial.println("READY.");
}
void loop(){
if (irrecv.decode(&results)){
switch(results.value){
case 0xFF30CF:
// button 1 was pressed, turn on LED
digitalWrite(BLED_PIN, HIGH);
break;
case 0xFF18E7:
// button 2 was pressed, turn off the LED
digitalWrite(BLED_PIN, LOW);
break;
}
irrecv.resume();
}
}
[/code]
Be sure to check your IR codes and make sure they are the same as mine. If they are not, just update the switch-case statement with the codes you found in our first program above with your own remote’s codes.
If everything worked correctly, button 1 on your remote should turn on the LED and button 2 on your remote should turn off the LED. The LED could of course be replaced with any number of other devices, such as relays, servos, motors, etc.

Checking if an IR Button is Held Down
As you go through expanding on this project, it’s important to know one additional piece of information. Let’s suppose you wanted to make the LED stay on while you held down the button and then turn off when you release the button. The IRRemote library has a nice built-in way of making this easy for you. If a button is held down, rather than returning that IR code again, it starts returning 0xFFFFFFFF. All your code needs to do is keep checking and if it finds 0xFFFFFFFF keep the state the same rather than continuing on.
We hope you enjoyed learning how to setup an IR remote for an Arduino!
[amazon_link asins=’B06XHGJG7Q,B00EFOQEUM,B01EWOE0UU’ template=’ProductGrid’ store=’murraynet-20′ marketplace=’US’ link_id=’05107e4e-eb65-4cfc-abae-4f20ee87fb4f’]


4.5
0.5
all I get is 0 for every button