Blog
How to use the Snipping Tool
[adinserter name=”TopOfPost”]The snipping tool is a little known tool that has awesome benefits! I’m often surprised at how many people don’t know it exists. When I show it to people they are often either amazed, or they say something along the lines of “I’ve been doing that on the Mac for years! I didn’t know it was even an option on Windows!”
The Windows Snipping Tool
The snipping tool in Windows is a tool that allows you to take screen shots, window shots, or snippets of the screen or applications! It’s very similar to the COMMAND+SHIFT+4 that is so commonly used on the Mac. This is a really fantastic feature, and once you know about it you simply can’t stop using it!
Using the Windows Snipping Tool
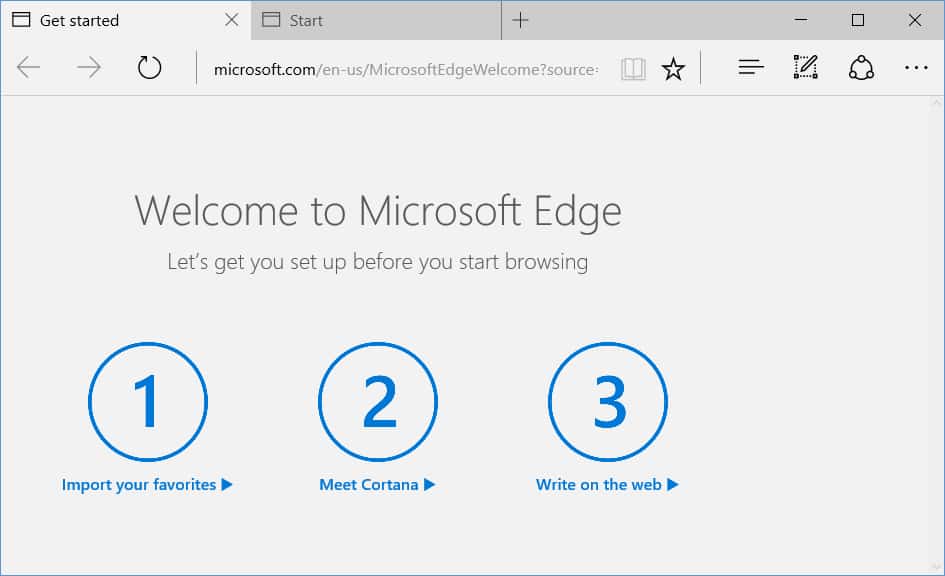
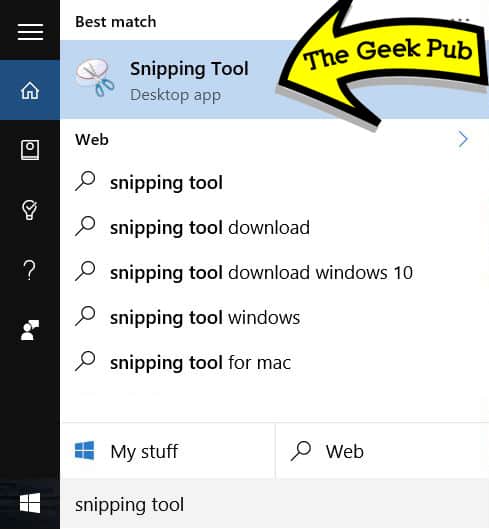
To open the Snipping Tool, click in the search box (some call it the Cortana box) on the task bar and type in “Snipping Tool”. The top result should be a Windows Desktop app called “Snipping Tool”. Go ahead and click on it.
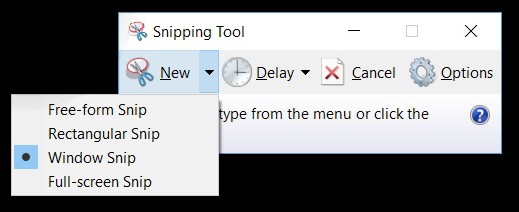
The snipping tool has a few options. Under the “New” button you will find a set of options: Free-form Snip, Rectangular Snip, Window Snip, and Full-screen Snip
It’s probably already pretty easy to figure out what each of these do, but let’s review them before moving forward:
- Free-form Snip – Allows you to select free from using the lasso tool. You can draw any shape you like to make the snip.
- Rectangular Snip – Allows you select sections of the screen while constraining the lasso to a rectangular or square shape.
- Window Snip – Turns the lasso tool into a hand. Simply select any open window to take a picture of just that window.
- Full-screen Snip – Turns the lasso tool into a hand. Snaps a picture of the entire desktop.
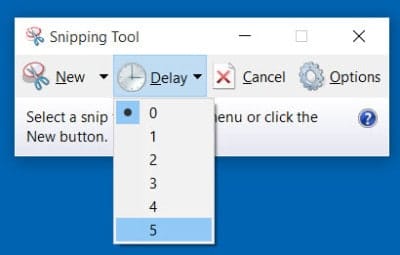
The Window Snip is probably my favorite of all of the snipping tool features. Using it makes it super easy to take pictures of just a specific window, something I use quite often on this blog. But there’s another feature I love almost equally that is a Windows 10 only feature, and that is the snipping delay!
How to use Delay in the Snipping Tool
The delay feature in the snipping tool will delay how long after you click new before the snipping lasso become active. This is incredibly useful if you need to take a picture of an open menu item that will close if you click or drag away from it. To use the delay (0 to 5 seconds) set it to the desired timer value and then select “New”. Quickly open the menu or context item and hold the mouse over it. When the snipping tool’s lasso activates the menu will not close or lose context.
If you know any other awesome features of this tool or have any comments that might help others out, feel free to leave a comment below! The community will appreciate it!